To view the video of these exercises and read Part I of the article, click here.
Whether your horse is just learning to jump or he’s an old campaigner, there is always room for improvement. Working with grids can put the polish on a horse’s jumping style and prepare him for show-ring success.
Before you can start on a mission to improve your horse with gridwork, however, you must sort out the mechanics of the grid. First, define your working space. If you have a fenced arena, set the grid up down the long side, using poles and standards that can easily be altered to jump both directions. If you are working in a field, create a 150-foot straight line with right-angled corners at each end using jump poles or markers and set your grid along that line. With five or six pairs of standards and a dozen or so poles, you should be able to build a grid. If your poles vary in length, make sure you build the grid so the center of it is always in line, even if the standards are offset.
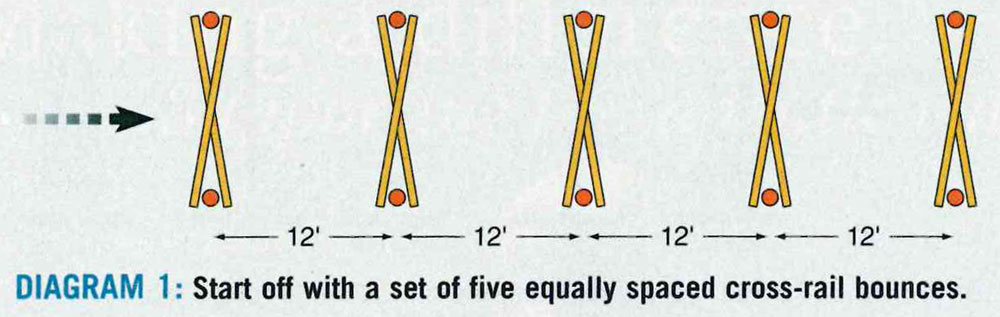
Use a measuring tape when you set up your grids, as pacing it off is not accurate enough. The subtle adjustment of just a few inches will make all the difference in effectiveness. To familiarize your horse with gridwork, set up five low cross-rails with 12 feet between each fence (Diagram 1). Now you are ready to tackle two common jumping problems with grid exercises.
The Fast Horse
It’s hard for a horse that is going too fast to snap his legs up quickly enough to avoid rattling the poles. He has neither the time nor the room to jump cleanly. Although it’s nice to have a keen horse, you are going to be continually disappointed as he leaves a trail of flattened jumps in his wake if he is too keen!
Encourage your horse to remain at a steady pace by taking more contact. However, unless you use enough leg as well, you will only have a major argument as he fights the brakes, resulting in even more knockdowns. He must learn that your leg is there to keep his engine running, not to ask for acceleration. You want him to jump upward, not just forward, and you will be able to do this by improving your own timing.
The following grid will teach you to land with your leg on and gather the canter up more quickly so your horse doesn’t zoom off underneath you. By harnessing all of your horse’s energy to work for you rather than against you, you will be able to jump consistently with more clear rounds.
This grid won’t improve your horse immediately, but it will help you learn just how quickly you need to land, balance and push your horse into the supporting contact to change his pace and jump clean without a fight.
For the fast horse, construct a triple combination of one-strides. Your first fence should be a high cross-rail oxer (with the ends set at around 3’9″), followed by 24 feet to a high single cross-rail, then 24 feet to another high cross-rail oxer. You now have the conventional one-stride distances between each of the three jumps.
The fast horse would love to jump in and zoom through the grid without giving you a chance to steady him. Unless you are quick enough to half-halt at the right time, he will almost inevitably make up too much ground to the second and third jump, getting too close and knocking them down. If you check too late, especially without enough time to get your leg on, he will hollow against your hand as he takes off again.
You need to hone your timing technique to get your leg on and also check your horse at the beginning of his enthusiastic stride to the next jump, not at the point of takeoff. If you’re not in a position to immediately push your horse into your steadying and supporting hand with your leg, he will still be too flat and too fast.
Place a ground pole 11 feet away from the landing sides of the first and second cross-rails (Diagram 2), rather than the normal 12 feet, to shorten your horse’s landing stride. This will give you the split-second you need to gather your horse at the start of his stride, not a fraction later when you are past the point of being effective.
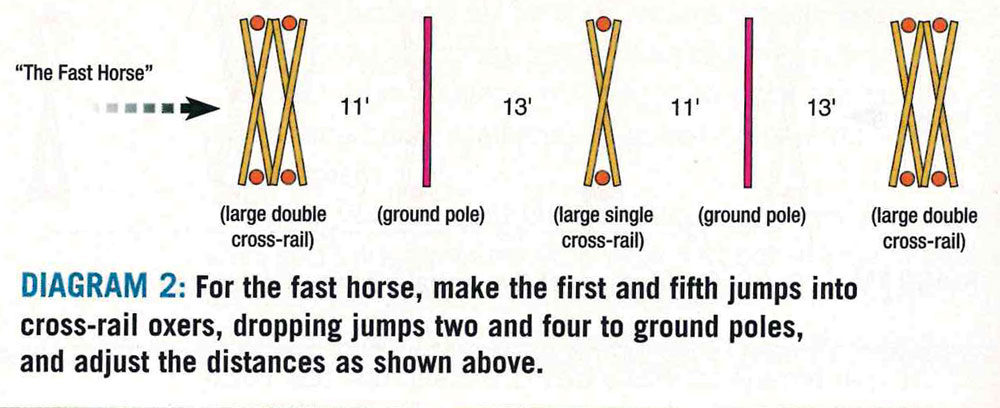
The extra room created by having the poles 13 feet before the second and third jumps will give your horse more space to snap up, but you still have to check him in the right place to collect his canter so it is strong and active, not fast and flat.
This is a great grid to practice, as it will let you know immediately if your timing is good enough to be effective. And if it isn’t, practice until it is! The ground poles won’t do the work for you, but they will help you steady your over-enthusiastic horse before he spoils his accuracy.
The Lazy Horse
If you can get enough leg on the lazy horse to make him go forward, he will usually be very clean-jumping, as all his energy will be contained underneath him, rather than it slipping out through your fingers. You just need to generate the energy, and you need a grid to help.
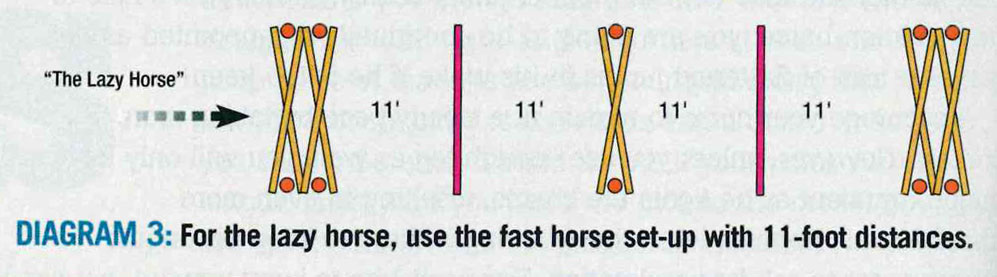
Build a grid of cross-rails as in diagram 2, but instead of using the 24-foot distance for the one-strides, build the grid so the distances are 22 feet, and place the ground poles in the middle of this distance at 11 feet (Diagram 3). The lazy horse will generally find a conventional one-stride distance too long and will be reluctant to work hard in the middle; he will find it difficult. By shortening the distances by 2 feet to accommodate his stride, he should find the exercise easy and become a little more obedient, perhaps even enthusiastic.
Concentrate on pushing hard with your leg, wearing spurs if necessary, and insist that your horse work. Don’t expect him to suddenly become livelier, but if you try to make the grid easy by revving him up and supporting him with your consistent contact, you should feel a difference in his attitude, as he feels he isn’t being unduly pressed to do what you want.
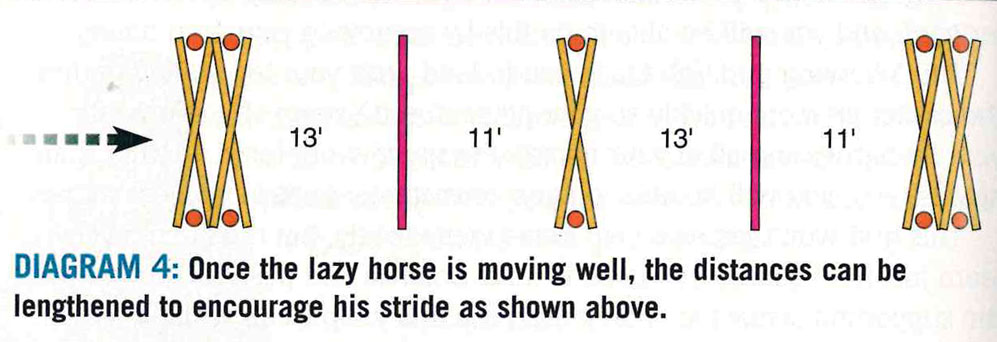
Once your horse is being cooperative and finds the work straightforward, gradually (by only 3 or 4 inches at a time) move the first cross-rail out, leaving the first ground pole 11 feet away from the second jump. At the same time, move the third cross-rail out as well as the second ground pole so it remains 11 feet from the third jump (Diagram 4).
Repeat the grid several times after each move, aiming to get your horse lengthening from your leg at the beginning of each stride after landing. If you can balance and land quickly enough to use your legs on him at the beginning of his stride instead of waiting until he settles into “lazy mode,” you will encourage him to be more forward.
Your goal is to eventually move the distances between the jumps out to 24 feet without your horse realizing he’s putting forth more effort. If you get the timing of your leg right and he accepts that as the dominant aid, he should find jumping the grid easy. But don’t forget that you should be kicking into your contact to get more impulsion, not just kicking and rushing him out over the next jump.
As with the grid for the fast horse, the poles on the ground are there to let you know if you are timing your aids correctly or not. The poles are not substitutes for good, effective riding or to force your horse to do better, so take note of what works well and try to reproduce it when you are jumping courses.
A methodical and sensible approach will eventually pay dividends. As with any gridwork, it will always be effective in the end. The only variable is the amount of time it will take.
Carol Mailer has trained riders of all levels for 30 years, and is the author of Better Jumping: Using Grid Work for Success at Every Level.
This article originally appeared in the July 2009 issue of Horse Illustrated. Click here to subscribe.