You’ve pondered styles, researched suppliers, sat in seats, evaluated trees, though about girth lengths, decided on the perfect size for your horse and compared prices. Your catalogs are tabbed and dog-eared, and you’ve visited every tack shop you could find. And now the shiny, brand-new saddle is in your hands. You groom your horse immaculately, disdainfully bypass the old saddle and tack up with your prize.
Hmm, it’s a little stiff tightening the girth.
Up in the saddle, the blissful comfort you expected from your latest-design marvel is surprisingly absent. Your horse’s first steps are accompanied by a cacophony of squeaks and creaks. No, you haven’t made a big mistake. Your saddle is probably as much as you expected and more — it just isn’t broken in yet.
How do you break a saddle in? As in many horse-related activities, there are traditional approaches as well as a little bit of new technology to help you along. Although there are many viewpoints on how to break in a new saddle, two points of consensus are: use some kind of lubricating preparation to add moisture to the leather; and ride, ride and ride until the saddle fits your seat.
Lubricating Products
Inside leather are bundle-like fibers that give it strength and flexibility. If those fibers get proper lubrication, they won’t squeak, dry out or split. Because leather is a natural substance, most who work with it recommend applying natural oils to replenish its moisture. Which products are best and worst for cleaning and lubrication leather is a topic of considerable debate.
Glycerin has traditionally been used to clean leather surfaces and maintain shine, but it doesn’t penetrate the surface. Instead, it attracts moisture from the air to keep leather pliable. Another traditional product, neatsfoot oil, penetrates the leather but has some other drawbacks, some caused by its change in composition over the years.
In the past, neatsfoot oil was actually made from boiled cattle hooves. Now products marketed as neatsfoot oils may be pork lard mixed with petroleum-based mineral oils. Neatsfoot and olive-based oils will permeate leather, but they continually migrate to the stitching and stress areas, eventually wearing off on your breeches or jeans. Neatsfoot doesn’t cause mold, but it does create an environment that can let mildew in. Also, neatsfoot oil may darken leather.
Using highly alkaline products can weaken leather’s fibers. Saddle soaps were made for convenience centuries ago by mixing soaps with oils. The soap’s cleaning effectiveness, however, is diminished by its efforts to dissolve its own oils, leaving little useful cleaning capacity to remove dirty oils from the saddle.
One-step cleaning/lubricating products are designed to be used occasionally when tack-cleaning time is tight. However, no one product can thoroughly clean and remove oils and then replace the moisture to lubricate the leather. Cleaning requires that dirt and soiled buildup be removed. Conditioning requires that oils lost in the cleaning process be replaced. Soap can also turn leather dark and remove tanning agents, causing hardening and cracking.
To begin the break-in process, Frank R. Marciante, who makes Marciante Saddles in Paulden, Arizona, recommends using and good grain oil — extra-virgin olive oil or peanut oil, but cautions that mice like peanut oil. Commercial leather dressings, such as Hydrophane, are also designed for the leather’s initial oiling.
For easier application, Marciante suggests pouring the oil in a can and painting it on with a brush. Wiping leather with a solution of bleach or vinegar was the traditional way to eliminate mildew, but that won’t prevent its return.
“If you treat your leather like skin, keeping it nourished and clean, it will last longer than you will,” says Anna Blangiforti of Unicorn Editions, makers of Leather Therapy products, which contain mold and mildew preventives. It’s especially important to clean and condition the underside of panels and flaps that rub against the horse because his body oils and salty sweat can damage the saddle, she notes.
Cleaning and conditioning products that are pH neutral will protect the leather’s fibers and stitching. Nontoxic additives prevent mold and mildew without detracting from other beneficial properties. Products with emulsifiers will also help push some built-up debris out of the pores of over-oiled saddles.
Sue Littlefield of L7 Ranch in Simla, Colorado, prefers to use a leather cream, which she applies as soon as practical to a new saddle. “I have found that it does not darken the leather as much as neatsfoot oil. It also is less sticky than oil compounds. A used, soft toothbrush is great for getting the product down into the tooling.” A good rule of thumb is that if the brush scratches your skin, it’s too stiff for the leather. And, she reminds, rawhide should never be oiled.
English Saddles
New English saddles often come with a white film of tallow, the natural fats and oils in the leather that have risen to the surface. “It’s a protectant and should be left on,” says Robin Davidson, saddle product manager at Miller’s Harness Company. As you ride, the heat and friction will rub the tallow back into the leather.
Davidson recommends treating your new saddle with a leather conditioner called dubbin, such as Lederbalsam. Dubbin is a super-fatted emollient, a thick, pasty product that helps nourish the leather.
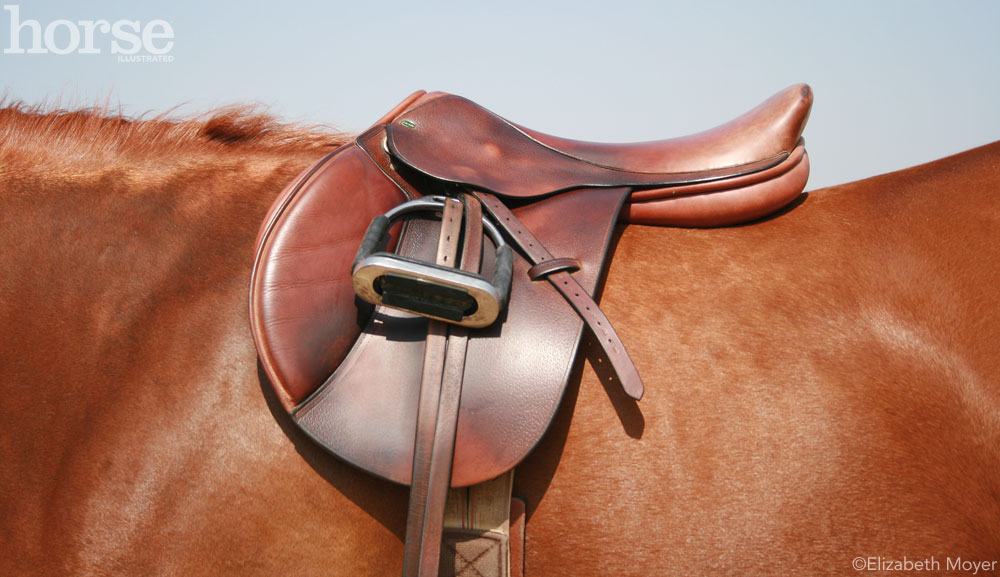
“It is best to treat both the hair and flesh sides of the leather,” Davidson says. If the temperature is low, let the dubbin sit in the sun to warm up or it will be thick and difficult to rub in. Use a dry cloth or sponge, and rub on a light coating. After that layer has been absorbed, add another. A saddle that has been sitting on the showroom floor for months may need two or three coats applied a few hours apart. Then invest the time and ride in it, she says.
Using a leather oil may break the saddle in more quickly because it penetrates quicker than dubbin, but it might penetrate to the core of the leather and release the dyes if it’s too saturated, she warns. Over-oiling can also cause dyes to stain breeches.
“I’ve had many long discussions with the tanners and leather couriers we use, and they prefer the old English ways to make saddles and leather last a long time,” says Davidson. She cautions riders to never dip or soak their saddles in oil.
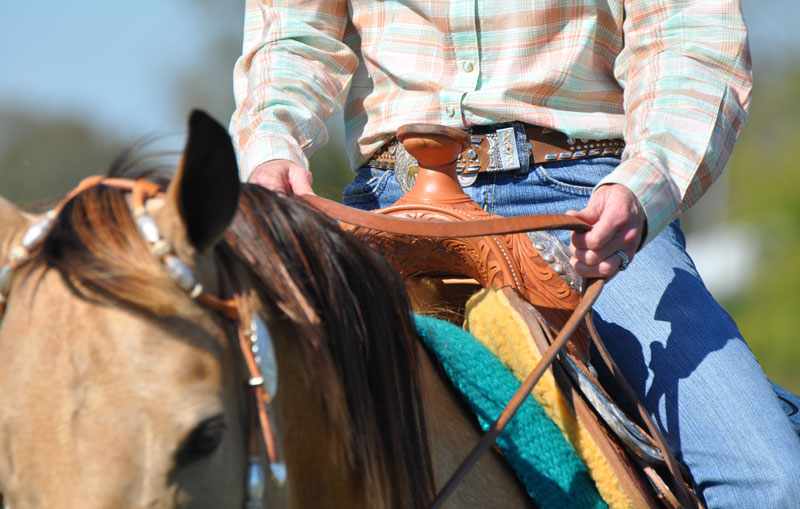
Western Saddles
Western saddles, with their heavier leather and thicker layers, require a more time-consuming break-in process. The old cowboy approach is to throw the new saddle in a water trough, then ride it dry. By accident, Don Burress, who, with his wife Kay, owns Cowboy’s General Store in Lawrenceburg, Indiana, learned how well that works. Trail riding one summer day, he got caught in a drenching rainstorm. The group kept riding. “By the time we got home, that saddle fit me like a glove. It had gotten soaking wet and dried to the shape of my body,” says Burress. As you use leather, with oil and heat and you in the saddle, it will continue to conform to your body. “In my opinion, it doesn’t hurt to get a saddle wet,” says Burress, who has ridden for 45 years and sold saddles for 13, “but the main thing is when they dry out, you put the oil back in to replenish what dried out.”
Stirrups on a western saddle that hasn’t been broken in have a normal tendency t be parallel to the horse, when they need to be at right angles, says Burress. He soaks the saddle fenders, then rolls them back in toward the horse and ties them to dry, which sets the leathers so the foot will naturally slide into the stirrups. “When I store a saddle, I run a 2-by-4 through the stirrups to keep them turned in toward the horse,” says Burress.
Sharon Camarillo, an international horsemanship andbarrel racing instructor who is also the author of the book and video,Training, Tuning and Winning, goes even further. She takes the stirrups off, soaks the fenders up to the skirt in water for four to five minutes until the leather is about as pliable as clay, then molds them with her hands, dries them, applies a saddle soap or spray glycerin, replaces the stirrups, turns them out, and puts a rake handle through the stirrups to hold them in position. “Then I go over the saddle with a good saddle soap,” says Camarillo. “Then just ride in it. I have done the same process by riding the saddle until it dries. A night or two with a rod between the stirrups usually does it.”
Bruce Olsen of Montrose Quarter Horses in Richmond, Virginia, uses the same approach of wetting the stirrup leathers and turning the stirrups in. He places an ax handle weighted with a bucket of water hanging from it through the stirrups to stretch the leathers. He says it takes a week and a half, riding 10 hours a day to get a saddle “that feels pretty good.”
“If the stirrups are persistently hard to keep turned, softening the leather will help,” says Littlefield. She offers another time-proven solution: “If the saddle squeaks too much to tolerate, turn it upside down to where you can get under the panels, and shake a generous amount of baby powder into the tree and under the jockeys. Once righted, wipe the excess that may get onto clothing while using it. This will help alleviate some of the noise while the leather gets seated, stretched and settled in the process of being used.”
Ride, Ride, Ride
Once you’ve selected a lubricant and applied several coats to your new saddle, the next step is riding in it. But be sure that you’re just breaking in the saddle — not your body or your horse’s back — cautions Holly Covey of Mary-Dell Farm in Harrington, Delaware.
The best way to break in a new saddle is to spend hours in it. Avoid using a heavy pad, ride for 20 to 30 minutes, then stop, get off, take the saddle off, and see if there are any hot spots on the horse’s back, says Covey. And while you’re riding, watch the horse’s ears and stay alert to see if there’s something bugging him. Those may be signs that the saddle doesn’t fit.
“New English stirrup leathers don’t feel the same as old stirrup leathers,” she says. She suggests riding in the old ones until you feel more comfortable with the new saddle, but be aware that the old stirrup leathers may mark a new saddle, and you should never put them on a trial saddle. “Wear chaps or breeches and boots when riding in a new saddle. If you want to get a good sore, ride in jeans,” says Covey, adding that if you are moving your leg around trying to find a comfortable spot, the saddle won’t break in right. “If you’re switching from an all-purpose saddle to a dressage saddle, which really puts your leg in a different position, ride in the new saddle for a while, then go back to the old until your legs are used to the new leg position, or go back to your old saddle for a few minutes at the end of the ride,” she says. “I’ve ridden half the lesson in the new saddle and half in the old. A new saddle that fits properly will break in quickly. A new saddle that still has you gritting your teeth after several weeks of daily riding may not fit you or the horse.”
Don’t expose your saddle to too much sunlight at first, because it has no natural oils, she cautions. Continually clean and oil it to work softness in. If you have a black saddle, be sure you don’t wear your best white breeches. The black will rub off, especially if you sweat a bit. Most leathers have dyes that are sweat-resistant, but save the white pants until the saddle is broken in.
Although breaking in a saddle is somewhat of a “no-pain-no-gain” proposition, keep in mind that significant pain for you or your horse is a big hint that the saddle may not fit one or both of you. Keep your leather-lubricating product handy to use regularly and whenever your saddle gets wet. Your new saddle will soon be as comfortable as the old, and you’ll be ready for that show or trail ride.


it really helps-for people with leather saddles! i have a synthetic saddle and its REALLY stiff i need help please!!!
I’ve plenty experience riding but none with a new saddle. I now have 2 that I will be needing to break in for the coming riding season. I found the basics of what I need to do the job in this article and look forward riding my nice, new tack this Summer.
good tips thanks! i just got a new saddle.
you should add in that you should use stirrup leather covers if it’s a trial saddle. That way you don’t rub markings and ruin it because if it dose’nt fit you might not be allowed to return it.
everything else is great i’m trying out this stuff on my new saddle.
if you have a synithetic saddle it’s usually very stiff so a good idea is to buy a second hand one.but they don’t last as long i;ve had my experience.but lubricating a synithetic saddle will ruin it. so ride in at walk with your horse walk for about one week then trot for one week or even less if you want then do what you want.
Article is great, exactly what we did last time with a new English saddle ( 9 years ago) BUT we were also advised to “roll” the leather flaps, both ways, each time to aid in softening and absorbtion of the WARMED neatsfoot oil. We are in the process of starting another new saddle and we will do the same as before
This was very helpful, but i was wondering if Lexol would work, or should i stick with an oil. Any comments?! thanks!
ive been breaking horses and saddles for 45 years,quickest way to break in a saddle is to tie 20 ft of ropr arond the horn then throw it in the dam for 2 hrs pull it out strap it on your horse,go for a good ride,come back take it off and put it in a dry place for a week,then graese.
not my fav thing to do
Good advice Horse Channel!
I enjoyed this article. Thank you.
Thought I would share my standard pattern of leather care for my saddlery – both English and western saddles and bridles:
Glycerine saddle soap all over. Get that dirt and sweat out and off of the piece. Wipe off excess foam from the soap. Allow to dry.
Heat pure Neatsfoot oil or Neatsfoot compound in a small crappy sauce pan designated just for that service. I get it pretty hot, too – NOT blazing hot, just really, really warm. Don’t walk away from the stove, oil can catch on fire. Heating the oil is extremely efficacious; i.e.: it is much, much more effective than applying at room temperature. The hot oil is much more penetrating. I’m not kidding.
I take a sponge – I prefer the dense kind that are made for grouting tile. I buy them from someplace like Home Depot and cut them into thirds (they work well for the Glycerine soaping, too). I take the heated oil and dip the sponge in it and liberally wipe it all over the saddle, underside, too, forcing it into the cracks and crevices. It soaks in very rapidly.
After a short time, whatever is going to soak in will have soaked in. I take an old cotton T-shirt (cotton jersey – lint free) and wipe and buff all over the saddle or bridle. Leather is left preserved, soft, supple.
You can wear heavy rubber cleaning gloves during the application if you don’t want to get the oil on your skin or the oil is too hot for you. I don’t bother with gloves. Oh, I’ve heard that some folks who use this method substitute a designated paint brush for application.
Considerations and comments:
• Pure Neatsfoot WILL darken the leather. So will the compound. Just sayin’.
• Pure Neatsfoot can be kind of sticky. I have found that the compound is much less sticky.
• I do not apply the Neatsfoot every single time I saddle soap the saddle. Depending on how much a saddle is used, I would say that I apply about every 2 to 3 months, more if the leather gets super wet during use.
• I live in a humid climate (western Oregon). If a Neatsfoot leather item is stored in a barn or tack room for a length of time and it is not climate controlled, sometimes a funky layer of mold shows up. It’s of no consequence. I just saddle soap as usual, an apply the hot Neatsfoot, and presto: good as new. I think the mold appears because Neatsfoot is a natural fat or product.
Some people hate Neatsfoot. I love the stuff and overwhelmingly the advantages outweigh the disadvantages. Try this method on one piece. See how you like it.