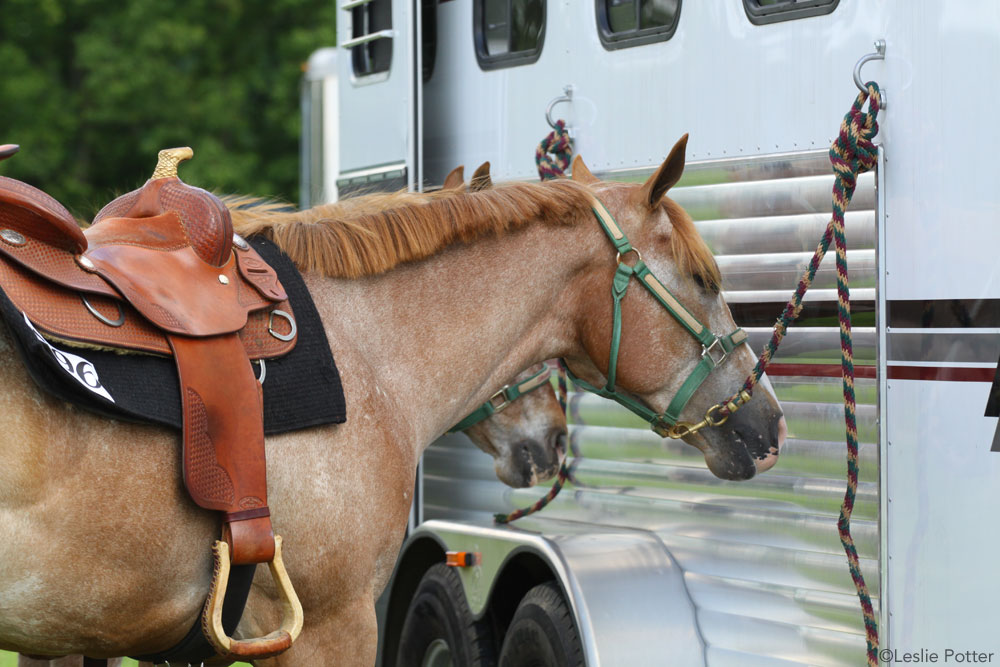
Always make sure your horse is tied safely and properly. Photo by Leslie Potter
You’ve probably seen horses tied to all kinds of inappropriate things, from lightweight plastic chairs and moveable objects like gates, truck mirrors and bumpers, to flimsy fence rails instead of solid posts. You’ve probably also seen viral videos of horses dragging said chairs behind them as they bolt across crowded parking lots. While horses can pull back and un-anchor most anything designed to hold them, knowing how to tie your horse safely can help you avoid costly veterinarian and repair bills.
Each time I see a horse tied to something unsafe, I imagine that the handler said “Oh, he’ll be fine just for a second,” or “He’ll be fine. He never spooks.” While some horses may stand well no matter where you choose to tie or leave them, there’s always a chance they could spook, pull back, break what they’re tied to, or ruin expensive tack (and hurt themselves if tied while wearing a bit).
To keep your horse as safe as possible, imagine the worst-case scenario, then make sure you’ve done everything possible to prevent it. You’ll keep yourself and your horse safe when you think like a horse, identify the possible dangers, and take time to tie safely.
Quick Guide to the Release Knot
Tap image for full-sized view. Illustrations by Susan Harris/Certified Horsemanship Composite Manual of Horsemanship. www.cha.horse
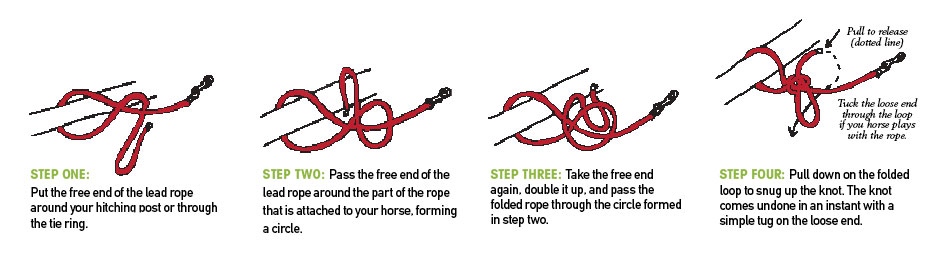
Step One: Put the free end of the lead rope around your hitching post or through the tie ring.
Step Two: Pass the free end of the lead rope around the part of the rope that is attached to your horse, forming a circle.
Step Three: Take the free end again, double it up, and pass the folded rope through the circle formed in step two.
Step Four: Pull down on the folded loop to snug up the knot. The knot comes undone in an instant with a simple tug on the loose end.
If your horse is known to untie himself, take the end of the rope and put it through the last loop so that it’s locked. This does make it so that you’d have to reach up and unlock it before pulling it loose, but can help ensure your horse stays put.
Location Matters
I’ve seen a horse pull an iron hitching rail from the ground. Both posts had been secured in concrete 3 feet below the surface. The horse moved under the rail then pulled back.
While even the strongest posts designed for tying could give way with the right combination of strength, force and horse’s determination, it’s always best to tie your horse to a well-designed and secured post.
Never tie your horse tightly to a rail or to something that could easily move. If you’re tying along a fence line, choose a post instead of a rail (most are attached only with nails). If you must tie a well-trained horse to a rail, loop your lead rope without tying a knot, and make sure your horse is within your line of sight at all times.
If your barn has cross-ties, make sure that they’re secured to the wall and that there is a quick-release connection. It’s my preference to tie a horse to only one instead of both cross-ties. While they are convenient for humans to use, cross-ties can be tricky for horses. Not all horses are trained to them and may be uncomfortable being confined with their heads up. If a horse slips while tied in cross-ties, he can’t easily catch his balance because he can’t move his head.
If you use cross-ties with both connections in place, make sure your horse has non-slip footing, such as rubber mats. Horses should not be left unattended in cross-ties.
Tying Gear
The lead rope you tie with should be a ¾-inch rope that is spliced or tied instead of sewn onto its clasp. Sewing can come undone and will be weaker than the actual lead. I only use bull snaps for tying. I want to make sure my snap is strong or is specially designed as a pressure-release horse tie.
If you’re using a quick-release buckle, it should attach to the rope end that is farthest from your horse. That way, you can release it in case of an emergency. You don’t want to have to move under a panicked horse to release a clip. Plus, with this configuration, when you do release the clip, your horse will still have a lead rope attached so he’s easy to catch and calm.
For ease and for safety, I like to use a large clip designed to allow slack if a horse pulls back. These clips are great for convenience—especially when tying to the inside or outside of a trailer.
Tying Height
You want your horse to stand comfortably with his head in a natural position. If your horse will be tied for a long time (and will need to eat and rest while he’s tied), you want him to be tied high enough that he won’t get a leg over the lead, but with enough slack that he can touch the ground with his nose. For everyday purposes, allowing 18 to 24 inches of lead from the knot to your horse’s halter is best.
If there’s too much rope hanging down (so that there’s a long loop of rope below the horse’s chin when he’s standing in a relaxed position) your horse could move too close to another horse standing nearby. With too much room to move, your horse could move into another horse’s kick zone or even get his lead caught in another horse’s halter.
Long Time Tied
On pack trips, horses are often tied to a highline. Horses are tied so that they are comfortable and can reach food. They can move around and lay down. As long as horses are taken to a water source often, they can be safely tied overnight with a highline.
My horses are routinely tied for two or three hours each day. By the time they are groomed, ridden, wait for other horses to be worked, then are groomed again, they have plenty of time to practice their tying skills. As long as there are breaks for water, there’s shade and comfortable footing or mats, horses should be able to wait and stand patiently. Some horses could have difficulty standing still on concrete for that long. I like to make sure that they’re comfortable with mats, shade and fly spray.
Know the Knots
It’s great to know a variety of different knots to help you tie to trees, posts, and highlines. Look up resources to learn useful knots. You can practice tying knots any time, even while sitting on your couch watching TV. The widely accepted knot used for tying horses is the quick-release knot (see diagram above).
Tying your horse is a routine part of grooming, tacking up and everyday horse care. While the purpose of tying is to secure your horse in place, it’s important to be able to free him quickly. Even the most experienced horse people need to remember to be vigilant about safe horse handling and tying procedure.
Check out the Certified Horsemanship Association’s Composite Manual for more safe tying practices.
This article originally appeared in the January 2018 issue of Horse Illustrated magazine. Click here to subscribe!