Enter our 12 Days of Christmas Giveaways here!
0 ITEMS
  • My Account
  • Holiday Gift Guide
  • Podcast
  • Webinar
Subscribe Combo
Enable cache13
Home Blog Page 1049

What to Pack for Riding Vacations

2

You can travel anywhere in the civilized or not so civilized world for a riding holiday these days. But there’s no need to lug along a giant tack trunk of gear to enjoy the ride. Our equestrian vacation experts share their advice on what essentials to pack so that you have everything you need for the trip of a lifetime, on horseback.

“After taking over a hundred riding tours around the world and welcoming about 400 guests a year for the last 35 years here at our ranch, I do have a few ideas on the subject!” says Bayard Fox, founder and president of Equitours, travel outfitters since 1971 providing ranch vacations and worldwide riding trips.

Group horseback riding on the beach


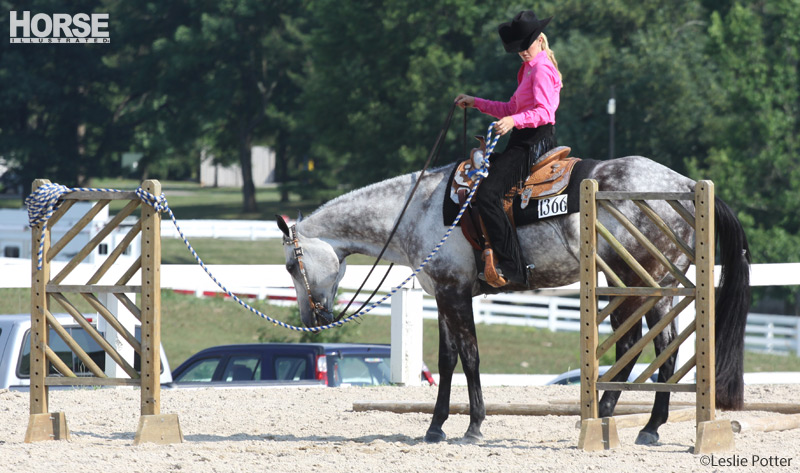
On trips where you’ll be logging a lot of saddle time, whether riding western or English, comfort is key. “Take clothes that are comfortable, nothing that rubs, nothing new. Boots should be broken in; breeches, schooling tights and riding jeans should fit well. A trail ride is not the time to break things in that you have not worn before,” says Karen Lancaster, president of Cross Country International, which has specialized in equestrian travel around the world for 15 years. While most tours don’t allow you to bring your own saddle (not very practical to carry, as well as problematic for having to fit the horse), Karen advises that bringing a sheepskin or gel seat saver can add to your comfort. “Padded underwear is also a help,” she says.

Our experts agree that a waist pack is most useful for carrying items on horseback such as camera and film, Kleenex, lip balm, sunscreen, et cetera. “A backpack can be dangerous and saddlebags can bounce at trot and canter,” explains Nancie Vion-Loisel, a ride consultant with Equitours. Bayard Fox prefers bags that fit on the front of the saddle. “Hard items like cameras attached behind can upset a horse, especially if they start to come loose,” he says. If tying a jacket behind your saddle, make sure it is securely fastened.

For an intensive English training vacation, such as dressage or jumping, you’ll want your wardrobe to be conducive to the best possible learning experience. Neat and workmanlike riding clothes will allow your instructor to see your form. Breeches, field or dress boots, helmet and gloves are the attire Karen recommends. She also brings a boot cleaning kit. For jumping, you might want to add a protective vest.

Coping with Weather Extremes

“When riding in cold climates like Iceland or even Northern Scotland I like corduroy stretch tights, riding mittens and a riding fleece head band,” Karen says. Her advice is to layer clothing, as needed: long underwear, turtleneck, sweaters or fleece, then jacket. “Layers are the way to go,” Bayard agrees.

A jacket that travels and layers well is a pivotal item for the well-prepared traveler. But don’t fret about packing a bulky parka. The latest generation of outerwear for riders offers many options. Look for a lightweight waterproof breathable shell as your main defense against the elements, and let layers provide the warmth.

“Outerwear that is both wind and water resistant is great,” Nancie says. Australian-style oilskin coats are a favorite with her because they can be used as an overcoat on the street when traveling, as well as for raingear when riding.

Bayard cautions against crinkly, flapping raincoats, although he recalls the popularity of the yellow saddle slickers worn by cowboys in the Marlboro ads. “I remember one time when I got bucked off big time because a raincoat tied on behind the saddle had spooked a horse on the first canter,” Bayard relates. The matter of the crackling rain gear is important, he says, noting that it can be problematic in the wind, or when getting on or off the horse.

A jacket that is totally waterproof, fits over the saddle, offers freedom of movement and handy pockets is what Karen Lancaster prefers. Versatility is also important in a jacket. The Riding Sport International 5-in-1 Jacket from Dover Saddlery is one that she likes. “On wet mild days the outer jacket can be worn, and a vest can be added when it is colder,” she explains. Karen’s other picks are waterproof riding boots and fleece waterproof gloves—take at least two pairs if they might get wet, she suggests. “I also bring those packets that heat up when you squeeze them,” she says.

Mountain Trail Riding


If you will be riding through water or in a rainy climate, you might wind up with a pile of heavy, soggy clothes if you don’t plan ahead. Quick drying fabrics are a help, such as nylon, polyester, fleece and other modern technical fabrics.

To beat the heat less is usually more, but Ellen Vanuga, who is responsible for organizing and booking Equitours’ riding safaris in Africa, has some special advice for riders in those extreme conditions. “The African sun is fierce, and it’s easy to burn quickly before you even realize it’s happening. I’ve tried just about every type of shirt, and by far the best are—believe it or not—loose fitting safari shirts with long sleeves and tabs to hold rolled up sleeves into place, a vented yoke, a collar to protect the back of your neck, a pocket or two for lip balm and long enough shirttails to tuck into breeches. The material is tough and holds up well when riding through whistling thorn and acacia.

“Something as simple as having the right kind of shirt for safari can make a big difference in your overall comfort level,” Ellen says. “Better to be focusing on that herd of giraffe rather than worrying about ripping your shirt to shreds on the thorns.” Additionally, she explains, “Neutral, or ‘bush-colored’ clothing is important on the safaris where wildlife viewing is a big part of the daily adventure. Bright colors, particularly red and white, are highly visible for a long distance across the savannah, and are a universally understood alarm signal to the wildlife that riders are hoping to encounter. The idea is to blend into the landscape by wearing neutral tans, khakis and greens.”

Boots & Helmets To Go

Tall boots and helmets are two key items of riding apparel that can be tricky to travel with. Luggage designed especially for these two items can be a worthwhile investment. These are widely available from equestrian manufacturers including Ariat, Devon-Aire and Kensington. “One of the best things I ever bought was a custom bag from Dover—it fits my boots, helmet, gloves, toiletries and a day’s clothes,” says Karen Lancaster of Cross Country International. “People ask me at airports and on rides where I got it all the time. You can take it on board, so if all your other luggage is delayed you can ride and brush your teeth!”

Alternatively, Equitours’ Nancie Vion-Loisel says, “Paddock boots and half chaps work equally well for western and English riding and don’t weigh as much as western boots and full chaps in luggage.” HI’s editorial staff suggests wearing your paddock boots on the plane so that you don’t have to pack them.

“Half chaps and paddock boots allow you to hop off your mount and be comfortable,” Karen explains.

Equitours’ Bayard Fox adds, “It is important that the boots be well broken in and comfortable for a long day in the saddle. Many rides have places where walking is necessary at times, and in these cases it is important to have boots that are comfortable to walk in.”

Helmets are also tops on Bayard’s list. “Be sure you take your own hard hat which fits and meets safety standards,” he advises. “I know they are bulky, but I have seen too many head accidents and dented helmets that saved riders over the years.”

Traveling Light

Two pairs of breeches/jeans for a one-week riding vacation seem to be the consensus. “Riders all smell horsey after the first day anyway,” says Nancie. “Packing depends partly on whether laundry services will be available,” Bayard points out. “On the average people bring twice as much as they need and come back without having used much of what they brought. Soft bags are easier for outfitters to handle in vehicles or on packhorses. If the area has good shopping (as in India), riders may want to take an extra soft bag to carry things home.”

“Take everything you want to bring on your trip, put it on your bed, and then cut it in half,” Karen advises. “For a week I like three pairs of riding tights, although you can get away with two—but that is not where people go wrong. They bring a different outfit for every evening. Wrong! Bring one or two pairs of pants—I like black jeans and one nice cotton twill. Two or three turtlenecks or cotton shirts, a blazer from Travel Smith [a travel catalog] and that’s it! If it is cold, I bring two sweaters—not five.”

Nancie agrees. “Pack a pair of slacks or trousers that travel well and just change tops a couple of times during the week for dinners.”

“It is a good idea to have comfortable shoes for the evening when the riding is over,” Bayard adds. But hold your horses, Imelda—one pair should suffice.

Bon Voyage

And our final advice for a great trip? “Just remember it isn’t a fashion show,” Nancie says. “Be comfortable and take riding clothing you know fits and is comfortable—particularly important with boots. You’re a long way from home, and there’s usually no opportunity to change.”

Now that you are well equipped for whatever riding adventure you choose, enjoy the journey and take home wonderful memories. “Journal your experience,” reminds Karen. “And remember—you are in another place with other people—stay curious. Traveling is the great educator.”

Further Reading
Equestrian Vacations: Don’t Leave Home without It
Travel Guide for Equestrians

This article originally appeared in the February 2006 issue of Horse Illustrated. Click here to subscribe.

Is Your Horse College Bound?

7
Riding at College

“So, what are you going to do with the horse?”

This was the second most-asked question last year among our friends as talk revolved around our daughter’s upcoming college plans. After we’d gotten past “Where will she go to school?” the next question was inevitably about Arroya, our daughter’s Half-Arabian show mare.

I joked that I didn’t know if we could put a horse and a kid through college. We still don’t. But after considering every alternative, we decided to try.

It’s a drama played out every year in horse-owning families. Read any equine classifieds and you’ll see the ads: “Must sell, owner off to college.” Talk to any college equestrian coach, and you’ll find the prospective student’s main question is, “Can I bring my horse?”

Between these two extremes are a world of options and choices. We’ve talked to college students who’ve made those choices, as well as professors and coaches who’ve advised them to give you tips on what to consider when it’s time for college.

Students, parents and professors alike emphasize certain common issues you’ll face when deciding what to do with your horse when college bound. They include choosing a school, time management, money and competition.

Choosing Your School

Choosing a school can be a complicated process, and deciding what to do about your horse simply adds another level of complexity. If you plan to ride in college it’s important to choose your school wisely, and make sure you consider more than the equestrian team.

Jenny Frye, a hunter rider and currently a graduate student at North Carolina State University in Raleigh, N.C., chose her first school, State University of New York at Stony Brook, based on its equestrian team. Jenny liked SUNY-Stony Brook’s equestrian team, which had a good reputation, and it also accommodated her limited transportation.

Jenny didn’t own a horse when she went to college, but considered bringing one that had been offered on loan from her barn back home. She decided against it since she didn’t have a car and was concerned she would not have enough time for a horse of her own with her equestrian activities and school.

Although she liked the equestrian competition, Jenny soon realized the school’s academic offerings didn’t mesh with her goals. “That was my biggest mistake, thinking only in terms of the equestrian team and not even looking at what I wanted to major in. I wanted to be a vet, so I decided to transfer to a school that had a good pre-vet program.” By her sophomore year Jenny had transferred to North Carolina State, a much better fit for her. There, she finished her undergraduate work and competed on the equestrian team.

Other students are set on a school for one reason or another and make their horse decisions accordingly. Joe Pluhar, a freshman at Texas A&M University in College Station, Texas, and American Quarter Horse Youth Association’s winner in 2005 of the Wrangler Aspire Award, has been showing American Quarter Horses for 11 years in competition all the way up to the AQHYA World Championship Show. Joe knew he wanted to go to Texas A&M for the pre-vet program. To go there, he has given up competitive riding for the time being. He can’t compete on the school’s equestrian team because Texas A&M’s National Collegiate Athletic Association (NCAA) equestrian team is women-only. Nor did he feel he could continue in AQHA competition; even though at A&M he is less than an hour from his trainer, Nancy Cahill, he decided he would not have time to keep a horse with Nancy, compete and go to school.

Joe says the school’s excellent equestrian team was still a draw, however. “[It] was something I could be involved in, in terms of maybe helping teach some of the beginner riders, and they also give clinics during the summer to 4-H groups. There are a lot of things I do that are perfectly matched with A&M. I also knew, though, that coming to A&M meant that I wouldn’t be able to show any more.” Joe left his show horses at home for his younger brother and sister to compete on.

NCAA vs. IHSA

Students who want to compete at the college level need to understand the differences between National Collegiate Athletic Association (NCAA) Division I and II schools versus Intercollegiate Horse Show Association (IHSA) schools. Here’s a quick comparison to get you started:

NCAA

  1. Most schools (not all) take care of riding and showing expenses. Budgets vary by school.
  2. Most teams are women-only to comply with Title IX school funding rules for team sports.
  3. Athletes are not allowed to win prize money in competition. Athletes are restricted to a certain number of competitions during the school year, even on their own horses.
  4. NCAA schools follow IHSA procedures.  Horses from the host school are used in competition; riders draw their mounts randomly and have no warm up before entering the ring.

Note: There have been some changes to NCAA equestrian in recent years. For up-to-date info, visit the National Collegiate Equestrian Association at collegiateequestrian.com.

IHSA

  1. Support varies from no expenses covered to most or all covered in varsity programs. The best financial arrangements are usually found at small private colleges, especially those with riding majors.
  2. No exclusion for male versus female riders.
  3. No restrictions on prize money earnings or number of competitions outside of IHSA.
  4. Horses from the host school are used in competition at IHSA shows; riders draw horses randomly and have no warm up before entering the ring. Some schools also put on local shows that are not on the IHSA circuit, in which students may use their own horses or school horses.

Managing the Time of Your Life

Concerns about time management are shared by students, parents and school administrators. Professor Suzanne Coen, associate dean of Equine Studies at Lake Erie College in Painesville, Ohio, says she discourages first semester freshmen from bringing their horses with them. Professor Coen explains, “One of the things that I tell parents is that the first year or the first semester of college the students shouldn’t bring their horses if they don’t have to.” College is such a dramatic lifestyle change—students often need time to settle in before bringing their horses to live with them, she says.

Texas A&M equestrian head coach Tana Rawson agrees. She explains that only 10 to 15 of their 70 riders bring horses. “A lot of girls decide the time commitment is too much for them. Those that can manage their time can do it,” coach Rawson says.

Texas A&M sophomore Casey Wong-Buehler can attest to the fact that it takes a lot of time management to keep your horse at college. Casey showed her Arabian mare Natasha in hunter pleasure on the Arabian Horse Association circuit, bringing her mare to college for two months in the second semester of her freshman year. Casey says, “I made sure that she was at a barn where I had more responsibility for her than I do [at her home training center]. I had to clean out her stall and feed her. That was for me to make sure that I went to go see her every day.”

In addition to her classes, studying, six hours per week practice for the equestrian team and another three to four hours in required weight training, Casey also had the occasional tutoring session. Although the boarding barn was only five minutes from the practice facility, Casey says it was often hard to juggle her time and tend to her mare on a regular schedule. She warns, “Give yourself enough time, because I’d be coming home from equestrian team, and be like wow, the dining hall closes in an hour and a half, and I haven’t seen my horse today.” Casey’s advice is to estimate how much time you think you’ll need for everything, and then double it.

Amanda Corns, a hunter and dressage rider who shows her American Quarter Horse Ready to Rumble on her local hunter circuit, has worked out another way of managing her time with her horse. Amanda, a senior at Wilmington College in Wilmington, Ohio, who is majoring in communications, did not bring her horse the first semester because she knew college would be, as she puts it, “an absolutely huge adjustment for me.” She leased a school horse her first semester, then brought her horse to school her sophomore year.

Amanda has a method that works well for her. She takes a heavy load of classes in the fall and really concentrates on her studies, leaving her horse at home. In the spring she brings “Rumby” to school and takes a lighter load, so she can focus on him. “It really works out great because I get the entire fall semester off, and then all spring semester I can get him back up into show shape for the summer,” Amanda says.

Budgeting for Boarding

If you’re set on bringing a horse to college, you’ll need to check out the boarding facilities at or near the school. You’ll want to know the cost, of course, but it’s also important to know what the policies are for boarding. Some schools don’t have boarding programs on campus, but if it’s a horsey area you can almost always find barns nearby. Other schools offer boarding as part of their programs. At many colleges you can choose either full board or partial board, where you do some of the work.

When you’re looking at boarding on campus, ask about the school’s policy regarding your horse. Some schools don’t allow a student’s horse to be used in lessons (even if the owner is riding), while others permit or even require it. The University of Findlay in Findlay, Ohio, for example, allows students to board on campus only while they are using their own horse in the program; horses must be pre-approved by the instructors. Once the students are past the portion of their instruction where they can use their own horses, they must find boarding off campus.

If your horse is coming from a backyard barn where you haven’t been paying for board, you’ll need to factor in the costs of keeping him at school. These costs can vary widely.

At Fresno State University in Fresno, Calif., students have the option of a “mare motel” for $190 per month, which does not include stall cleaning, or the main barn where stall cleaning is included in the price for $250 per month. Indoor and outdoor arenas are available for riding when they’re not in use by the school.

Lake Erie College charges $435 per month for full board not including turnout, and $350 per month for partial board. Partial board includes feeding, but no stall cleaning. Murray State University, in Murray, Ky., offers board for $300 per semester, with the student fully responsible for all horse care and stall cleaning.

If on-campus boarding is too expensive or not available, you’ll probably be able to find alternatives near your school. Professor Coen explains off-campus private boarding often offers a less-expensive option to Lake Erie College’s students. “Some of them might board here their freshman year and then make other arrangements because it’s financially more feasible for them,” she says.

On the plus side, students and professors alike say being near horses, whether your own or school horses, can be relaxing for college students. Professor Coen says, “It’s an outlet; it gets students away from campus and the stress of book learning. It gets them out where they can get physical exercise, which I think is extremely important.” She has observed that Lake Erie College’s boarding barn on campus offers a haven, even for students who don’t ride there, as they often come out just to be near the horses, groom them or walk them.

If you’re set on continuing your horsey life at school, remember there are lots of options available. Do your homework on schools, set a budget for time and money, and get creative. As long as you can balance hitting the books with hitting the trail, you and your horse should do just fine in college.


Ange Dickson Finn is a horse show mom and freelance writer in Houston, Texas. She is the author of The In-Gate: A Parent’s Guide to Horse Shows.

Riding the Run

13

Aside from the thrill of speed, what draws many riders to barrel racing is the fact that it’s a purely objective competition. You don’t need a lot of silver on your saddle, the latest show apparel or the best-bred horse. There’s no judge scrutinizing your form, and you won’t be penalized if your heels aren’t down. Or will you?

While barrel racing is indeed a race against the clock, poor form will cost you. If you’re not helping your horse with your equitation, you’re hindering him.

Barrel racing champion Martha Josey says it’s crucial for a barrel racer to have proper equitation, since a well-trained, finished barrel horse is extremely tuned in to his rider. “Every time we make a move they are sensitive to it, so it’s very important that we ride correctly,” she explains.

To help you improve your runs, Martha gives insider tips on the correct body position for each part of the pattern.

Moving Forward

During the speed portions of your ride—as you head away from the gate or chute, straight between barrels or home from the last barrel—your body needs to encourage your horse to go all out.

“When you want a horse to run, take some of the weight out of your seat and put it into the front of your saddle and push on your stirrups,” Martha says. Your upper body should lean slightly forward as your horse runs. Pushing on your stirrups will help you get out of the saddle without pulling on your horse’s mouth, which some riders accidentally do in an attempt to bring their upper bodies forward. “I teach to push down on (or put weight in) your stirrups and pull up on the saddle horn, not on the bridle reins. Roll your pelvis slightly forward, allowing your chin to be just in front of your saddle horn.”

A normal equitation position generally requires a straight line from your ear to your shoulder, to your hip, to your heel. “When your legs are directly under you, you’re sitting down more,” Martha says. Since you’re leaning slightly forward for the run, your legs will be a little bit behind this line. “You’re actually pushing your upper body forward with your feet and legs.”

While many people may equate western with riding one-handed, Martha recommends two hands for collection and control at high speed. “I teach riders to stay two-handed going to a barrel because it helps to line up the horse. A lot of horses need this to help keep them from moving out wide or dropping the shoulder. Also, by riding two-handed the rider is able to perform a two-hand check [if needed], which asks the horse to start his rate while staying straight.”

Your hands should be low, near your saddle horn, during the run. High hands are an all-too-common fault. “If your hands are high, and the horse has any trouble with body position, it’s hard for you to control the shoulder,” Martha says. She also finds many riders using a straight arm rather than keeping a bend in the elbow. “I see a lot of barrel racers who run with their arms straight out in front of them. I go to a barrel with an L in my elbows. Then when I do get to that turning point, my hands are ready to tilt my horse’s nose into the turn.”

The Turn

Horses tend to go where their riders are looking. Unless you want your horse to move or fade into the barrel, don’t look at it. As you approach the barrel, your eyes should look toward the pocket. “When I’m going to the right barrel first, my eyes are focusing on a spot 8 to 10 feet to the left of the barrel,” Martha explains. “How many feet you allow for will depend on the style of your horse—some horses need more of a pocket, others need less. On the second and third barrel, I look for a spot 3 to 5 feet to the right side of the barrel.”

Martha emphasizes that a finished barrel horse should automatically rate at the correct point during his approach to the barrel. If your horse doesn’t automatically rate, work on this at home by sitting deeply in the saddle when you want him to rate, putting your feet slightly forward and cueing him with your hands. “If I’ve got to help him [rate], I’d do a slight two-hand check,” she says. For additional rate practice, Martha has her students do a posting trot between the barrels and then sit around them; or she has students trot to the barrels and walk around them, sitting deep in the saddle at the rate point.

On your approach to the barrel, Martha emphasizes the order of events. “It’s rate, wait, and then turn. I want my horse to know that rate and turn mean two separate things.”

When a finished horse shifts his weight back onto his hindquarters to rate for the turn varies from horse to horse. “Some horses might be a horse length before the barrel; others will be right at the barrel. It really depends on the particular horse,” Martha says.

Your body position will change in preparation for the turn when this shift occurs (or change your position ahead of time to cue him if he’s still green and doesn’t make the shift on his own). “When my horse is starting to get on his rear end to get ready for the turn, that’s when I sit down,” Martha says. “You want the horse to be on his rear end, so you sit on your rear end deep in the saddle.” As you sit, your legs should come directly underneath you, with your heels down. “Proper position in your legs is very important in that turn,” Martha says. “A lot of times in barrel racing you get thrown forward [when you slow down for the turn], and your feet go behind you. You don’t want that to happen.” Proper leg and body position will help keep you from winding up on your horse’s neck.

Your hands will also change position as you turn. “I like to stay two-handed as long as possible,” Martha says. When it’s time to turn, however, your outside hand (the hand farthest from the barrel) will go to the saddle horn. “You should push against your horn to position your body deep in the saddle and remain sitting straight on your horse,” Martha says. The inside hand tucks the horse’s nose, by coming toward your inside hip. It’s the inside hand’s job to guide the horse, and Martha says many riders mistakenly pull toward their knee, which is too low and not the proper hand position. “When you go to your knee with your rein it causes you to lean to the inside, which is incorrect.”

Rather than leaning slightly forward as you did for the run, you will stay straight during the turn. “I always twist in my lower body, which helps my horse turn the barrel when I’m ready,” Martha says. “You’re not just sitting there looking straight ahead when that horse is turning—your body should be turning, too.” However, remember that turning your body is different than leaning, and Martha reminds riders never to lean into their turns or drop their inside shoulder. “I keep my shoulders even because dropping a shoulder here teaches the horse to shoulder into a barrel.”

Barrel Racing
Photo: micadew/flickr.com

Practice at Home

Martha has several recommendations for riders looking to perfect their equitation.


“A good exercise is to have the rider hang a bridle on the back of a chair and straddle a chair behind it. You can visualize going through the entire pattern practicing with hand and body position. We’ll have the students think about where to whoa and where to pull back toward the hip.”

Martha also watches all of her runs on video. “Video is one of the best tools you can have in barrel racing, and I really like to study my runs. That is why we have a professional videographer at all of our events here at the ranch. The video camera will really show you what you did correctly and what you need to work on.”

On the horse, Martha suggests practicing rollbacks without a barrel. Rollbacks help riders learn a strong, independent seat, as well as practice correct hand and leg position through a turn and takeoff.

To help your horse learn to tuck his nose around the barrel, practice teaching him to give to the bit at the standstill. “Pull back toward your hip, and the horse should stand still and bring his nose around,” Martha says. “Another way to practice correct riding is trotting and loping perfect circles on your horse. You can practice being in rhythm with your horse and having a good seat and nice quiet hands.”

Get in Shape

Another key to improving your performance is remembering that the horse isn’t the only athlete. “It’s like a good horse. He can’t win unless he’s in good shape. It’s hard for barrel racers to win unless they are in shape.”

“Playing all kinds of sports in school made
me realize how much your body helps your horse,” Martha says. “It takes
being an athlete to ride the horse right.”

Martha says barrel racers must have strong arms and strong legs. 

“I do everything from jogging to push-ups,
sit-ups, and while sitting on my horse I do a variety of leg and body
flexing exercises.” In addition, she points out that, like all athletes,
barrel racers should do a lot of stretching.

Study Other Disciplines

“I study all other events,” Martha says. Like cutters, barrel racers must
be able to sit the horse, and the horse must be quick and agile around
the barrel, just as a cutting horse is to a cow. The horse also needs
speed like a racehorse, and the rider should be able to ride in a
forward position—similar to a jockey although not to the same extreme.
And like a competitive reiner, a barrel racer must have excellent hands.

Know Your Horse

Lastly,
Martha reminds riders that every horse is different, and successful
riders need to adapt their style to each horse. “I’ve been really lucky.
I’ve taken a lot of different horses to the National Finals Rodeo, and
every one of them was different. Every one of them had their own style,”
Martha says. Some horses require aggressive riding, while others run
and rate without extra pushing from the rider.

Once
you understand what your horse’s style is and learn to maintain a
proper position throughout the pattern, you will be sure to shave
seconds off your time and have more successful runs.

This article originally appeared in the December 2005 issue of Horse Illustrated magazine. Click here to subscribe!

Advances Against Cushing’s Disease

89

Horse with Cushing's
With advances in veterinary medicine, we have an increased understanding of diseases that strike our horses. Equine Cushing’s disease has been recognized for more than 70 years, but has often been misunderstood. Today, however, with our improved diagnostic and treatment options, Cushing’s horses are living longer and enjoying a better quality of life. Here’s what we currently know about this disease:

What is Equine Cushing’s Disease?

Over the years, the disease has had a few name changes, with equine Cushing’s disease the most commonly accepted. But labels such as “equine ‘Cushing’s-like’ disease,” “equine Cushing’s syndrome,” “equine pituitary pars intermedia adenoma,” and the most currently accepted name in the veterinary community, “equine pars intermedia dysfunction,” have all been used to describe the condition.

Equine Cushing’s disease is a primary problem of the pituitary gland, located inside the brain. This gland is like a dispatch center, where hormones and other chemical mediators called “proopiomelanocortin peptides” (POMC) are produced and then released into the body to control body functions. Horses with Cushing’s disease have a breakdown of the control of the pituitary gland—it literally doesn’t shut down and continues to produce POMC.

The overactive pituitary gland of a Cushing’s horse can grow in size and even develop benign pre-tumor and tumor cells that press against the brain. In the advanced stages of the disease, this compression can be severe and cause neurological problems if the gland becomes big enough. Cushing’s disease has often been described as a benign tumor of the brain, but there is still debate whether it’s a tumor or hypertrophy, which is tissue enlargement as a result of increased work (similar to the way that muscles enlarge from exercise). Indeed, the pituitary gland can develop cells that grow to become a tumor, but it’s unknown which comes first, hypertrophy or the tumor.

An overactive pituitary gland also affects the horse’s adrenal glands (located near the kidneys). Stimulated by increased POMC production, the adrenal glands overproduce cortisol, which contributes to a host of health problems. Increased cortisol levels have been the traditional marker for detecting and diagnosing equine Cushing’s disease.

New research is leading to a lot of answered questions and development of new questions for this disease. It’s now known that specific nerve cells in the brain secrete dopamine. In normal horses these cells inhibit an overactive pituitary gland and are present in large numbers. Horses with Cushing’s disease have dopamine-producing cells with decreased antioxidation capacity that are more susceptible to dying. But the question remains as to why. What is known is that fewer dopamine-producing cells means pituitary gland activity goes unchecked.

Clinical Signs

The classic Cushing’s case is an old, skinny, hairy horse that grows a long, wavy hair coat year-round. Many people unwittingly believe that their horses are just getting older. In reality these horses are often sick. Along with being very hairy, Cushing’s horses are generally lethargic, sweat easily, tend to run high temperatures, drink and urinate excessively, and have fertility problems. Horses with this disease are also at increased risk of developing laminitis. The high cortisol levels in the body lower the immune system, making the horse more susceptible to infections, such as delayed healing, reoccurring hoof or tooth abscesses, sinus infections and chronic fungal, bacterial or parasite infections. Pneumonia is even possible.

As Cushing’s disease progresses, more and more body changes occur, and symptoms become more obvious. This can take years to happen and it’s really a snowball effect. Cushing’s horses metabolize protein at a higher rate that causes muscle breakdown and wasting, which can be very noticeable along the topline and haunches as the disease progresses. Weakened abdominal muscles become stretched from the weight of the intestines,creating a “pot belly” appearance. Intermittent front limb stiffness can also be seen.

In the advanced stages of the disease, severe neurological problems can occur if the pituitary gland becomes big enough and causes compression in the brain. Symptoms of compression include ataxia (uncoordinated movement of the limbs), fever, hyperventilation and possibly recumbency leading to death. If treatment is not provided—and sometimes even if it is—the pituitary gland gets larger, the immune system weaker and the body condition worsens to the point of real debilitation for the horse. These horses look and act very old. Their hair coats are extremely long, sometimes several inches long, and very wavy. They breathe heavily and sweat in their stalls and seem extremely lethargic. They might start to sway when walking, and in the most extreme cases get to the point where they can’t get up.

Disease Diagnosis

There are several ways to diagnose equine Cushing’s disease. The classic method is to measure body cortisol levels in response to an outside stimulus, most notably dexamethasone (a corticosteroid). Dexamethasone, when administered to a healthy horse, tells the pituitary gland to shut down. Horses with Cushing’s disease don’t respond to dexamethasone stimulus—their pituitary glands continue to produce POMC, and their adrenal glands continue to produce high levels of cortisol. This dexamethasone testing procedure is known as the “dexamethasone suppression test.” The higher the dose of dexamethasone used, the more the pituitary gland should be suppressed.

There are actually two types of “dex” suppression tests: high-dose dex suppression and low-dose dex suppression. It may seem obvious that the high dose is more accurate and should be the test of choice, but it’s not without its complications: The biggest risk is increased chance of developing laminitis. For this reason researchers and clinicians alike are trying to find alternative ways to test for equine Cushing’s disease. And they have found a few.

One alternative is the low-dose dex suppression test. This test has become the standard and is theoretically safer, due to the lower dose of dexamethasone, especially for the horse that has already had an episode of laminitis. Some researchers suggest avoiding the test during autumn months, as hormone levels in horses can vary seasonally. During fall, researchers are pointing to a higher possibility of false-positive results.

Taking it to the next level, a new test is being developed that combines thyrotropin-releasing hormone and dexamethasone, referred to by some veterinarians and researchers as the “DST/TRH” test. This test allows for increased accuracy in testing in the early stages of the disease.

Other testing methods have also been developed, mostly in an effort to avoid administering dexamethasone to horses that have laminitis or are at greater risk of developing it. One such method is to evaluate the levels of ACTH (adrenocorticotropic hormone) in the body, which has been shown to be higher in Cushing’s horses. Unfortunately, this test can have false negatives, meaning even though the ACTH levels are low, the horse can still have Cushing’s—the disease is just not advanced enough for the test to pick up on it.

There are researchers who suggest that high insulin levels in the horse are an indicator of this disease, and some research is being devoted to testing cortisol levels in saliva.

Another test monitors and measures the day and night levels of cortisol. In normal animals it’s been shown that morning levels of cortisol are high, and in the evening levels drop off. The difference between morning and night should be more than 30 percent; if not, it’s theorized that the cortisol remains at a constant level as a result of the pituitary gland not shutting down.

One final method used quite often in the field is response to treatment. Instead of testing what appears to be an obvious case of Cushing’s, a veterinarian treats the horse with medication and watches for clinical signs to resolve. This has its drawbacks, especially if we are mistaking the disease for something else that should have a completely different treatment.

Treating the Cushing’s Horse

A few drugs have emerged for treating equine Cushing’s disease that are better than others. Today, the most commonly used drug for treating the disease is pergolide. This drug, also used to treat Parkinson’s disease in humans, stimulates dopamine release, which in turn tells the pituitary gland to shut down. There are good anecdotal results and very limited side effects with this drug, as well as a lot of research available that has shown its effectiveness. In some of my patients, owners report that their horses act 10 years younger after starting treatment.

Cyproheptadine was the original drug of choice for treating equine Cushing’s disease, but many studies are now showing that its effectiveness is not nearly as good as pergolide. Some reports indicate that cyproheptadine used with pergolide can be more effective, however.

A human drug called trilostane offers promise for treating equine Cushing’s disease. This drug works at the level of the adrenal gland to slow down cortisol production. Current research has shown that this drug has reversed some of the symptoms of equine Cushing’s disease.

More research is on the way to reproduce these findings and prove the drug’s safety in horses. Trilostane is available in the United Kingdom, and also to veterinarians here through special arrangement with drug compounding companies. At this time trilostane is very expensive, but hopefully, as has been the case with pergolide, when demand grows and efficacy and safety are established, this drug will become more available and affordable.

Diet is gaining significance in the management of Cushing’s disease. Antioxidants, such as vitamins E and C, could play a role in helping to support Cushing’s horses. Chasteberry (Vitex agnus castus) is emerging as an organic source of dopamine stimulation; while it hasn’t completely stood up to the rigors of scientific testing, many researchers are still looking into it as a source of treatment for equine Cushing’s disease.

Feeding a Cushing’s horse can be very challenging, and unfortunately there are no set rules. However, it is safe to say that horses with Cushing’s disease do well on the same type of low-sugar, low-starch diet that horses prone to laminitis do. This type of feeding plan usually rules out alfalfa and grain, and leaves us with grass hay and grass hay pellets. If the disease symptoms aren’t too severe, then extruded feeds utilizing soy and beet pulp can help keep weight on. Generally I try to keep Cushing’s horses on mostly timothy and orchard hays, along with pelleted feeds, like those mentioned above, to keep weight on, and I minimize sugar as much as possible. Since Cushing’s horses are difficult to keep weight on, dedication has to be put into balancing diet with exercise.

Insulin Resistance

One real misconception about Cushing’s disease is that affected horses are hypothyroid and fat. They’re not. We don’t know enough about the thyroid gland and its hormones, but currently it’s believed that the thyroid does not play a direct role in equine Cushing’s disease. In the past, many older horses that were “easy keepers” were diagnosed with Cushing’s disease and put on thyroid medication. Thyroid supplementation hasn’t been proven to help horses with Cushing’s disease. In fact, many horses that are true hypothyroid are not fat at all and can often be thin.

It is the horse with insulin resistance that is fat. Insulin resistance is fast becoming a buzzword as the culprit behind easy keepers. The pituitary gland has nothing to do with this disease. Instead, as its name suggests, cells become resistant to insulin. When this happens, sugar (carbohydrates) circulating in the bloodstream is no longer drawn into the cells by insulin. This leaves excess sugar in the blood that gets converted to fat. In horses this often causes a cresty neck and large fat pads in abnormal places. Mustangs are genetically engineered for this condition so that they can put on fat stores in times of plenty to rely on when food is sparse. This leads us to believe that genetics play a large role in insulin resistance.

The trouble with modern horsekeeping is that we often provide plenty of food all the time for our beloved equines, so they just keep making fat stores—some better than others. Insulin resistance can create dire health problems, especially in the hoof, where laminitis can occur.

In the End

Cushing’s is an easily recognized and treatable disease, but unfortunately it can’t be cured yet. It is a slow-progressing disease that often goes unrecognized in the early stages. Sadly, Cushing’s disease usually gets diagnosed once the clinical signs are more advanced. When caught early, treatment is very successful in reducing clinical signs and allowing affected horses to live almost normal lives. For those horses in advanced stages of the disease, treatment still offers improved quality of life and longevity.

This disease hits close to home for me since my own horse Prophecy was diagnosed with it at the age of 9 using the morning and night cortisol levels testing method. I have had him on pergolide since that time, which was about four years ago. His symptoms at the time of diagnosis were for the most part very mild and very subtle. He had many episodes of “ain’t doing right,” laziness in the arena and a mild case of laminitis. His owner at that time, having had a dog with Cushing’s disease, asked me to test him. I’m happy to report that he is symptom free today. However, to be on the safe side, I’m starting Prophecy on higher dose vitamin E supplements and will test him using low-dose dexamethasone suppression combined with TRH stimulation. If he tests positive with that method, I will seriously consider trilostane for him.

In my practice area, horses with Cushing’s disease do very well and can lead an active lifestyle. Those undergoing treatment do much better for a longer period with fewer problems; I rarely have to deal with laminitis in these horses. I have one 18-year-old Grand Prix dressage horse with Cushing’s disease that is still competing and doing well. She has been on pergolide for three years, but we are starting to see a few more symptoms, so we are increasing her dosage and are considering trilostane for her.

Overall, horse owners shouldn’t fear this disease, but we must all have a healthy respect for it.

Further Reading

Optimal Diet for Cushing’s Disease

What is safe to feed a horse with Cushing’s?


This article originally appeared in the November 2005 issue of Horse Illustrated. Click here to subscribe.

Add Years to Your Senior’s Life

33


Twenty is the new 15 when it comes to today’s horses. With advancements in veterinary medicine and good horsekeeping practices, senior equines are proving that age is just a mindset. Keeping your mature horse going strong takes commitment on your part, but the payoff is partnership for years to come. Use these tips to help keep your veteran young at heart:

A Purpose in Life

Just because he’s a little long in the tooth doesn’t necessarily mean he’s ready for retirement. Seasoned campaigners often put their young brethren to shame, whether it’s good behavior in the barn aisle or a blue-ribbon performance in the competitive arena. As examples, Lipizzan stallion Siglavy Mantua I headlined the U.S. tour of the Spanish Riding School of Vienna with a command solo performance at age 26; and Giltedge, David O’Connor’s famous Olympic mount, took retirement from eventing at the young age of 17 to work as ambassador for equestrian sport at the Kentucky Horse Park. If your vet gives the OK, keep your horse’s mind and body going in a suitable career that he enjoys.

Read more about riding your senior horse >>

Kid's horse
With proper care, nutrition and conditioning, senior horses can thrive in second careers well into their 20s and beyond. Photo: Leslie Potter

Keep Him Moving

Tucking your senior into his cozy stall that’s bedded up to his belly may help you rest better, but it’s probably not best for him health-wise. To help ward off ailments such as arthritis, obesity and respiratory disease, keep his body in motion with plenty of turnout—optimally, 24/7—for a healthier lifestyle.

More Than a Fleeting Glance

Use your eyes to stave off potentially life-threatening problems by giving your horse a daily once-over. Ask yourself: Is he eating/drinking/behaving like normal? Does he have any wounds, bumps, swelling, skin problems or hoof maladies that need attention? Is he bright and alert? Is he moving out as usual? Seniors don’t always bounce back as quickly from injury or illness, so don’t hold off on treatment. And don’t wait to call your vet if the situation looks serious.

What’s On the Menu?

Stemmy, poor-quality hay, weedy pasture and sugary grains … these are less than ideal food choices for an aging horse because they won’t meet his nutritional needs. As horses age, their digestive systems become less efficient, and their ability to absorb and utilize essential nutrients in their feed, especially protein, phosphorus and fiber, decreases. Make smart menu selections, such as good pasture grass supplemented with high-quality hay that is easy to chew and digest, along with complete feeds designed for the senior horse. If your old guy has dental problems—hence chewing problems—you’ll have to accommodate him with complete senior feeds and/or hay pellets. Talk to your veterinarian about any special supplements to round out the menu.

Read more about nutrition for the older horse >>

Dental Detail

“Mature” horses need thorough dental exams at least once a year, whether there are signs of problems or not. Besides a float, an equine dentist will look for diseases that afflict older horses, such as periodontal disease and tooth decay. If you put off your horse’s dental appointment, you could be risking his health. By the time you notice a problem—trouble chewing and dropping food, which lead to weight loss—it may be too late: Tooth surfaces that are severely uneven can be impossible to fix.

Pull Blood

Regular vet visits, which should include blood work, can help ward off disease in your older horse. Cushing’s disease, liver and kidney problems, anemia, electrolyte imbalances, insulin resistance, and other senior horse disorders can be detected with blood tests. Hands-on examination can monitor old-age conditions, such as eye disease, dental issues, weight loss, et cetera.

Balanced for Soundness

Reducing your aged horse’s workload doesn’t mean you can cut back on his hoof care. Even if he’s retired to pasture, he still needs trimming/shoeing every six to eight weeks. Keeping hooves balanced can be even more critical in the aged horse that suffers from debilitating diseases like arthritis, navicular or laminitis, and your farrier can also alert you to any unforeseen hoof problems that might be brewing.

Asset Protection

Lack of shelter during bad weather, pesky parasites, disease and herd rivals are detrimental to your senior’s immune system. Don’t let him slip: Always provide protection from rain, wind, heat and frigid conditions; stick to a regular deworming program; keep up on insect control; and vaccinate on time.

That’s What Friends Are For

Allow your neighborly oldster to flaunt his social skills by giving him equine friends. Letting him partake in normal horseplay with his own kind will improve his quality of life and may just help him live longer. Make sure his pals are well-matched to his “mature” personality to minimize injury and ensure he gets his fair share of food and water.

Lots of Lovin’

While edible treats are fine now and then, give them in moderation. Instead, overindulge him with extra pats and praise for everything that makes him so special. Added benefits: He’ll be more eager to please, and spoiling him rotten this way is good for your emotional well-being.


This article originally appeared in the November 2005 issue of Horse Illustrated. Click here to subscribe.

Trailer Loading A Horse

0

If someone asked you to load your horse or pony into a trailer right now, would you be able to do it? Would you know the safe and correct way to put your horse in the trailer?


Would your horse hop right into the trailer or would he back up and refuse to enter it?


Loading into the trailer should be a simple task and if you teach your horse how to do it properly at first, you should have no trouble with him later on. A horse that won’t load is a real problem and can really ruin your fun when you go to shows or on trail rides.


Read on to learn how to make your horse 100 percent trailer friendly.


  1. Before you try loading your horse, you must have control over him on the ground. He must lead quietly, turn and halt and listen to your commands. He should not pull you around and put his head down to eat grass.
     
  2. Your horse must back up when you ask him to. Put pressure on his chest and push on his shoulder with your hand to encourage him to step backwards.

  1. Lead your horse over strange objects like a tarp or a flat piece of plywood so he get used to following you over unusual things. If he trusts you, he’ll be brave. Doing this exercise prepares him for walking onto a ramp.

  1. Get your horse used to squeezing through small spaces. Set up a jump filler (shown here) or a row of barrels next to the fence so your horse has to walk through a narrow space. This gets him used to walking into a straight-load trailer.

  1. Put shipping boots and a head bumper on your horse and practice walking around. Some horses will kick out and act silly in shipping boots. Your horse should get used to them in no time. It’s a good idea if you wear a safety helmet and gloves when loading a horse. Gloves prevent you getting rope burn if your horse pulls back, and a helmet protects your head if he rears up or acts dangerously.

  1. Now you can load your horse. Take a firm hold on the lead rope and lead your horse in a straight line towards the trailer. Walk beside him until you get to the ramp, then move a step or two in front of him. Walk confidently into the trailer and he should follow you up the ramp.

  1. Once he’s in the trailer, give him a tasty treat to tell him he’s been a good boy. Don’t tie him up yet. You need to fasten the butt bar behind him before you tie him up.

  1. Go round to the back and fasten the butt bar. Always fasten the butt bar before you tie him up. You don’t want a tied horse backing up and snapping his lead rope or halter. Some horses will panic if try to they back out of the trailer and are tied up.

  1. Go back to the side door and tie him up. Fasten a slip knot with the lead rein to the trailer tie ring or snap him to a quick release (panic snap) trailer tie and remove his lead rope.

  • Now he’s secure in the trailer, put up the ramp. Stand to the side so you don’t get squashed if he backs out, breaks the butt bar and steps on the ramp.
    1. Remember to fasten all the locks on the trailer ramp. You don’t want the ramp falling down while you’re on the road, do you?

    1. Once you get to your destination, untie your horse before you lower the ramp.

    1. If you have a helper, they can lower the ramp and you can back your horse out of the trailer and follow him out. If you’ve taught him how to back out on the ground, this should be easy.

    If you don’t have a helper, untie him then go to the back and lower the ramp and unfasten the butt bar. Stand to the side of the ramp and pat your horse or tug on his tail to ask him to back out. As he walks out you should be able to grab hold of the lead rope


    * This article first appeared in the November/December 2005 issue of Young Rider.
    Subscribe today!

    Packing Your Horse’s Hooves

    1

    Wrapping a horse's hoof

    Does your horse behave as if his feet are a little “ouchy” after a long trail ride over rough terrain? Are his tootsies tired by the end of a long day of showing? Of course, establish that this is not an acute injury that requires a vet call. Then consider that it could be that the soles of his feet are slightly bruised or stung from the concussion of performing on less than cushiony arena footing.

    One treatment is to pack your horse’s hooves overnight. You can do this by using one of several commercially made hoof packing products found in equine care catalogs or at your local major tack store.

    To temporarily cover your horse’s packed soles, and help it adhere to the hoof, you’ll need a roll of that thin, stick-to-itself stretchy bandage material. Or you can cut thin cardboard in the shape of a slightly oversized hoof. To hold that onto your horse’s hooves you’ll need your handy dandy roll of duct tape.

    How to Pack and Wrap a Horse’s Hoof

    1. Now that you have your supplies, tether your horse to a hitching post or put him in the cross-ties.
    2. Clean your horse’s hooves thoroughly. Use a small, stiff brush to completely remove any debris.
    3. Next, dig into it the packing material with your fingers, and extract enough to form a small mound about the size of a golf ball.
    4. Then lift up your horse’s foot and plop the ball of packing at the tip of his frog. Just like modeling clay, smooth it out so that it covers the entire sole of the hoof, including the frog. Push it all the way out to the inside edge of the horse shoe, or if your horse is barefoot, cover the entire outer edge of the hoof. Make sure you press firmly enough so that the packing adheres to the surface of the sole.
    5. Finally, to secure the packing material overnight, either press the cardboard shape onto the packing–it’ll stick while you set the foot down to pick up your duct tape–or carefully begin wrapping the self-adhesive wrap around the sole and the packing in a figure-eight pattern. Stop just at the base of the coronet band; don’t go further. It should take about half a roll for each hoof.

    In the morning, remove the tape, pull off the covering and gently remove the packing with both a hoof pick and your fingers. After this spa-like treatment, your horse’s soles should feel refreshed. If not, make sure you contact your veterinarian and consult with your farrier. Chronic sole soreness can be a sign of a more serious soundness problem.

    Blister Beetles

    6

    By Cindy Hale


    Late summer is the time of year when alfalfa hay is prone to infestation by the blister beetle. There are many varieties of beetles that contain a chemical known as cantharidin, which is corrosive to the skin and toxic when eaten. Any alfalfa grown in arid regions of the United States is susceptible to swarms of the nasty critters.
     
    The mature blister beetle is approximately one-inch in length, and is always dark in color. It may also have stripes atop its back. The antennae are noticeable, being almost one-third the length of the beetle’s body.
     
    The beetles often follow a grasshopper invasion, as its larva feed on the egg pods of grasshoppers. Later, the beetles feed on the alfalfa blooms. When the hay is cut and baled, the beetles are crimped or crushed, which only exposes their caustic juices further. While it can take up to 100 blister beetles to kill a horse, much fewer can raise blisters on the inside of a horse’s mouth or cause a bout of colic. Be on the beetle lookout. Watch for the dried insects pressed inside flakes of alfalfa. If you notice any, discard the feed.

    What to Do When Your Horse Loses a Shoe

    0

    Young Rider Magazine LogoIf your favorite horse wears shoes, there’s one thing for sure-he’s going to lose a shoe once in a while. Shoes fall off for lots of reasons. A shoe can get stuck in mud and twist off. A front shoe can get pulled off if a back hoof strikes it. Or you may have left too much time in between farrier visits and the shoe simply comes loose and falls off.

    It’s important to schedule regular farrier visits (every five to six weeks is best) because when a shoe falls off, it can pull off a lot of healthy hoof with it. Then it may be difficult to re-shoe your horse and you may have to pay extra to have the holes filled up with an expensive hoof patch.

    Plus, a lost shoe could end in lameness for your horse. Horses’ hooves get used to having shoes on them and if the shoe falls off, your horse’s bare hoof might be extra-sensitive and be more likely to get a stone bruise or an abscess. And the hoof could start to crack or break up as it hits the hard ground over and over.

    Horse Shoes

    It’s important to check your horse every day to make sure he has all of his shoes. Pick up his hooves and check that the shoes are not loose or twisted. A twisted shoe won’t stay on for long. If you see your horse looking a bit footsore out in the pasture, go and take a look at his feet-he may have lost a shoe. If a shoe looks loose, take some duct tape (you should always have duct tape in your first aid kit) and wrap it around the shoe and hoof to keep the shoe as secure as possible. Then call your farrier to see when he or she can get out to your barn.

    When your horse loses a shoe, it’s important to act quickly if you want to keep the hoof in good shape. Here’s what you should do:

    1. Bring him up to the barn and take a good look at the hoof. If there are chunks of the hoof sticking out, grab a farrier’s rasp (you can buy them at a farrier’s supply store or through a horse-care catalog or ask your farrier to give you an old one) and rasp off any sharp pieces of hoof or pieces that are sticking out.
    2. If he seems footsore, it’s a good idea to cover the bottom of the hoof with padding before you turn him out again. It’s pretty easy. You should always have some medium-sized diapers in your first aid kit (they are great for poulticing sore feet). Grab a diaper and place it around the foot so most of the padding covers the sole. Then take vet wrap and secure the diaper as you would a poultice. Then secure the vet wrap and padding with some handy-dandy duct tape.
    3. Leave your horse in the barn for a while and go on a “shoe hunt.” When shoes fall off they may have several sharp nails sticking out. You don’t want your horse or his pasture-mates to step on a shoe with nails sticking out. This could cause a puncture that can turn into a nasty hoof infection. Ask a pony pal to help you search for the shoe. When you find it, put it in a safe place in the barn. Your farrier may be able to reattach the shoe and you won’t have to pay extra for a new one.
    4. Call your farrier to see when he or she can reattach the shoe. If it’s not going to be for a while, you can turn your horse out again. If it’s muddy or the ground is fairly soft, you can turn him out without wrapping the hoof. But if the ground is hard or he’s looking a bit lame, take the time to wrap the hoof. Remember the old saying-no hoof, no horse.

    This article originally appeared in the September/October 2005 issue of Young Rider magazine. Click here to subscribe!

    Practice Trail Obstacles

    3

    Training your horse to maneuver through and over various western trail class obstacles will also teach him to calmly negotiate many, if not most, natural obstacles found out on the trail. As a bonus you’ll discover that your own horsemanship skills will sharpen, which in turn will fine-tune your horse’s response to cues.

    “We like to start all of our young horses on trail class obstacles as soon as they are riding quietly in the arena. It teaches them to steer and keeps them from becoming bored by riding only on the rail,” say top Appaloosa World Championship trail class competitors, Tom and Phyllis Kirby of Chuluota, Fla.

    Bridge

    Trail Class Obstacles

    If you plan to show within a specific breed association, the best place to begin is to read the show rulebook of your particular breed so that you’ll know exactly what type of obstacles to expect. Each  association rulebook will normally provide a list of both mandatory and optional trail class obstacles. From this list the show committee will typically select six to 10 obstacles.

    Generally speaking, most shows will require you to traverse a bridge, ride at a designated gait over at least four poles, open and pass through a gate, perform a side-pass and complete a back-through. Other often-used obstacles include a box, a serpentine, a water hazard, removing an item from a mailbox, putting on and taking off a slicker, ground tying, carrying an object from one point in the arena to another, dismounting and leading your horse through an obstacle or clearing a small jump.

    Setting It Up

    To put together your practice trail course you’ll need to gather together a few items.

    To start off, you’ll need something that will represent a bridge. This might be as simple as a sheet of 3/4-inch outdoor quality plywood, or as fancy as a raised plank bridge with rails constructed out of 2 by 6 inch boards. However, as nice as a raised bridge might be, it’s usually best to start your horse off with a plywood bridge laid flat on the ground, graduating to a more complex bridge as your horse progresses.

    Building Bridges

    You will find that you can have two bridges within a single sheet of plywood. On one side of the plywood brush on a brightly colored coat of paint, perhaps accented with vivid stripes. Then flip it over every so often. Such a basic change as this may not seem like a big deal to you. But to your horse, it just might look as though you’re asking him to walk off the edge of the earth.

    Next you’ll need to amass a number of poles. To start off, 12 poles will be sufficient, though you may want to add more as you and your horse progress in training.

    Versatile Poles

    When putting together your practice course, you’ll find that the pole is probably the most versatile trail element of all. The back-through, step-overs, the box and the side-pass obstacles are all, by and large, assembled out of poles.

    “Poles may also be added to existing obstacles, such as the bridge or gate, to boost their difficulty. But there are specific rules about how high they can be elevated, and if elevated poles are used some obstacles must be widened to make them negotiable,” explains Tom. “Elevated poles must also be secured in some way so that they do not rock or roll if touched.”

    Read on for advice on practicing lope-overs >>

    Gate

    Gates

    The last major item is the gate. If your arena gate is easy enough for you to handle from the back of your horse, by all means feel free to use it as part of your practice course. However, be sure that it’s safe to handle while mounted. There should be no sharp edges that could cause injury if your horse bumps into the gate.

    Even if your arena gate is suitable, setting up a basic rope gate is also beneficial, as you might run into such a gate at a show.  The rope gate is constructed out of two uprights or jump standards. Space the uprights 6 to 8 feet apart, and then fasten a length of rope to one of the uprights. Tie a loop in the other end of the rope so that it will easily drop over the top of the second upright. A wooden dowel or peg set into the upright approximately 6 inches from the top and sticking out a couple of inches will prevent the rope from sliding too far down the post.

    Tom advises to practice gates from both directions, left and right, and even occasionally back through.

    Read on for more advice on practicing gates >>

    Optional Obstacles

    A number of cones are useful to have on hand. You’ll use them for serpentines as well as different variations of back-throughs. You don’t have cones? With a little ingenuity you can fashion markers out of many items you already have at home. For instance, medium-sized plastic plant containers will work fine. Just stabilize them with dirt so that they won’t blow away in the first big wind. You might even plant flowers in the pots for a little added color. Old paint cans or small paint buckets will also work well in place of cones. Use the last of your paint to give them a bright new look.

    You’ll need additional things for your optional obstacles, so it’s time to bring out the true scavenger in you.

    Be sure to include common items such as a mailbox, water box, slicker, saddlebags and tarp or a lariat on your list. While it’s always nice to use the real thing, you may want to use substitutes for those you don’t have. For example, a simple box may take the place of a mailbox, a cotton longe line for a lariat, and a piece of heavy plastic will pass for a slicker.

    Don’t forget to include items that produce horse-spooking noises. You never know when you might be required to blow on a whistle or be faced with the challenge of picking up a trash bag of noisy aluminum cans. Be inventive and have fun with it. The more things you introduce to your horse, the better prepared he’ll be, either out on the trails or performing in the arena trail class.

    Putting It All Together

    Now that you have your obstacles, how do you go about putting it all together?

    “For ideas, we save trail class patterns from shows,” Tom says. “Phyllis has a book of them from the Appaloosa World and National shows for the last five years. However these patterns are generally three times longer than what you’d find at your local horse show, and most home arenas wouldn’t hold them. We just use parts of these courses to practice on.”

    Backthrough

    Dare to Challenge

    In the beginning, practice difficult maneuvers such as backing, side-pass and turn on forehand or haunches well away from the trail obstacles. These exercises are complicated enough without the interference of added stumbling blocks.

    “To start a new or young horse on trail obstacles, begin with the simple ones first. Maybe just a walking over a pole,” Phyllis says.

    Set up a few basic trail obstacles, but keep it simple. In other words, start with a single pole to side-pass over, slowly working up to more complex patterns, such as the “T” or “W.” Demanding too much of your horse too early on will only serve to discourage him.

    “The worst thing to do is scare your horse. If your horse is uncomfortable with an obstacle, go back to something else until he’s bored stiff with it. Then try the new one again. For example, walk through the dry water box many times before you try walking through it with water in it,” Phyllis explains.

    Each time your horse is able to handle the task at hand, change the obstacles so that there’s a reasonable amount of challenge in it. However, be sure to fairly evaluate the degree of difficulty. A slight challenge to you may in fact be an overly frustrating task to your horse.

    Keep it interesting and avert anticipation by altering the obstacles as well as the pattern. You might even practice your trail course from either end. Begin a practice session with the gate one day, then the next time you might finish with the gate.

    “We change our practice pattern often,” Phyllis says. “Even if we don’t move the obstacles every time we practice, we never practice it in the same order. Horses learn by repetition, and we don’t want them to learn a pattern. We only want them to learn how to think their way through an obstacle.”

    “Repeating a pattern over and over will allow your horse to anticipate. This will get you into trouble when your horse begins to think he knows the pattern better than you,” Tom adds.

    While practicing at home it’s always a good idea to stop your horse at any point when working an obstacle. A hesitation of a few moments before signaling him to continue will teach him to be patient.

    “Some horses are anxious to please while others just want to get it all over with. In either case, they will start to rush and that usually results in ticks and knocks,” Tom says. 

    Training your horse for western trail class is not only challenging, it can be very rewarding. As you and your horse progress, you’ll be amazed at how truly maneuverable your horse actually is.  You may also find that it has enriched your relationship with your horse.

    Find the correct dimensions for your trail obstacles.


    Kim and Kari Baker raise Appaloosas in Montana.

    0FansLike
    0SubscribersSubscribe
    We use cookies to help personalize content, tailor and measure ads, and provide a safer experience. By navigating the site, you agree to the use of cookies to collect information. Read our Cookie Policy.
    OK