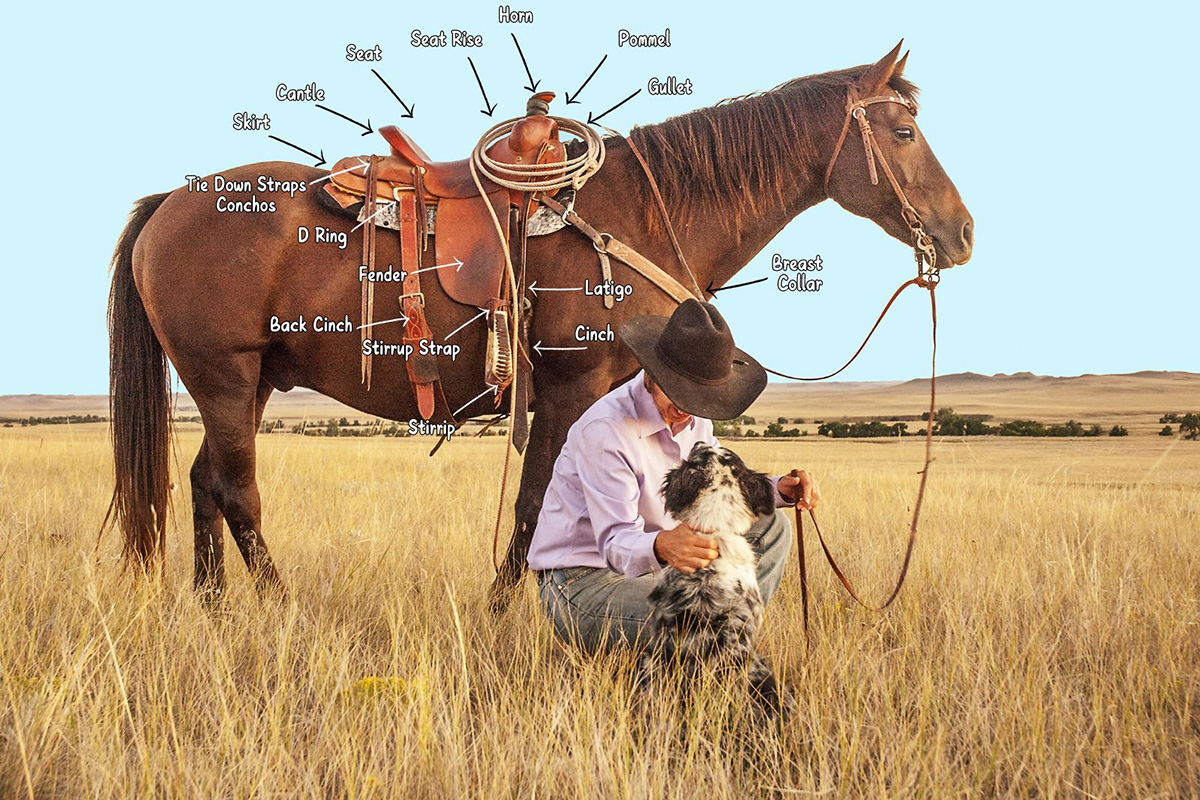
Photo by Heidi Nyland Melocco
Even if your horse is great at splashing through puddles around the barn and navigating arena obstacles with water, he may react differently when faced with a moving stream. Moving water can look scary and the sound of the water may be new and loud. It may take some work to teach your horse how to cross water.
For your horse to cross moving water, he must place his feet on ground he can’t see beneath a loud, indiscernibly deep stream. You may know that you have picked a safe spot to cross water that is only 3 inches deep over a solid base, but your horse can’t see that clearly and may worry that the water is 20 feet deep.
What can you do to help if your horse is afraid of moving water?
Trainer Jessica Dabkowski of Pony Peak Stangmanship in Laporte, Colo., focuses on natural horsemanship techniques while training Mustangs and all breeds of horses. Here, she’ll help you learn the steps to introduce your horse to water while working from the ground.
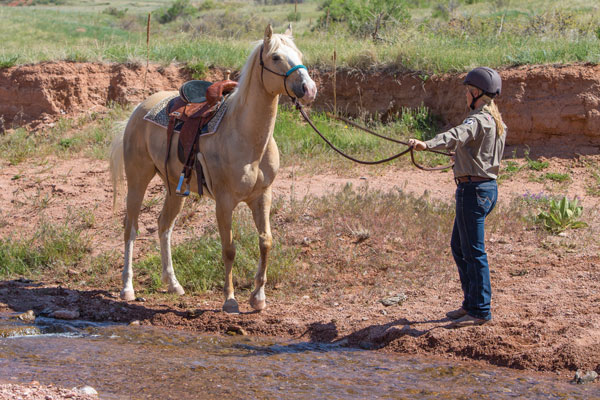
Cinch steps to the side, away from the water, so Jessica swings the rope to prompt him forward. Photo by Heidi Nyland Melocco
To Teach Your Horse How to Cross Water, Work at the Water
If your horse has never seen moving water before, it’s ideal to plan a training session at a water crossing where you have space to work and when you aren’t rushed. You don’t want to force a training session when you’re short on time and must catch up with a group ride.
Dabkowski worked with her client’s Quarter Horse, Cinch, who had limited experience. He was unsure about the water and became emotional despite his rider’s calm prompting. He resorted to falling to his knees and refusing to move forward through the water.
To help him, Dabkowski scouted out a safe water crossing with moving water that was fairly shallow and not too fast. A flat area near the bank provided plenty of safe training space, much like the arena where they worked on groundwork at home.
When you choose a place to work, make sure the creek or river bottom isn’t muddy and there’s a clear way to get out of the water on the other side. There should be no steep banks or thick vegetation for first-time water crossers to have to move through.
Dabkowski prefers working out issues using a halter and lead, without a bit and bridle in place. If a horse pulls back with a bridle, it can slip off of his head. Plus, if a horse pulls hard on the bit, he may injure his mouth.
Dabkowski used the “send” command to direct Cinch into the water (see “Sending Lesson,” below). She also wanted to make sure that she was safe. She didn’t want him to move into her space when he was afraid. She was prepared to block him by moving her directing hand up. The motion blocked him from moving toward her and gave him the cue to go where she wanted.
Sending Lesson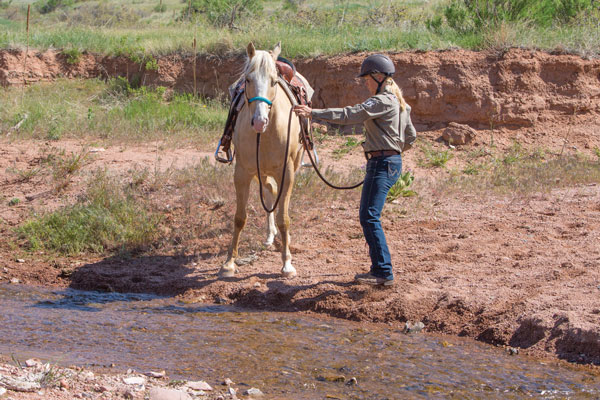 Jessica presents cinch to the water with calm, slow movements. notice the slack lines in the rope allowing the horse space to move forward. Photo by Heidi Nyland Melocco When you’re on the ground, your horse may feel more confident. He’ll see that his leader is in charge. Working from the ground also allows your horse to try out any move that could get him out of the water (rearing, backing up, falling down to his knees) without as much risk of injury to himself or to you. Before practicing on location, make sure you can “send” your horse around you while working from the ground. To start, outfit him in a rope halter with a long training lead (at least 10 feet long). ■ Ask your horse to move to the left by holding the lead line and raising your left hand and arm to point to where you want him to go. |
Successful Introduction
When you try this work with your horse, make sure to keep your body posture strong and confident. You’ll also keep your feet in one place so that you don’t move backward out of the horse’s space. If you move back, you signal to the horse that he can swing into your space to get away.
Move your directing hand up and point away from your body, toward the water. This clear cue shows your horse that is the only direction he should move. Be careful not to pull the lead rope toward you, which could turn the horse’s head and pull him into your space. If he moves toward you, keep your directing hand up as a block.
Use your driving hand—the one holding the tail-end of the rope—to reinforce what you’re asking for with your directing hand. You’ll either reinforce the forward cue by swinging the rope end toward the horse’s hindquarters or use the end of the rope to block your space. It’s important to have patience.

Once he understands that moving forward through the water is the only option, Cinch steps in. Photo by Heidi Nyland Melocco
When teaching your horse how to cross water, don’t watch the clock. Move slowly and methodically and convey a sense of calm and safety to your horse. However long it takes for your horse to get confident is how long it takes, says Dabkowski. Keep in mind that your end goal is not just to get across this one stream. You’re teaching your horse that water isn’t scary and that he can cross this and any future stream with confidence. If your horse appears to be thinking about moving forward, leave him alone and remove all pressure.
He may point his ears forward, look at the water, or even begin to investigate and play at the stream’s edge. However, if he stops looking or moving forward, add pressure again. Generally, a horse’s natural curiosity will kick in during the training process, as long as you keep your pressure low so that he isn’t stuck in fight or flight mode. If you push your horse too much and are too “loud” with your body language and cues, your horse may still eventually go in the water. However, he’ll be less likely to step in with a curious mindset. He’ll step in because he’s avoiding uncomfortable pressure. Anytime your horse makes a significant effort, like finally putting a toe in the water, let him rest for several minutes and make sure he feels zero pressure during this time.
When you relax your body and drop your hands, he’ll have the reward of a break and learn that he’s doing the right thing.
The release of pressure is the horse’s biggest praise. Saying “good boy!” without releasing pressure doesn’t praise your horse. Be careful not to rely on words to praise him instead of dropping your hands to give a release.
If your horse appears to be thinking about moving forward, leave him alone and remove all pressure. He may point his ears forward, look at the water, or even begin to investigate and play at the stream’s edge.
If your horse sees backing up as a potential answer, allow him to try that answer. Just drift backward with him, keeping driving pressure on the whole time, until he stops and goes forward again. Stop the driving pressure as soon as the horse starts going forward, and don’t keep the pressure on all the way until you’re back at the water. Reward the first thought of going forward by releasing the driving pressure right at that moment.
If your horse steps into the water then quickly backs up, that’s good! Stay patient and reward the effort with a break. Allow him to settle and realize that stepping in didn’t cause something terrible to happen. When he’s relaxed, cue him forward again.
Once your horse steps in and stays in the water, remove all pressure. This is what you’ve been waiting for and it needs to be his happy, peaceful place.
In the water he gets what every horse wants—rest, peace and release of pressure.
When your horse is walking through the water and circling around you easily, stay with the process. Send him through for as many times as it takes for him to look totally confident and relaxed. His head will lower and he’ll start walking through slowly (instead of the first splashy and fast attempts).

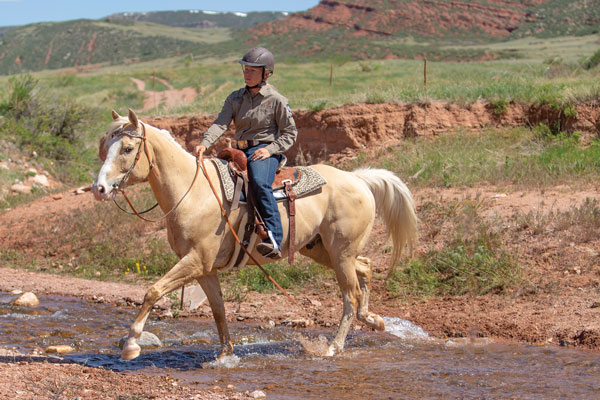
Jessica mounts up and repeats the training steps while riding once cinch is calm and willing to move through the water without jumping it. Photo by Heidi Nyland Melocco
Ready to Ride
How much practice you’ll need before riding depends on your individual horse. You may choose to pack a halter and lead with you for all of your trail rides so that you can stop to practice if needed. If you feel unsafe riding across, you can practice again before attempting the ride. Your end goal is to not have to dismount. However, the more you can build in safe, calm crossings, the easier your future rides will be.
When you’re finally in the saddle, ride toward the water. As long as your horse is even thinking about moving forward, remove all pressure. Relax your legs and sit quietly. When you’re ready to ask him to cross, ask with very light leg pressure at first. Slowly add pressure until you get a response, and then remove all leg pressure as soon as he even shifts forward. Use your reins to give direction just like you used the lead rope.
You didn’t pull the horse into the water, you just raised your hands to show him where to go. Once you can do the basics and cross the stream confidently, then have some fun. Ride upstream or downstream if the conditions are safe and allow for it. Explore all the trails now that water is no obstacle!
When to Stay in the SaddleKeep in mind that sometimes when teaching your horse how to cross water it’s safer to ride through the water instead of training from the ground. If you don’t have the proper equipment to work the horse from the ground (a training halter and lead), it’s probably best to stay aboard. Working the horse from the ground with a mecate rein attached to a gentle snaffle bit is acceptable. Do not work your horse from the ground using any lead or rein attached to a twisted wire bit, a leverage bit, or a mechanical hackamore. Those bits can cause your horse pain if pulled on from an unintended direction. If you find yourself in a situation where you must ride through water, look for a buddy horse to follow. Following another horse can give your horse confidence and allow him to see the water’s depth. |
This article on teaching your horse how to cross water originally appeared in the August 2019 issue of Horse Illustrated magazine. Click here to subscribe!