
There is an undeniable elegance in hunt seat riding. Despite the inherent risks involved with jumping a horse, it’s aesthetically beautiful: horse and human taking flight together. But let’s be honest. Posers who are merely propped up on their hunter or jumper won’t get far in this discipline. To be a safe and successful—never mind elegant—hunt seat rider, you also have to be an effective one. You must communicate with your horse using your aids, and that takes practice. Here are three simple yet challenging exercises to help you get started.
Hunt Seat Riding Exercise 1: Use your leg aids to steer your horse.
Your Objective: Discover how much you rely on your hands and neglect your legs when it comes to steering, turning and positioning your horse.
For this exercise, bridge your reins and hold them in your dominant hand. Place your free hand on your hip or allow it to hang loosely at your side. By riding with the reins in one hand, you’ll be forced to use your leg aids to guide your horse through a pattern. Though he probably won’t neck rein like a western performance horse, any English horse with solid flatwork fundamentals should move laterally when leg pressure is applied behind the girth.
Practical Applications: Enhancing your horse’s power steering through the use of your leg aids is especially important when you’re jumping a course. If you habitually pull your horse around a turn with a tug of your hand and no outside leg pressure, you’ll end up with a crooked horse. Though your horse’s head and neck may be bent in the direction of the turn, his hindquarters will drift outward, off the path to the jump. This disunited approach typically results in an awkward takeoff spot. Worse, it can allow your horse to evade the jump altogether by running out.
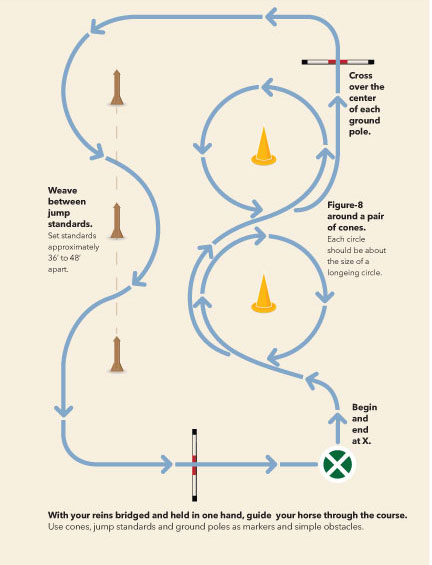
Directions: Your reins should be short enough to keep light, consistent contact with your horse’s mouth.
Assemble some cones, striped ground poles and several jump standards in your arena. They’ll serve as markers for your pattern.
The pattern should include circles or a figure-eight around the cones, weaving through a line of jump standards, and riding over the center stripe of ground poles (see Figure 1).
For your first few trips through the pattern, ride at the sitting trot. It’s a gait with enough impulsion to keep your horse going forward while still offering you a great deal of control.
By holding the reins in one hand, the bit will function differently in your horse’s mouth. If he leans on your hand or turns in the opposite direction, don’t get frustrated; give him more information with your lower legs.
As you approach each turn or circle, half-halt. It will get your horse’s attention and shift his weight off your hand and onto his hindquarters. By making your horse lighter, it’ll be easier to move his body laterally with your leg aids.
With each turn or circle, press behind the girth with your outside leg. Increase the pressure until your horse shifts his body over and inward, onto the appropriate track. Reinforce your leg with a nudge of a spur or a tap of a crop if necessary.
If your horse speeds up when you squeeze with your outside leg, half-halt to contain his forward energy. He has to understand that sometimes leg pressure means “go faster,” yet other times it means “move over.”
Squeeze with your inside leg if your horse cuts his corners or drifts inward on his circles. Regardless of which leg you use, your horse should move away from, or yield to, that pressure.
Once you’re communicating with your horse, canter a pattern. Unless he executes easy flying changes, stick to simple lead changes each time a new lead is required.
Afterthoughts: Were you constantly correcting a wayward horse? If so, then incorporate more lateral exercises into your flatwork. Ask your coach or riding instructor to help you practice movements like leg-yields and turns on the forehand and hindquarters. Also, always remember that turning a horse can be distilled into this very basic process: Your hand tells your horse which way to go, but your leg pushes his body in that direction.
Hunt Seat Riding Exercise 2: Use three different seats to influence your horse.
Your Objective: Can you adjust the canter by altering your position in the saddle? In this exercise, you’ll use a basic flatwork pattern (see Figure 2) and then ride at the hand gallop, working canter and collected canter. By utilizing three different seat positions and some complementary aids, you’ll influence your horse’s balance, pace and length of stride.
Practical Applications: The traditional hunt seat position is the forward seat, which ideally places the rider in harmony with the motion of a jumping horse. Yet there are variations to this classic seat, and each one has its purpose.
Two-point: The two-point position is so called because the only points of contact with your horse’s body are your two legs. Your seat remains out of the saddle, suspended above your horse’s back thanks to support from your secure lower legs.
Half-seat: Though you’re still inclined forward with your upper body, in the half-seat you sink into the saddle, settling lightly onto your pelvic bones. This is most commonly used for jumping a hunter course.
Three-point: While riding in three-point, your upper body will be nearly vertical, and you’ll sit deeply in the saddle. Because it’s a strong, assertive position, upper-level jumper riders often ride in three-point. Once you perfect these three seats, and understand when to use them, you’ll be a more effective rider.
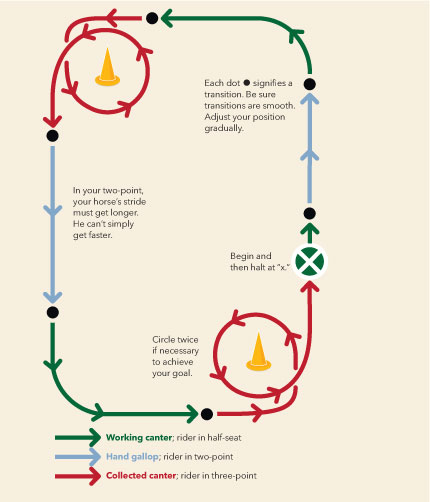
Directions: Place cones or jump standards in the corners of your arena. Set these markers at least 10 feet off the rail so you have room to ride a complete circle around them.
Start your pattern at the working canter, even if it’s just for a few strides. This is your opportunity to connect with your horse and get him listening to your aids, just as when you make an opening circle on a hunter course.
Use the long sides of your arena for the hand gallop, a pace more brisk and with a longer stride than a working canter. Ease your body into the two-point position. With your seat out of the saddle and your upper body inclined forward at the hip, your horse can move more freely and open up his stride.
Although the two-point gives your horse a great deal of physical freedom, you’ll have only a modicum of control over his movement.
As you approach the corner, transition into the half-seat. Increase contact with your horse’s mouth and sink lightly into the saddle. This gives you the ability to slow your horse and shorten his stride so you’ll have more control through the turn. The half-seat is also used while cantering in a hunter-under-saddle class.
Circle each cone one or more times as you ease into the three-point position. Your weight in the saddle becomes an additional driving aid. Expect to create more forward energy. Contain that energy by straightening your torso and taking up additional contact on your horse’s mouth. In response, your horse should slow down and, more importantly, collect (compress) his stride.
The three-point position allows you to use your leg, weight and hand aids to their full extent. It’s a vital resource for coaxing a spooky greenie around a course or staying on a potential stopper. However, because you’re sitting on your seatbones, you can easily get left behind when your horse leaves the ground at a jump. Use this position sparingly.
Afterthoughts: Did your horse bolt off like a racehorse during the hand gallop? Even though you’re in a two-point, you can still lift your hands above the withers and roll your shoulders back to execute a half-halt so you can steady and slow him. Was it a struggle to keep your horse cantering while circling the cones? You might have relaxed your leg pressure once you sat down in the saddle. To achieve collection and keep your horse cantering, continue to squeeze with your legs even as you increase pressure on his mouth.
Hunt Seat Riding Exercise 3: Control your horse between jumps.
Your Objective: You’ll collect your horse’s canter stride in order to achieve a varying numbers of strides between a pair of ground poles, cavalletti or low verticals. Does your horse get strong or fast when jumping through a line? This exercise will teach you how to use your aids to make your hunter or jumper more adjustable.
Practical Applications: An adjustable horse is more predictable and safer than one that tows his rider to the jumps. While boldness is an admirable trait in a hunter or jumper, you are the pilot. Your horse shouldn’t have his own flight plan. If you can adjust your horse’s pace and length of stride, you’ll be ready for the challenges found in hunter derbies, equitation medals and jumper classes.
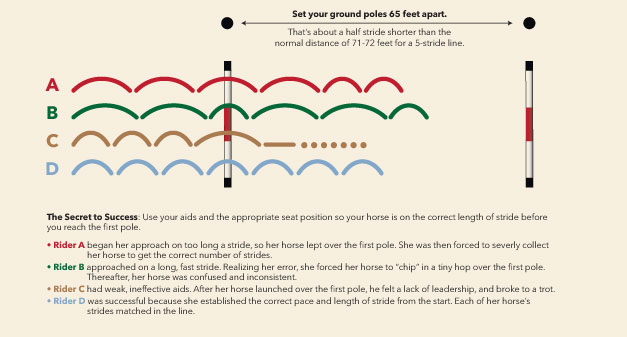
Directions: Place two sets of jump standards 66 feet apart in a line. While you may eventually graduate to conducting this exercise over low vertical jumps, begin by laying a single jump pole on the ground between the standards, or set up cavalletti instead (see Figure 3).
Once your horse is warmed up on the flat, trot back and forth over the poles to introduce him to the concept of this exericse. Be sure to use your legs to help guide your horse to the center of each pole, and to keep him on a straight track between them. After the second pole, halt straight.
Establish a working canter. Maintain that rhythm as you go through the line. Your horse should fit five strides between the two poles.
For the next approach, collect your horse’s stride just enough that you can add one more stride in the line. Your horse should get six strides between the poles this time.
Increase your horse’s collection even more, and approach the exercise on a noticeably shorter stride. Now get seven strides in the line.
For this exercise to be successful, your horse’s pace and length of stride must remain consistent from the approach, through the line, and for several strides afterward. Simply chipping in a short, tiny step at the last moment so you end up with the correct number of strides isn’t good enough.
To keep your horse interested in the exercise, and to test your skills, vary the number of strides (from five to seven) every few times.
Once you’re certain that you’re communicating with your horse, replace the ground poles or cavalletti with low verticals (about 2 feet) and repeat the exercise.
Afterthoughts: Did you experience trouble when adding strides in the line? Analyze your approach. Were you clear, consistent and firm with your aids from start to finish? If your horse suddenly took a long leap over the first pole or jump, he sabotaged any chance of getting the correct striding. Essentially, your horse went with his own agenda when it came time to leave the ground. If you can’t communicate with your horse in this exercise, you’re sure to have problems jumping a course.
Spend more time developing your aids to become a more effective rider. In return, you’ll experience more enjoyment in hunt seat horsemanship.
This article originally appeared in the September 2014 issue of Horse Illustrated magazine. Click here to subscribe!


This looks very helpful. Thank You Horse Channels for another wonderful articles.
great tips