 Dressage is a sport of precision. Details matter, and in the show-ring, you do need to sweat the small stuff. No matter what the competition looks like, you can focus on presenting your horse at his best and riding to maximize your score. Performing an accurate test with correct geometry ensures that you won’t lose unnecessary points, and will give you the edge every time. Cindy Sydnor, a longtime dressage judge and examiner for the United States Dressage Federation instructor/trainer program, shows you how.
Accuracy Counts
Riders often lose points on some of the most basic maneuvers in the test. Sloppy geometry on corners, centerlines and circles will cost you. “Accuracy is a big deal,” says Sydnor.
To ride your test figures more precisely, she recommends familiarizing yourself with the dimensions of the arena. Study both the large (20×60 meters) and short (20×40 meters) arena sizes with the letters in the right places, including those “invisible” ones—D, L, X, I and G on the centerline of the large arena and D, X and G on the small arena.
Download and view charts of the dressage arenas (pdf) by clicking the thumbnail images below:
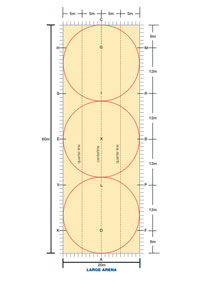 Large Arena |  Small Arena |
Centerline: Sydnor’s tips for more accurate geometry start at the beginning, entering at A and heading straight down centerline—and she does mean straight. “To make a straight centerline that is really on the centerline, enter from the rein (or direction) that you will turn at C after your halt and move-off. If the turn at C is to the right, enter on the right rein from outside the arena. Turn just inside the letter A so that when you pass through the gate of the arena, the letter A is 100 percent behind your back and you are looking at the letter C and creating an absolutely straight line connecting the two letters.
“Don’t look at the judge,” warns Sydnor. “This will distract you. Look at the letter C instead. As you approach C, be careful not to drift off to the left if tracking right at C. You might be well on your way to getting an 8 or 9 if your centerline has been straight up to this point, but will drop one or two points if you swing out before turning at C. Swinging out also tells the judge that your outside aids are not functioning very well.”
Perfect Your Twenty-Meter Circles
Precision is essential to your 20-meter circle. It needs to be exactly 20 meters—not 18 or 21. To get this figure to spec, follow Sydnor’s step-by-step instructions.
“If riding a 20-meter circle at A or C, do not ride into the corners of the arena,” she says. “Learn where on the long sides of the arena you should touch the track: It’s 4 meters past the corner letter; the letters H, M, K and F are 6 meters from the corners. So to make a 20-meter circle that has a 10-meter radius in the large arena, you have to touch the track 4 meters past these letters. Then be sure to cross the centerline opposite A or C two meters past L or I.”
In other words, Sydnor explains, the 20-meter circle at A should not cross the centerline at L—a common mistake riders make. “Look at your diagram of a 20×60 arena and you will see that the distance from A to L is only 18 meters. The correct diameter of a 20-meter circle is 20 meters. So the circle line has to go beyond L by 2 meters.”
In the middle of the arena, keeping your circles accurate is even more of a challenge.
“If you are riding a 20-meter circle in the center of the arena, touching E and B, the circle line crosses the centerlines just 2 meters inside L and I. Remember that the letters of a large arena are all 12 meters apart, and the corner letters (K, F, M and H) are 6 meters from the corners of the arena,” says Sydnor. “It will help you tremendously to learn the letters and the dimensions of arenas. If riding a 20-meter circle at E and B in a small arena, you cross the centerline 4 meters from G and D. The distance in a small arena between the side letters is 14 meters. The corner letters are still 6 meters from the corners.”
Diagonals: Wobbly diagonals are another way to lose unnecessary points. “Remember to really hit X when you ride on the diagonal, and you will make a straight diagonal,” advises Sydnor. “Also, remember to ride all the way to the opposite letter you are aiming for.” Sydnor suggests that you aim for a few feet before the opposite letter so that you and your horse stay on the right track as you pass that letter and are then positioned to ride correctly through the corner afterward.
A good corner will also set you up for the diagonal, says Sydnor. “Stay on the long side for the stride or two that it takes to actually reach the first letter of your diagonal. This way you will avoid reading on your score sheet, ‘cut corner—accuracy,’” she explains.
Transitions
You know that accurate transitions are important, but you may be confused about where exactly they should take place in relation to the letter. According to Sydnor, this is a common problem.
“The ideal transition happens so that the gait or halt required is happening when horse and rider pass the letter,” she says. “Therefore, if you are to ride a transition from trot to canter at A, for instance, you should give the aids approximately one to two horse lengths before A. This way the horse is in his first full canter stride as he passes A. In fact, his body should straddle the letter A—almost as if A were an invisible jump and he jumped over it in the first canter stride.
“Basically, when the rider’s body passes the letter, the first stride of the new gait, or halt, should be happening. This means that for a correct halt at C, for instance, the rider’s ear, shoulder, hip and heel line should be exactly in front of the letter C. It is not correct to halt when the horse’s head is at the letter.”
Further Reading
Dressage Tips at a Glance
Dressage Arena Exercises


Great advice. I guess it’s essential to have a good arena in which to practice.
Thanks