The Green Horse
The green horse is inexperienced, suspicious, lacks confidence, is gawky and spooks at everything. He needs some fairly conventional grid work to help him realize that jumping can be fun. He also needs a rider with the right attitude–someone who will allow him to learn at his own pace, rather than try too hard to teach him. If your horse fits any of the above descriptions, or is a complete beginner, set up the following grid to help him.
Set a cross-rail at the midpoint of the long side with the ends set approximately 18 inches to 2 feet high–just high enough to define a center, which will be about 9 or 10 inches high, and low enough that your horse can step over if necessary. Build two more cross-rails of the same size at 12-foot intervals on each side of the middle jump so you end up with a row of five cross-rails with a 50-foot approach and exit. That will give you plenty of room to prepare for the grid without your horse getting unbalanced and flat on a long approach. However, your approach shouldn’t be too short, or you won’t get your horse set up in a balanced line on the way in, so don’t cut the corners.
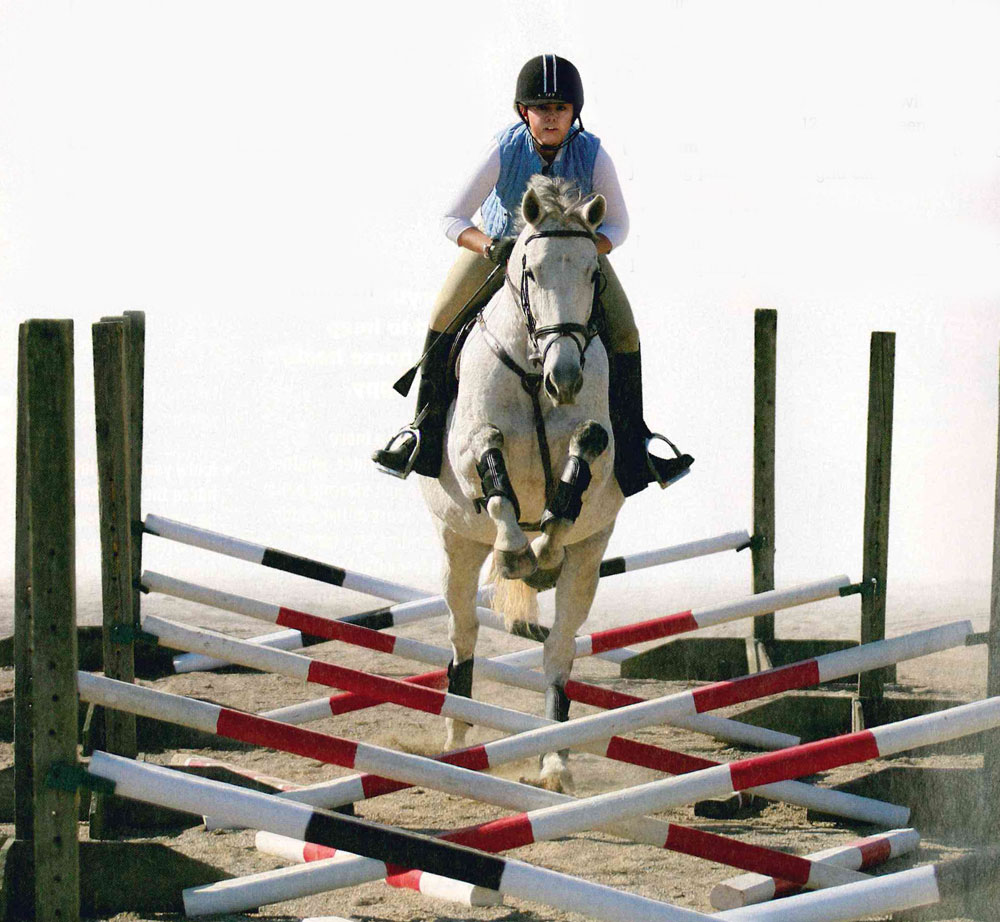
Even the bravest green horse will be surprised to come around the corner and be faced with a row of cross-rails. This is the time to make sure he realizes that there are no options but to go through the grid.
It would be easy to start with one cross-rail then gradually add more as your horse gets used to them, but starting with the multiple-jump method will make sure he learns that going forward obediently from your leg is his best option. It’s a lesson in cooperation, not necessarily jumping ability. The sooner you can insist that he negotiate the cross-rails, the more fun you will both have.
If your horse has a “comfort zone” at one end of the grid, such as the gate or barn, always begin by heading in that direction. Start at a trot, making sure it is active and springy with lots of impulsion, and keep your contact very supportive. The cross-rails are small enough for your horse to walk over them if necessary, so if he is very green and grinds to a halt, you should still be able to persuade him to go from your leg. Don’t be subtle with your cues, and don’t be disappointed if he paddles through all of the jumps. Make sure you have a patient helper standing by to replace the poles for you.
If your horse is quick and evasive enough to step sideways through one of the gaps, don’t let him continue the way he wants by circling him away. Turn him back into the grid at the gap he escaped from. Remember, he can step over these poles and you don’t need to have a big run-up to jump them. You just want your horse to go through the grid, whether it’s at a walk, trot or canter. You must ride your horse through his reluctance, but resist the urge to tap him with a crop to make him go, since he isn’t being naughty, just cautious.
Once the green horse has gotten over two or three cross-rails, he realizes he can see the end of the grid and generally makes an effort to jump the last cross-rail off a bounce stride. Make this exercise easy for your horse by riding positively to each jump in the grid, not just the first one; otherwise, he will run out of impulsion and struggle to keep going.
This is the best grid to encourage him to enjoy the work. By repeating the exercise, you will find your green horse’s confidence will grow by leaps and bounds. After a half a dozen tries, most horses will boldly take on the whole line.
By this time your horse may be quite keen to canter. Keep an “up” canter; don’t let him accelerate and try to hurry. Maintain a strong and steady pace, not long and flat. The short approach is ideal because it enables you to dictate the quality of the canter from the corner without it deteriorating on a long approach.
Don’t try to engineer a takeoff spot to the jumps. You need to allow your horse to learn. If he’s wrong and makes a mistake, he will realize that he should try harder to be neater and sort his legs out–don’t force him. Ride every cross-rail as positively as the first: look up, nudge with your legs at every stride or jump, and maintain the supporting contact.
 Diagram 2 |
Once your horse is jumping this grid confidently in both directions, lower the second and fourth cross-rails and make the fifth cross-rail into a simple, small vertical with crossed poles in front of it (Diagram 2). The straight pole should be showing about 3 or 4 inches above the middle of the cross-rail. Don’t be surprised if your horse peeks at it on his way through the grid. The familiarity of the cross-rail in front of the horizontal poles should encourage him to jump. Even if he hesitates, enough positive nudging should give him enough impulsion to keep going. Remember, the jump out should still be small enough to bunny hop if necessary, so don’t make it too big.
 Diagram 3 |
When your horse accomplishes this, make the same change to the middle cross-rail (Diagram 3), still leaving the second and fourth cross-rails low to keep his stride regular between the more demanding jumping efforts.
 Diagram 4 |
Next, do the same with the first cross-rail (Diagram 4), so you are now effectively jumping your green horse through a small combination.
Diagram 5 |
If things are going really well, add an extra pole and standards to the fifth jump to make a small ascending oxer going out (Diagram 5), but remember to ride it the same. Don’t get too aggressive as the jump gets bigger. If you have prepared properly, your horse should be making a little more effort, not you. This method of training means that you are asking your horse to work with maximum impulsion right from the very beginning. When you need more, don’t try harder, but don’t do less. Continue to ride positively to each jump and let him make the extra effort.
If your horse finds the work physically hard or too mentally demanding, back off and do the earlier exercise nicely once, then plan to repeat the whole thing the next day. Build up the grid gradually so the next step will be easy for him.
Once your green horse is successful over the small combination, you can add extra height and width to the fences, but concentrate first and foremost on riding in a rhythm with impulsion so he finds every exercise easy.
Move on to the next plateau only when your horse is ready. Then, stay on that plateau a while until he finds that easy enough to move onward and upward again.
The Horse That Won’t Stay Straight
The horse that isn’t straight on his approaches can be very difficult. He won’t improve without some remedial work, but there are some grids that can successfully fix the problem.
Again, it all comes down to how diligent you are when you use the grids, and your determination to keep up the same methods of correction when the grid isn’t there to help you.
One reason your horse may not stay straight is because you aren’t focusing on where you intend to go. If you have wiggly hands, your horse will veer off-course.
Another reason may be that your horse has a definite bias to hang one way or the other over a jump. He may even be ambidextrous and can hang to either side, depending on where his comfort zone (usually the fenceline of the arena) may be.
 Diagram 1 |
Take your horse through a conventional grid as in Diagram 1. Take note of which side he veers toward. If he does this in both directions, then he has no particular bias and it’s up to you to improve your steering.
When you approach the grid, don’t just let your horse follow the fenceline to guide him in. Steer him independently on the approach and actively look down the line of cross-rails. Have enough leg on so your contact stays very consistent, and point your knuckles to the middle of the cross-rails.
If you keep enough leg on for the supporting hands to be fairly strong, you should be able to steer a straight line. If you don’t use enough leg, the horse may drop behind the contact and be able to evade the straight steering and hang to the side again.
 Diagram 9 |
If your horse hangs to the left and the fence is on the right, you might find it very easy to stay straight, as the inclination is cancelled by the proximity of the comfort zone. If the fenceline is on the left, you may have more trouble and will need more help. In this case, noticeably raise the side of the cross-rail on whichever side of the grid your horse hangs by about 9 to 12 inches to make his preferred side more difficult to jump (Diagram 9).
Sometimes this works very well, but sometimes it doesn’t work at all. Your horse may still hang to that side and simply jump higher. You must remember that the change in the grid is not to be used as a substitute for positive riding and accurate steering, so keep doing your best to keep him in the middle.
 Diagram 10 |
 Diagram 11 |
You may get a better result by placing ground poles on a slant either to the left (Diagram 10) or to the right (Diagram 11) to encourage your horse to go straight down the middle.
When the horse starts going straight, one by one, starting from the far end, remove the diagonal poles and make him go straight as if the poles were still there by using a constant leg pressure and looking forward. If he starts to hang again, just replace them, one by one until he goes straight. You should find that even if he doesn’t go well all the way through, you might not need to replace as many poles as you think. Just work a bit longer to establish the right feeling of being more in charge of the steering.
 Diagram 12 |
Setting V-poles on the ground (Diagram 12) can help as well. Look where you are going and point your knuckles forward. When you get a feel for steering accurately, work hard to retain it.
Remove the V-poles gradually, starting from the far end, to check on your progress. If your horse stays straight, you’ve done your job. If he begins to wiggle again, put the poles back and work with them a little longer until you feel confident that you’ve got it right. Don’t be in a hurry, as improvement takes time and patience.
Practice over this grid until staying straight becomes second nature for both of you–and be on red alert for him backtracking. If he does, do something about it. Don’t let the bad habit develop again.
A methodical and sensible approach will eventually pay dividends. As with any grid work, it will always be effective in the end. The only variable is the amount of time it will take.
For more grid exercises to help slow down the fast horse or speed up the slow horse, read part two of Great Grids >>
Carol Mailer has trained riders of all levels for 30 years, and is the author of Better Jumping: Using Grid Work for Success at Every Level.
See more horse videos >>



Great video!! this will come in handy!!
Good video; and very helpful. I always did like to jump the grid. It’s a good exercise for rider balance, too.
Really liked the grids video, will really help with my new horse, we are just starting him in jumping.
I can’t find the write up for the lazy horse section…?
In the lazy horse section she should have stoped and tried agin when the horse broke in a trot then keep her heel on the horse so he won’t break into a trot .For the horse that was to fast should have troted it first.Then done it when he was more collected at a canter.In the one where the horse keep going side ways over the jump they should have slowed the aproche so they could come in the middle of the jump.
Grids are such a great idea,the hardest part for me is getting the measurements/distances right.
I liked this video
Thanks for a great video and article. Grids are a fantastic way to get the lazy horse to perk up or the speedy horse watch his feet. I use them all the time
Interesting.
Great learning technique and workout!
These grids have helped my riding very much. They are very simple, and rather fun!
wow thas soooo cool keep it up
awesome! i wish i could jump like that! those girls, or girl, was/were GREAT!!!!!!!!
Wow, good tips.
Great information.
Very informative
Looks good, only wouldn’t starting out with just one raised crossed rail and then after succeeding with that, move on to two, and so forth?
These are great too without raising the poles for a western pleasure horse or a trail course horse to learn to lift and elevate that back better and get the collection he needs for his events.
Very clear and helpful.