 Perhaps you want to try cross-country jumping or would like to enter an eventing show. Many areas of the country are far from schooling courses, making it difficult to test your horse’s jumping skills in the great wide open.
The good news is that you can construct a few simple obstacles at home in a field or paddock, even with limited building experience, and prepare at home for lower-level eventing.
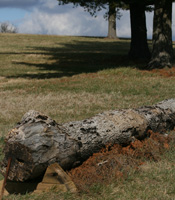
The simplest jumps are those that take advantage of natural features, such as fallen logs, ditches, banks and water.
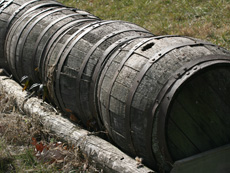 If you’re using a log, telephone pole or tree trunk, it should be moved to a firm, well-drained surface for jumping. If solid wood isn’t available, a row of three or four barrels make a similarly inviting, rounded obstacle that mimics the horse’s natural jumping arc. Metal oil drums or wooden whiskey barrels are suitable for jumping, but should always be held in place by square rails at either side to prevent them from rolling if a horse raps them. If you’re using a log, telephone pole or tree trunk, it should be moved to a firm, well-drained surface for jumping. If solid wood isn’t available, a row of three or four barrels make a similarly inviting, rounded obstacle that mimics the horse’s natural jumping arc. Metal oil drums or wooden whiskey barrels are suitable for jumping, but should always be held in place by square rails at either side to prevent them from rolling if a horse raps them. |
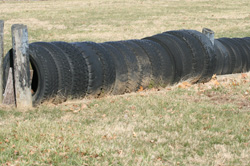 Tires are another safe jumping material if constructed properly. They should hang from a solid, anchored rail and touch the ground or be slightly buried, preferably with square poles on either side of the base. A row of at least 10 tires of roughly equal size should be used. If you are browsing the junkyard and have a lot of tires to choose from, consider making a jump with two (or even three) heights to pick from when approaching the obstacle. Tires are another safe jumping material if constructed properly. They should hang from a solid, anchored rail and touch the ground or be slightly buried, preferably with square poles on either side of the base. A row of at least 10 tires of roughly equal size should be used. If you are browsing the junkyard and have a lot of tires to choose from, consider making a jump with two (or even three) heights to pick from when approaching the obstacle. |
 Hay bales, stacked wood and hedges are also simple cross-country jumps that can be made at home. Hedges should never obscure a hidden wire fence underneath. A square hedge should be trimmed often to promote density and encourage a good jump. A wooden brush box is another type of vegetation fence, but it will need to be frequently re-stuffed with fresh green boughs. Horses will usually learn to “brush” through the top portion showing above the rails of the box, as opposed to clearing the tops of them, if branches are not tightly bunched. Hay bales, stacked wood and hedges are also simple cross-country jumps that can be made at home. Hedges should never obscure a hidden wire fence underneath. A square hedge should be trimmed often to promote density and encourage a good jump. A wooden brush box is another type of vegetation fence, but it will need to be frequently re-stuffed with fresh green boughs. Horses will usually learn to “brush” through the top portion showing above the rails of the box, as opposed to clearing the tops of them, if branches are not tightly bunched. |
If you have a naturally occurring ditch on your property, consider reinforcing it before using it as a jump; otherwise, it could cave in with repeated use. A shallow ditch can be easily stabilized by half-burying a ground pole on either side of it. Deeper ones will need more complex reinforcement, or “rivetting,” to stabilize the sides against collapse. Rivetting is necessary for most banks and water obstacles as well.
The most important thing to keep in mind is safety. Always ask yourself if there is any place a horse could trap a foot or leg on a jump, or get cut on a nail or splinter, and rebuild the fence as necessary until it is inviting and safe for a horse to jump. This includes footing concerns as well. Never build jumps in boggy, constantly wet ground. If the ground at the base or landing of a fence gets torn up, either move the jump or put down fine gravel to level the surface out again. Now you’re ready to have fun and enjoy your jumps!
Get more advice on training for eventing here>>
Build your own jumping standards here>>


This is great info! I could use these jumps for my dogs even! I am training my dogs to jump as well, you see. Like horses though – not the usual dog agility. but my horse would like the challenge of them.
Now I have all sorts of ideas for model horse jumps!
good ideas
Really neat, I would love to make these and start my horse on cross-country jumping, it would be fun!
These are really neat – good ideas for my friend and me (we do on foot events), as well as for the horses. Thanks for all the interesting info!
These are awesome!!!! My friend and I love to do foot events and I can’t wait to try these out!!!
Thanks for the great tips.
I love making my own jumps, and my horse appreciates the variety. If your horse seems bored with his work, definately give homemade jumps a try, and get away from the same simple, plain verticles
I thought it was very handy. Thank you for displaying on your website:)!
I thought it could of been a bit handier, but otherwise it was quite good.
Cool!
Where would I get wooden whiskey barrels? everything else I have except metal barrels.