
Click here to download a pdf of this page.
A neatly braided tail accentuates a hunter’s hindquarters. It adds to the overall picture of refinement and elegance, which makes it a pity that braided tails are rarely seen outside the A-rated divisions. Here are some step-by-step tips on how to braid your horse’s tail like a pro.
Begin with a freshly shampooed tail. Although you can use a conditioner, avoid any coat polish or detangler, as it will make the hair slick. You aren’t ready to braid until you can easily comb through the hair without encountering any snags.
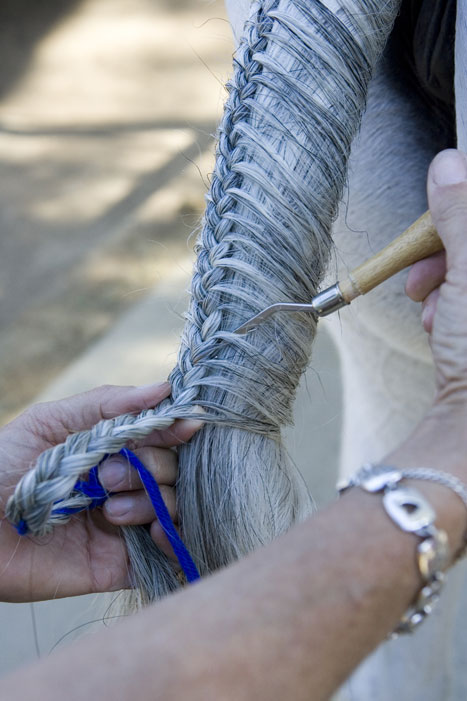
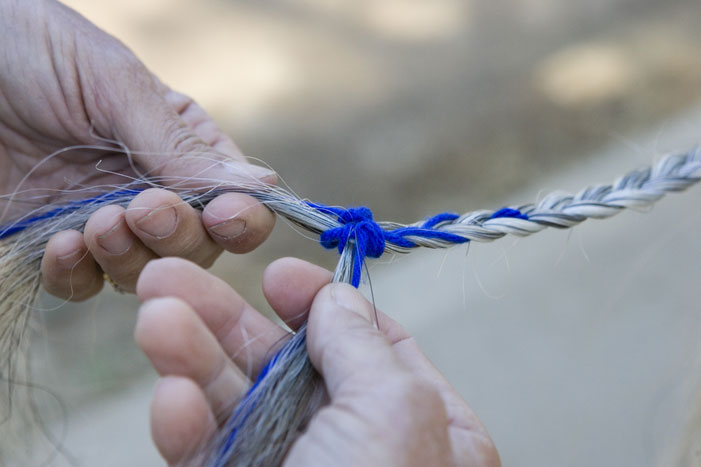
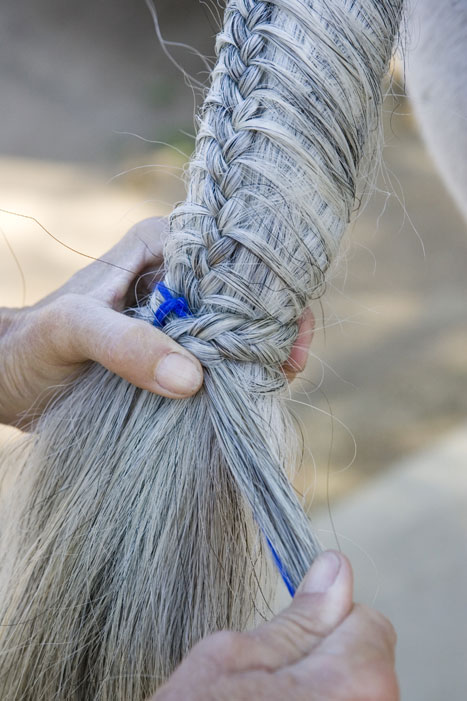
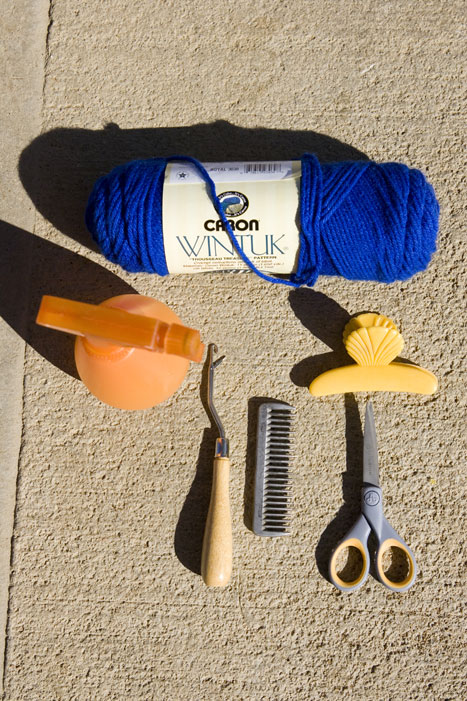 Dampen the hair at the top and all along the sides of the dock with a mixture of water and a styling lotion. You’ll need a piece of yarn about 24 inches long, a latch hook and a pair of scissors. Match the yarn to your horse’s hair. (Brightly colored yarn is a trend whose time is past, however, we’re using it here for illustrative purposes.)If your horse is tall, you’ll also need a step stool so that you aren’t accidentally pulling the hair downward as you braid. Pulling downward will eventually cause the tail braid to droop and sag. Instead, you want to hold each section of hair level as you plait it into the braid. |
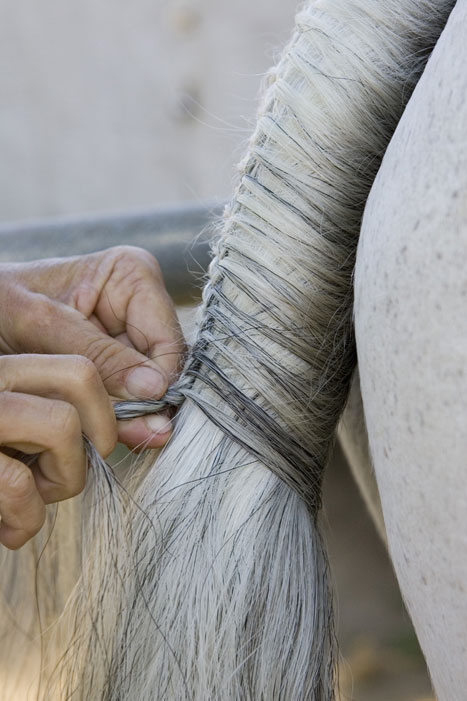
 Separate out three sections of hair at the very top of the dock. One section comes from the left side, one from the right side, and one from the center. Although the hair for the center section may be very short, especially if your horse rubs his tail, you can coax it into submission with extra styling solution. Separate out three sections of hair at the very top of the dock. One section comes from the left side, one from the right side, and one from the center. Although the hair for the center section may be very short, especially if your horse rubs his tail, you can coax it into submission with extra styling solution. |
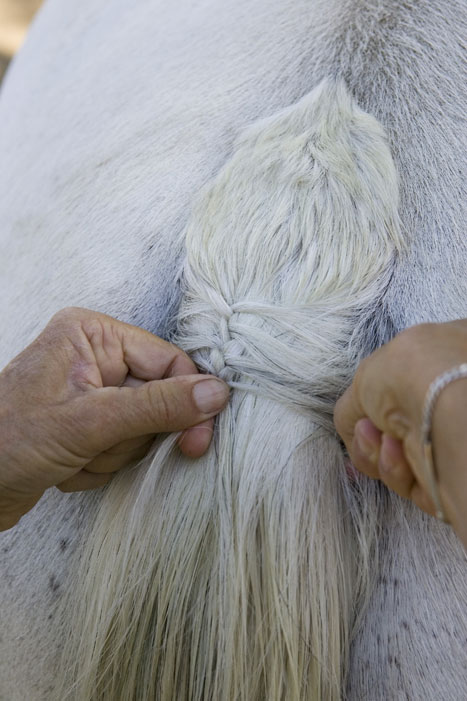 Using the three sections, begin your French braid. Using the three sections, begin your French braid. |
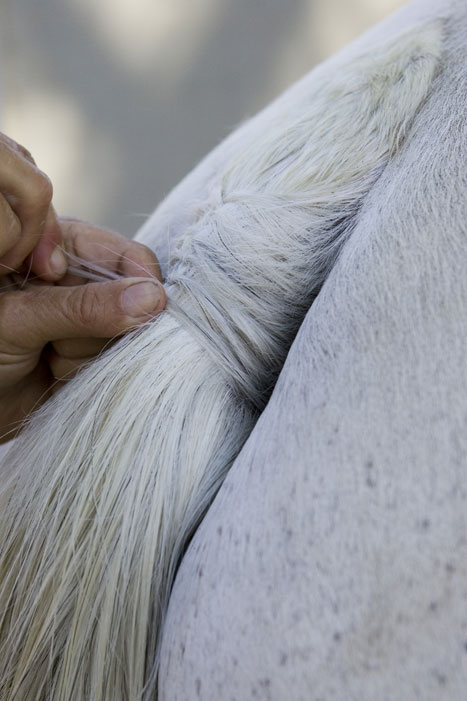 As you pick up hair from alternating sides to plait into the French braid, reach for hair underneath the dock. Only take a few strands at a time, or your French braid will become chunky and unmanageable. Press inward toward the dock each time you plait the hair together. This will help prevent the French braid from sagging away from the tail bone. As you pick up hair from alternating sides to plait into the French braid, reach for hair underneath the dock. Only take a few strands at a time, or your French braid will become chunky and unmanageable. Press inward toward the dock each time you plait the hair together. This will help prevent the French braid from sagging away from the tail bone. |
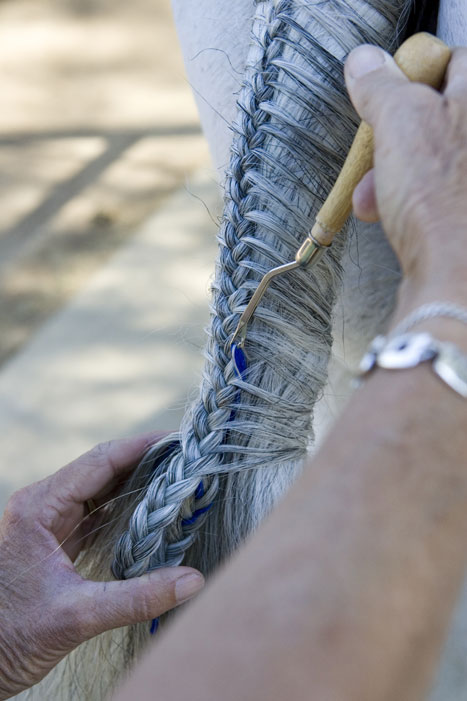
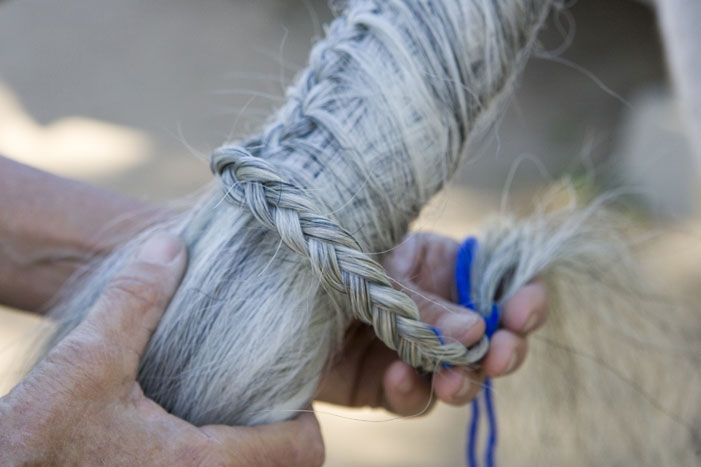
 Approximately two inches from the end of the tail bone, stop French braiding… Approximately two inches from the end of the tail bone, stop French braiding… |
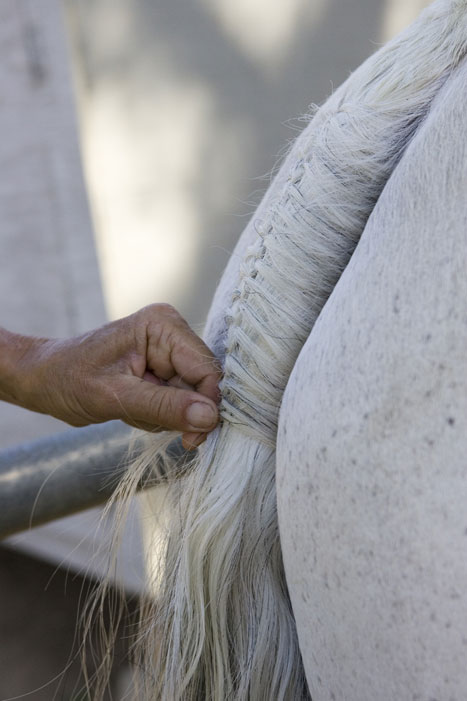
 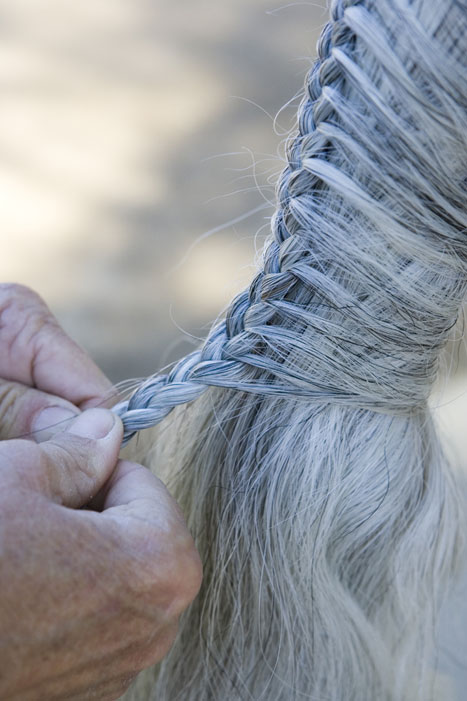 | …and incorporate the three sections of hair you hold into a simple “pigtail” braid, about six inches long |
 Fold your yarn in half and incorporate it into the braid and continue for another two inches before Fold your yarn in half and incorporate it into the braid and continue for another two inches beforeknotting it. |
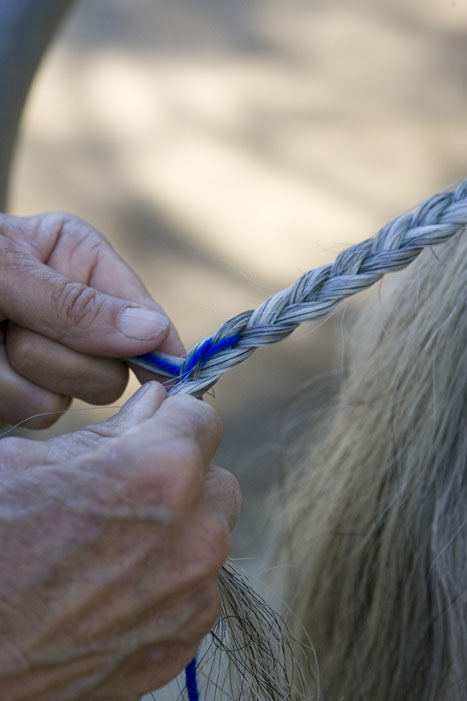
 For a secure knot, wrap both pieces of yarn around the bottom of the pigtail while forming a small loop with your index finger, then feed the yarn ends back through and pull taut, in a sort of half-hitch knot. For a secure knot, wrap both pieces of yarn around the bottom of the pigtail while forming a small loop with your index finger, then feed the yarn ends back through and pull taut, in a sort of half-hitch knot. |
Finishing Your Tail Braid
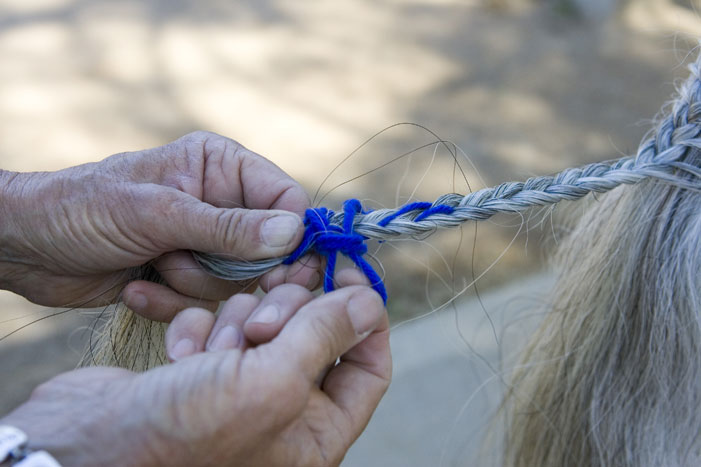
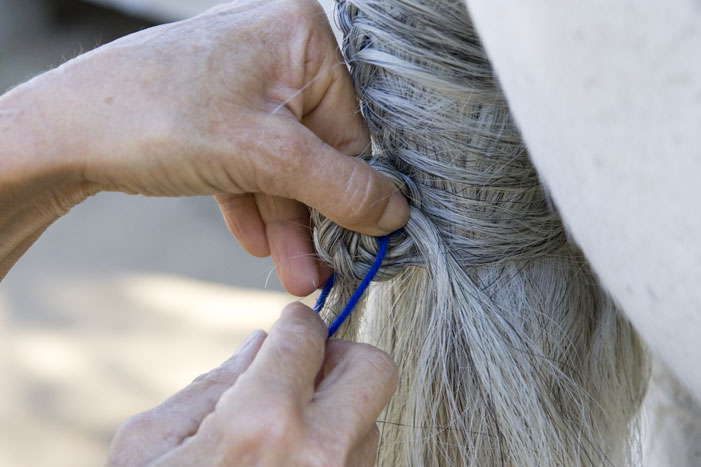
Grab the yarn tails and pull them through until the top of the pigtail is anchored beneath the French braid. Next, use your latch hook to take one half of the yarn and pull it through to the other side of the French braid.
| The Loop | ||
 The traditional way is to simply end with a demure loop. Insert your latch hook underneath the French braid, about two inches from the bottom. | ||
 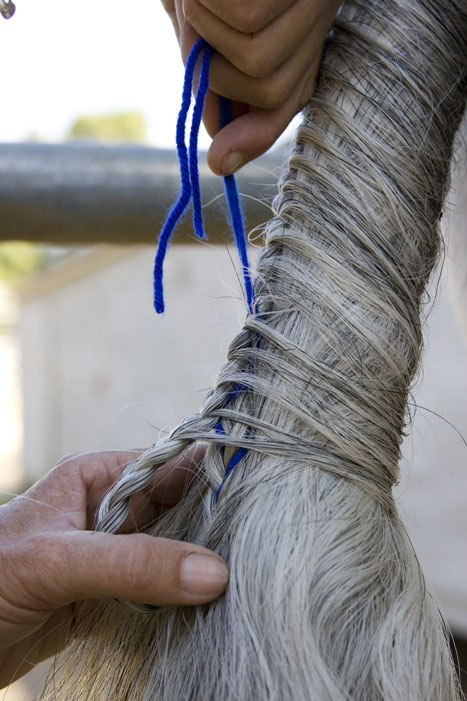 Grab the yarn tails and pull them through until the top of the pigtail is anchored beneath the French braid. Next, use your latch hook to take one half of the yarn and pull it through to the other side of the French braid. Grab the yarn tails and pull them through until the top of the pigtail is anchored beneath the French braid. Next, use your latch hook to take one half of the yarn and pull it through to the other side of the French braid. | ||
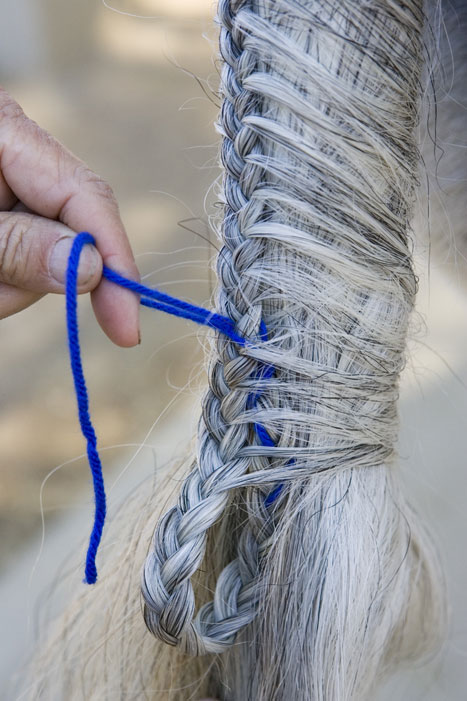 Finally, knot the ends on top of the French braid and snip off the excess yarn. |
| The Pinwheel | ||
 To create the stylish pinwheel, braid down into your pigtail; then split the hair into two equal sections, each one containing a strand of yarn. | 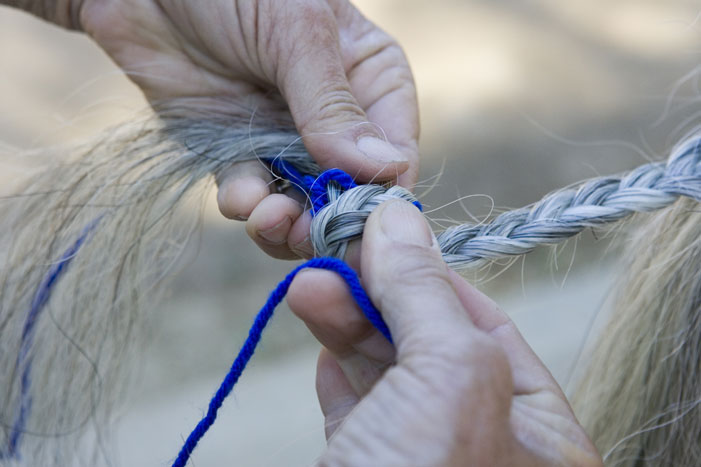 Roll the braid upward in a tight pinwheel, with each section of hair on either side of your coil. | 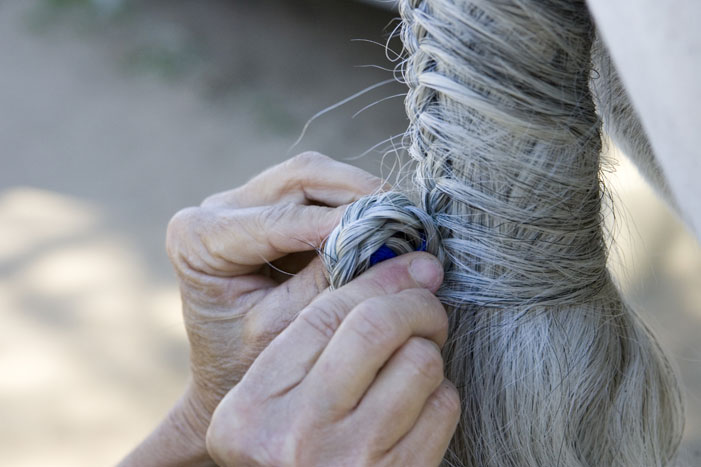 Continue rolling tightly. |
 Once the pinwheel is nestled against the French braid and the tail bone, find each piece of yarn and make a knot beneath the pinwheel. | 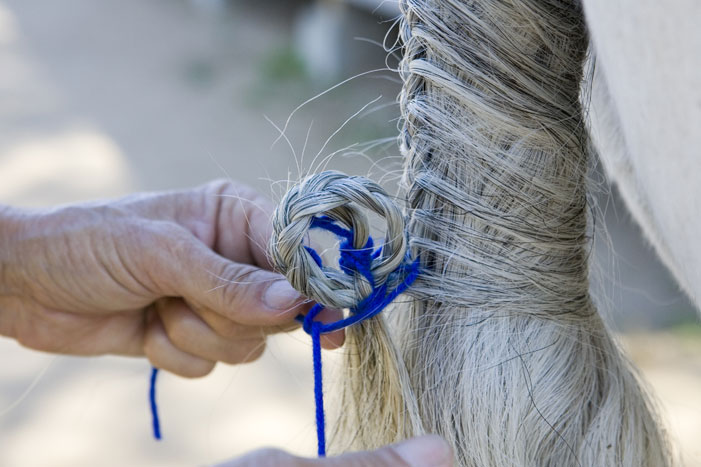 Then bring the yarn ends together above the pinwheel and knot again, right against the French braid. | 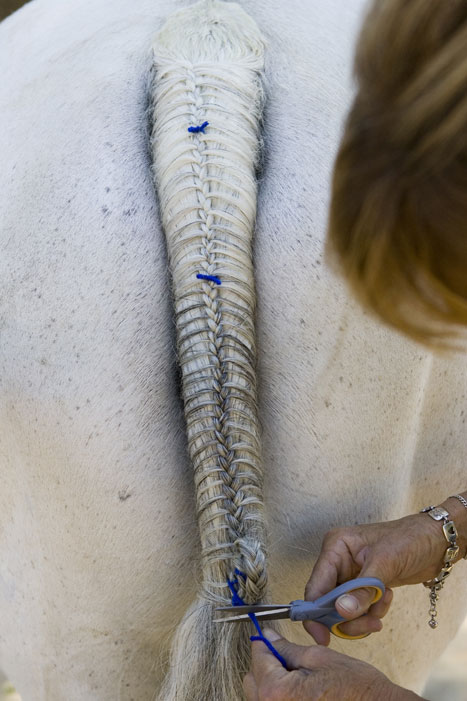 For some extra security, knot above and below the pinwheel a few more times. Snip off any excess yarn. |
| The Wrap | |||
 The most expedient finish is the trendy wrap technique. |  Wrap the pigtail braid once around the dock. | 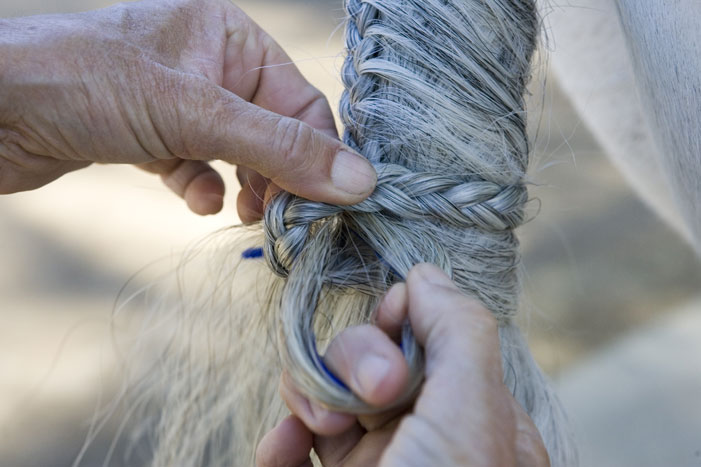 Tuck the end under the loop of braid, gently pulling any unbraided tail hair along. | |
| |||
 A Strong Finish: A Strong Finish:To help strengthen your French braid for a long day of showing, and to help it lie straight, pull through several short pieces of yarn under it and knot on top. This treatment also adds a little bit of subtle decoration. |
Need help with the mane? Don’t miss Managing Mane Braiding >>


The step-by-step photos make the words come to life so the braiding technique is much easier for me to understand. By the way, I also think English horses look so much more elegant braided and wish that it was seen more often!
What a nice step by step. I have long enjoyed Cindy Hale sharing wisdom with horses. And I agree that having good photos of the steps is great.
Wow! I could never braid like that…maybe now I can!
The article would be great but it only prints pg 1. on the print preview, it only shows pg 1 as printable. Please correct this as I would like to hang this in my barn for my 4-H kids….
This was very helpful, however, the pictures aren’t very clear and when I tried this, kept getting confuzed and really couldn’t figure out what some of the parts meant for you to do.
Hi great article but I have a question. Do you clip the top part of the horses tail? It looks like that has been done in the pictures. And if you do how far down do you clip. On my horses tails the hairs don’t even touch at the top.
Hello I think ur steps are easy to follow and I also would like to print them out but am having some trouble printing it out. could u help fig. something out?
thank you so much for repairing the printer problem. I have printed out successfully the step by step (to include illustrations) of the braiding section for my 4-H kids.
Again thank you, Marge
This was great!! I always knew how to do teh actual braid but I never knew how to finish it!! Thanks.
I think that the pics helped a lot, and the wording was wonderful. There were all beautiful, and I hope I can do some braiding real soon. I love to see it when people take the time and do their horses tails pretty. Thank you very much!
Thankyou so much for fixing it. The directins are easy to follow. Thankyou so much again.
That’s cool, I tried before and totally knotted up my horse’s hair.. now i can acutally braid it! Thanks
I think this is a very helpful article and I espicallt like the step by step photos, they are very helpful.
This is a good article but you should add one suggestion:
If your horse kicks, tie a red fabric ribbon tightly at the bottom of your braid. This warn others that your horse kicks and to keep a good distance away. It also gives you the security of knowing that your horse won’t have a chance to misbehave, in or at of the ring.
Very informative! Step by Step instuctions and pictures, thank you very much!
AWESOME! I was just struggling with tail braiding two days ago. Great step by step article!
Is there a easyer way to do this.
It was vaery helpful. since i am a first time braider it took me a couple tries but i soon got it and my horse and I won our divison thanks to this article.
I very much enjoyed the detailing of this article. I had not properly been taught how to braid the tail and this detailed info is great!!!
Thanks
These were great instructions and the pictures were wonderful (I’m glad you used a light colored animal) I am a professional braider & I have referred several people to your website!!
This was a great articale. THe pictures were excellent and it was very well written. Thank you so much for offering this. I can’t wait to go braid my horses tail…just for fun!
amazing pictures and directions! i would recomend this site to anyone!!
I’m going to try this soon. Thank you for posting this!
Great Info! I will be trying this this weekend!
Ah! Thank you so much. I had no clue.
I had no idea how
thanks so much — instructions were very easy to understand
This is amazing! i could never find any instructions that see so clear and easy to use!
The tips are awesome! I have a show in 2 weeks and I was thinking of braiding but I didn’t know how! Thanks !!!!!!!!!
Thanks some much I needed to learn how to braid for show season now I dont have to take the classes! This was so clear!I just loved it!
It really helped thnx. It was amazing
Well done! The illustrations and explanation were excellent!
thanks!!!! i always thought that you had to tuck it under. thats so cool with pinwheels and wrap arounds! thanks for posting
Just another friendly suggestion for horses who have shorter “starting hairs” at the base of the dock from rubbing or what-not, just braid two pig tail braids one on each side and be sure to braid a piece of yarn into the bottom. Then use the yarn as extentions of those braids to pull them into the start of your french braid. I find it much easier, but yes 25lbs of gel will do the trick too.
i would love to see a picture of what the wrap looks like completed
Thought it was very helpful. I’ll have to try it with my horse sometime.
Styling lotion? I’m not sure what that is, and the article begins by warning against detanglers. Can anyone give examples of the right stuff to use?
Brony!
good styling gels are QuicBraid and even just whipped egg whites. don’t put show sheen or conditioners in your horses tail, it makes it slick and hard to work with!
Its a really good idea to use the yearn/wool but i think that i peice of bailing twine pulled through the plait is easier to manage. I havent been showing heaps in the year but we have had to plait up for Pony Club musters, and i have also learned that if you are wanting to keep a horses socks white baby powder from the supermarket helps heaps!! Washing your horse the day before the show can also be a good idea. Plaiting a wet mane or tail is easier that one thats dry! (personally)
Very helpfull how-to instructions! I’ll try them with my pony sometime!Thx HC!
That looks really good! Nice job!
I am doing a talk for 4-H about horse mane and tail styles; and I need some cool stuff to fill it out. any ideas?
its very well explained and easy to follow. it would be even nicer if there was a video to watch as well, but certainly well done!
This is wonderful!!!!! Huge help! Thanks!
If you want to braid like a top pro, here is your most complete resource: http://www.luckybraids.com/pages/grooming-resource?firstcat=.category-12&hidenav=true&name=Beautiful+Braids
Grace, have you ever seen a Diamond Braid? It isn’t really a braid but it turns out really pretty and it is simple.