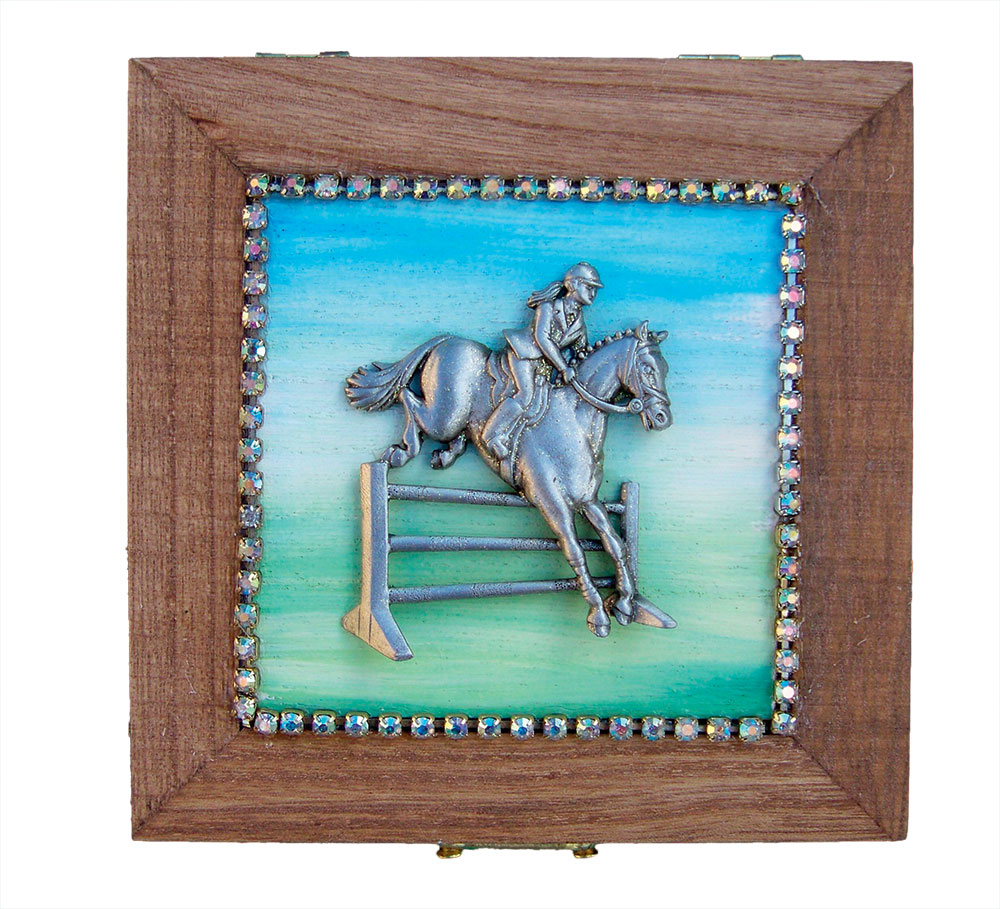
The inexpensive, small wooden boxes sold at craft stores can be easily transformed into a gift that’s both pretty and useful. Anything from earrings to loose change can be stored inside. They can also serve as a unique way to present a gift card. Although they can be decorated in multiple manners, I like to incorporate the costume horse jewelry I’ve been given by well-meaning but misguided friends and relatives. Somehow a ruby-eyed steed looks far better prancing around on the lid of a box than it ever would have pinned to my blouse.
Crafter’s Tip: Equestrian jewelry, from the fabulous to the “What were they thinking?” variety can be found at garage sales, thrift stores and on eBay. While you’re browsing for unwanted horse baubles, look for vintage rhinestone necklaces, too. They add respectable bling to craft projects. Snip the necklaces into more manageable, shorter strands with small wire nippers. Craft stores and bead and jewelry supply sources usually have mass-produced horse charms as well as beads and bling to incorporate into your creations.
Horse Lover’s Trinket Box
- Unfinished wooden box
- 1 piece of peel-and-stick felt
- Acrylic craft paint (1 or 2 pastel colors)
- Small jar of wood stain
- Sponge sticks and paint brush
- Roll of painter’s tape
- Horse jewelry
- Message or quote, printed on cardstock
- All-purpose glue (I prefer Weldbond)
- E6000 adhesive
- Trim: vintage rhinestones or tiny faux pearls
- Stamping pad (your choice of ink color)
- Q-tips
Directions: Cut, don’t tear, the painter’s tape into straight sections. Use them to completely cover the area on the lid where you’ll later paint and add your jewelry piece. Then lightly coat the rest of the box with stain, using a sponge stick. Wipe off any drips or excess stain with a paper towel. Let the stain dry, and then decorate the inside of the box.
For the (inside) bottom of the box, measure and then cut a small square from the felt. This will serve as a cushion for any trinkets that might be placed inside. Peel the paper lining from the back of the felt to expose the sticky side, and firmly press it in place.
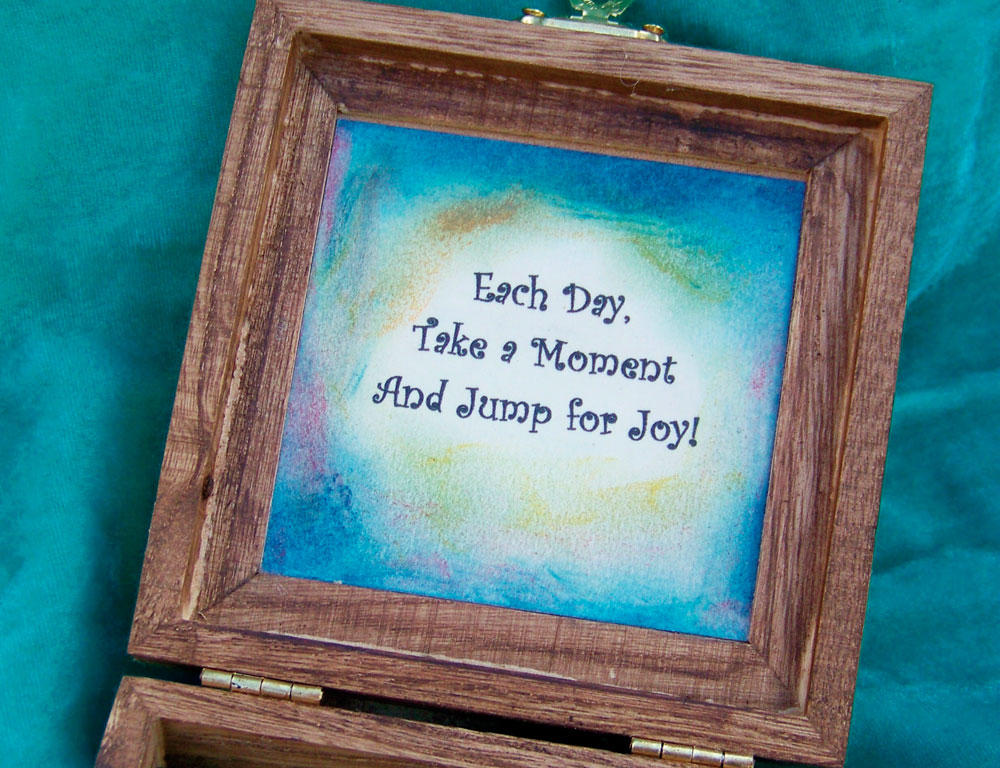
The inside of the lid will feature your brief message, printed on cardstock, which greets or inspires the recipient. To enhance the impact of your message, frame it in colored ink. Swipe a Q-tip several times across the stamping pad, then rub it along the edges of the cardstock; encircle your message with fainter hues. Then turn the small square of cardstock over and spread a thin, even layer of white glue from edge to edge using a sponge stick.
Quickly set your message in place on the inside of the lid. Press with your fingertips until you feel it’s secure.
The inside of the box will be dry in an hour and then you can start decorating the outside. Peel off the tape and paint a simple, subdued background for your jewelry.
While the paint dries, use small wire nippers to remove any loose hanger attachment or pin back from your equestrian jewelry; it must lie as flat as possible on the lid. Put a dab of E6000 adhesive wherever the jewelry contacts the lid, and then set it firmly in place. Use the same process with the trim so that your centerpiece is showcased.
You can admire your completed creation, but the E6000 needs 24 hours to fully set.