Does your horse seem clueless when you ask for a flying lead change? Then you have my sympathy. Whether your riding goals are connected to hunters, reining or other riding sports, few challenges are more frustrating than working with a horse whose flying lead changes are missing in action.
If flying lead changes have stymied your progress at home or in competition, consider the following tips, flatwork exercises and troubleshooting techniques. Hopefully they’ll help you and your horse find your way to flawless changes.
What Your Horse Needs to Know
Both horse and rider need to possess certain skills in order to perform a successful flying lead change. As a rider, you must be sophisticated enough to know which lead your horse is on without looking down, and be able to use hand and leg aids independently.
You and your horse need to be competent at riding and performing basic lateral movements, including turns on the forehand and leg-yields. You must be able to collect and extend the length of your horse’s canter stride—this is not the same as speeding up and slowing down.
Your horse must be able to track straight from head to tail; flex at the poll in response to pressure from the bit; be supple through the neck, shoulder and ribcage; move laterally away from leg pressure at all gaits; respond to your half-halts by collecting his stride and sitting back on his hindquarters; and balance around turns without falling in.
To really develop your feel and timing as a rider, work with an instructor who can teach you on a schoolmaster. These equine veterans will happily swap leads, but only when properly asked.
10 Tips to Teach the Flying Lead Change
Now that you and your horse are ready, use these schooling suggestions and exercises to help find those elusive flying changes.
1. Always make your session productive. Integrate circles, half-halts, and lateral movements into your routine so your horse becomes comfortable doing something more demanding than simply making laps around the arena.
2. Constantly practice simple lead changes, and don’t rush through them. Focus on a smooth downward transition. Keep your horse tracking straight for a few strides, and then ask for the new lead.
3. On the days you practice jumping or pattern work, use simple changes whenever a lead change is necessary. Don’t mix your swapping struggles into other activities.
4. Introduce the concept of flying lead changes to your horse by cantering a figure-8 pattern with simple changes in the center.
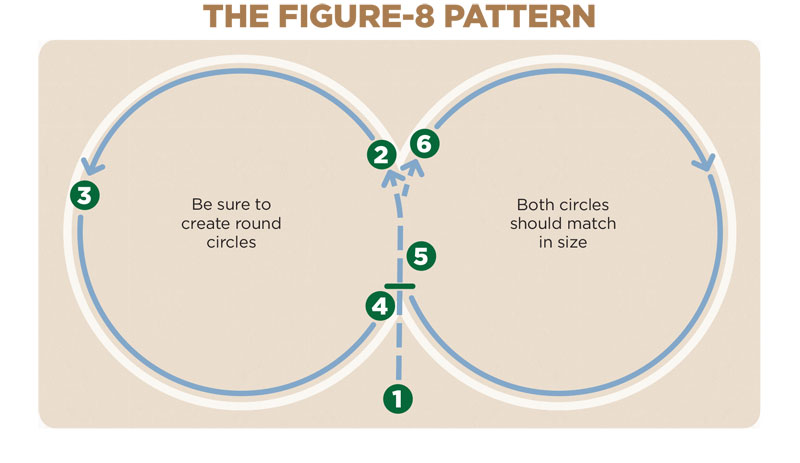
The Figure 8This is a basic pattern, yet you must use your aids consistently to perform it correctly. Cantering circles on the correct lead and transitioning through the center on a straight line teaches your horse that a new direction requires a new lead. You may start on either lead; this diagram starts to the left.
Use the figure 8 frequently, but be creative. Vary the number of circles you canter on each lead, and break up the left/right/left/right lead ritual, otherwise your horse will begin to anticipate the changes in direction and leads, and that’s a bad habit to develop. |
5. Every horse is more comfortable on one lead than the other. To help your horse become ambidextrous so he’ll eventually swap onto whichever lead you need, canter numerous large circles that are a bit bigger than a longeing circle. First canter to the right several times. After he’s been allowed to walk on a loose rein as a reward, reverse and canter several circles to the left.
6. The serpentine pattern is more advanced than a figure 8. The multiple loops or half-turns force both you and your horse to think faster in order to execute the simple lead changes at the correct time.
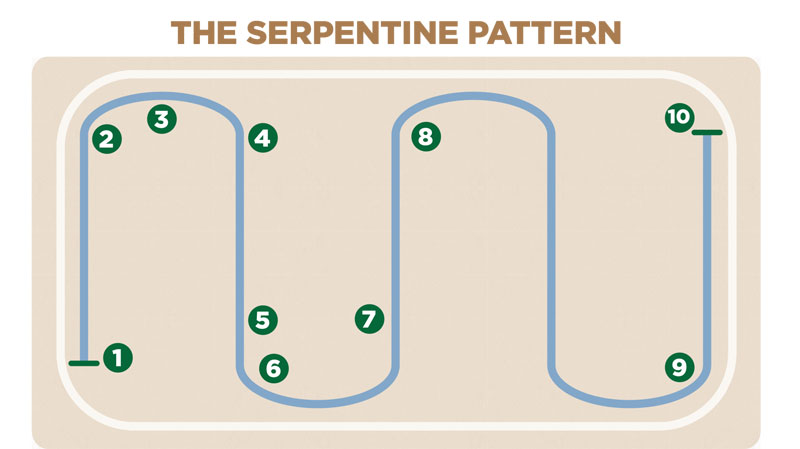
The Serpentine PatternAs its name implies, the serpentine pattern resembles a snake. Like the figure 8, your horse must rely on your aids while he changes directions; he also must remain straight through transitions. The loops or half-turns of the serpentine are much tighter than the circles of a figure 8. Plan your pattern wisely. Too many loops in a small arena will make you and your horse feel rushed. You can begin on either lead; this diagram starts on the right lead.
|
7. Are you certain your horse travels straight from nose to tail? Have your coach stand on the ground and watch you canter away on a straight line. If your horse is crooked, apply leg pressure behind the girth to press his haunches over and hold them on track. Flying changes require a straight horse.
8. Introduce the half-turn exercise, which requires your horse to canter straight on a diagonal line. Shaped like an ice cream cone, this exercise closely resembles a real-life flying lead change scenario.
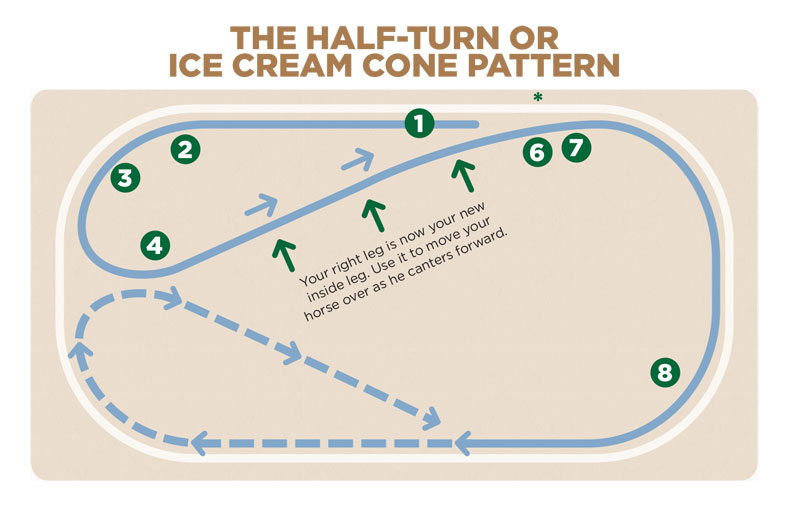
The Half-Turn or Ice Cream Cone PatternThis is the most advanced pattern of the three. Plus, it closely resembles the set-up and execution of a flying lead change. This diagram uses a left to right simple change.
|
9. Since communication is the key to achieving flying changes, what is your horse telling you? If he’s relaxed and compliant through these preparatory exercises, then it’s time to ask for flying lead changes. Revisit the three exercises in the diagrams using the cues listed in No. 10.
10. To go from simple changes to flying changes, all you’re doing is eliminating the trotting portion of the change. The only difference is that you want your horse to remain cantering so he changes his lead “on the fly.” Therefore, when you ask for a flying change, apply your aids just as you did when you asked your horse to depart onto his new lead when you were doing simple changes.
Keep your horse balanced and straight. When you feel in sync with his rhythm, half-halt and tip just his nose toward the new direction, using a direct rein. At the same moment, press your outside leg behind the girth to shift his haunches in the new direction. Don’t kick with your heel, but be emphatic. If you’ve prepared your horse properly you should be rewarded with a flying lead change. Congratulations!
This article originally appeared in the May 2015 issue of Horse Illustrated magazine. Click here to subscribe!


I sure am thankful for this article explanting lead changes so simple.
This is a a great article. I would add that on occasion doing your simple changes through the walk can help discourage a horse from thinking he’s meant to trot his lead changes.