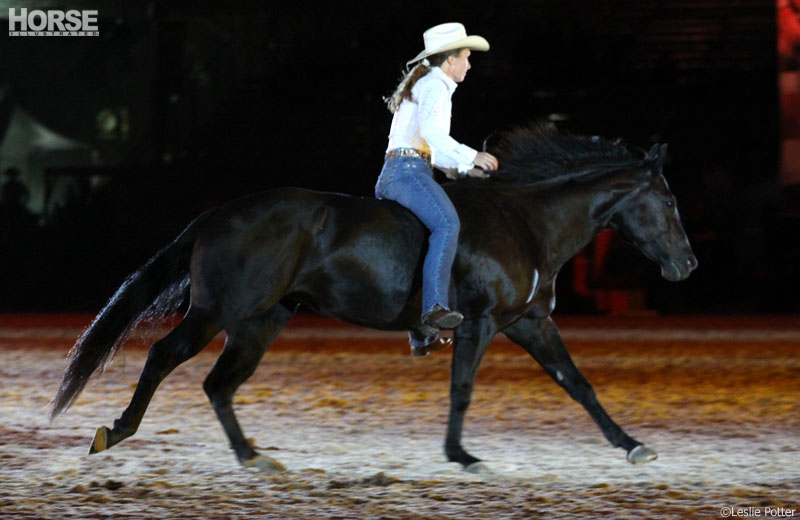
Stacy Westfall rides Roxy at the opening ceremonies of the 2010 Alltech FEI World Equestrian Games
Would you be able to stop your horse if he spooked and took off? “Most of us prefer not to jump off a running horse,” says reining champion Stacy Westfall. “Being able to stop is a huge part of being safe on a horse. For me, it also contributes to having a great ride. If I feel like I’m sharing the power and I’m an extension of my horse’s body, then it’s fun. If I feel out of control, it’s not fun.”
Making sure your horse has a solid whoa means more enjoyment and confidence for you as a rider. It also creates a foundation for performance stops, such as those required in the competitive reining arena that has made Westfall and her horses so famous.
Westfall teaches her horses to whoa four different ways: with one and two reins, with leg cues and with a verbal cue. Each of these methods should work independently of the others.
“I can use the reins without the other aids and my horse will stop,” says Westfall. “I can release my legs without saying ‘whoa’ or using the reins and my horse will stop and back up. I can also say ‘whoa’ without releasing my legs or pulling on the reins, and my horse will stop and back up.”
One-Rein Stop
The one-rein stop is like an emergency brake that stops your horse by steering him. “It’s a technique you should have available at any time,” says Westfall. “You don’t want to practice it every day, but you should know how to do it.”
This stop relies on the rider’s ability to pull the horse’s head to one side while pushing his hips to the opposite side. This causes the horse to plant his front feet and stop his forward motion. To teach your horse the one-rein stop, start on the ground, following these steps:
- Stand on the left side of your horse as if you were going to mount.
- Holding the left rein in your left hand, draw his head around to the left until his nose touches the saddle. If your horse is stiff, ask him to bend an inch or two and then release, gradually working all the way to the saddle.
- With his nose touching the saddle, he will probably walk in a circle around you. Release his head as soon as his feet stop moving.
- Once your horse consistently stands still when you ask him to, challenge him by asking him to move his hips away from pressure, pressing his side (where your heel or spur would touch) with your right thumb as you draw his nose to the saddle. Later on, when you’re repeating this exercise while mounted, it creates a turn on the forehand and prevents him from going forward.
- As soon as your horse steps away from the pressure with his hips (watch his hind legs for movement), release your thumb and the rein pressure.
Saddle Up
When you and your horse have mastered this on the ground, try the exercise mounted:
- At the walk, slide your hand down the left rein, and gently but firmly pull your horse’s head around to your left leg.
- When your horse freezes his feet, release his head. If he doesn’t stop, use your left leg to disengage his hips by pushing them to the right.
- When he stops, release his head.
- Challenge your horse more by trying this exercise at the trot.
- Take his training one step further by asking for the stop as he passes something scary.
“Sometimes people feel like they’re being mean by drawing the horse’s head all the way around to the saddle,” says Westfall. “But if you have ever watched a horse bite at flies, you’ve seen that he can comfortably reach his sides with his mouth.”
Two-Rein Stop
While the one-rein stop provides an emergency stop, the two-rein stop can help you slow, stop and back up under any circumstances. Even pressure on both reins encourages your horse to remain straight during the stop, which is necessary for advanced maneuvers. It also helps improve your horse’s ability to use his hindquarters well.
Try the following exercise at the walk:
- Pick up both reins and gently take out the slack, holding about 1 pound of pressure on the reins without jerking them. Take one hand and make a circle around the reins with your thumb and pointer finger at the withers (like making the OK symbol but keeping the rest of your fingers level with your index finger). With your other hand, slide the reins through the circle. This will help you pull the reins smoothly instead of jerking them.
- Hold the rein pressure evenly until your horse slows his feet, stops and takes a step back. Keep your body still and don’t use any verbal commands.
- Immediately release the pressure when your horse takes a step backward to reward him.
- Repeat until your horse anticipates the back-up as you take the slack out of the reins. Challenge him by repeating the exercise at the jog.
If you ask your horse to whoa but he hesitates and then steps through the aid, use both reins to ask your horse to fully stop and take a step back. Don’t let him get in the habit of doing a rolling stop.
Stopping with Leg Cues
Whether you’re aware of it or not, you use cues with your body every time you ride. Intentional body cues, however, make the most of your horse’s ability to anticipate your requests. Your legs, for instance, can communicate a lot more than just “go faster.”
“I got a letter once from a customer who had been teaching her horse leg cues from one of my training DVDs,” recalls Westfall. “One day, her horse rubbed his bridle off on a gate and started heading for the barn. Using the leg cues that she had learned, she asked her horse to stop. She had another way to communicate with her horse and was able to safely hop off.”
In order to teach the whoa with a leg cue, your horse must already know the two-rein stop. Try the following steps:
- While mounted but standing still, put your reins on standby—no slack, but don’t pull either.
- Extend both legs forward and gently bump your horse’s shoulders with your feet or the sides of the stirrups. Resist the temptation to lean back, which interferes with your horse’s balance and can keep him from stopping correctly.
- Continue bumping for 2 to 3 minutes or until he tries to move. Keep your hands still.
- If he moves back, give with the reins and let your legs hang quietly; that’s his reward. If he walks forward, use the reins to ask him to stop, but keep bumping with your feet.
- When your horse backs up, stop the bumping and slacken the reins.
According to Westfall, most horses figure this out within one ride, even if they are only backing up a little bit. The key is to get to the point where you can wave your feet without needing the reins on standby. After you’ve mastered this at the standstill, try it at the walk, and then at the trot or lope. Your horse will begin to anticipate your leg cue, and you won’t even get to the bumping stage. At that point, you can use the leg cue for downward transitions, such as going from an extended trot to a jog, without the reins.
Verbal Whoa
“I save the verbal whoa for after I’ve taught the rein and leg cues because it’s the only one of the three ways that can’t reinforce itself,” says Westfall. You can keep tapping with your legs until your horse does what you’ve asked, and you can keep applying pressure with the reins until he backs up. However, with the verbal whoa, even if you say it louder, it’s still just “please stop.”
Follow these steps to introduce the verbal whoa to your horse:
- At the walk, rest your hands on the saddle to keep yourself from pulling on the reins while you give the verbal aid.
- When you want to stop, say “whoa” in a deep, low voice. Elongate the word to differentiate it from the rest of your speech.
- Wait three seconds. Don’t skip this step because it’s important to give your horse a moment to think about your request.
- If your horse doesn’t stop, take the slack out of your reins and make him back up five steps and stand.
- Stand for 2 to 3 minutes. Another option is to briefly stand, then turn and ride in the opposite direction. This way, your horse learns to anticipate the stop, and it keeps him guessing as to when and where you will ask him to move forward again.
- Repeat the exercise until you don’t need the reinforcement of the rein aids.
If you have four separate ways to ask your horse to stop, you have a much more sophisticated way to communicate with him. You also have a lot more control when the unexpected happens, not to mention a much greater chance for a safe outcome.
Further Reading
Go Forward
This article originally appeared in the April 2010 issue of Horse Illustrated. Click here to subscribe.


like this article
Thanks so much for a great article and awesome tips! Reading this article was definaantly worth my time!!
Great advice. I need to teach my horse some of this. I’ve done the one rein stop on a number of emergency situations but he’s very strong and he sometimes comes off balance so much that I think he’ll fall! Learning it on the ground first is a great idea.
One question though, why do we want the horse to step backwards after stopping? Why not just stop? Or is this particular to Western practice?