 Who would have thought negotiating an obstacle course could draw so much attention or be so much fun? Across the country, at shows both large and small, more and more riders are entering trail classes. Many of these riders find that trail is less “political” than other classes, and that it offers an excellent opporunity to highlight their horses’ abilities. At some of the bigger shows, in-demand course designers are flown in to create the challenging courses that often draw in excess of 50 entries.
Trail Competition
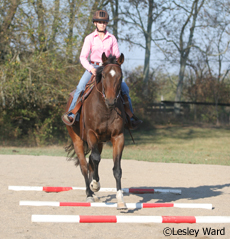
“The trend is that trail is getting more popular,” says trainer, coach and competitor John Briggs. “We’re seeing an increase in entries all the time.” John and his wife, Jill, of Briggs Show Horses in Pilot Point, Texas, work as a team training youth and amateur riders for competition. John shows in western all-around events, including trail, western riding and western pleasure, with a strong focus on trail and western riding. One of the more demanding obstacles in the trail class can be the lope-over. A lope-over is defined as a pole or set of poles that are spaced between 6 to 7 feet apart or increments thereof, and may be elevated up to 8 inches high. The number of lope-overs per class largely depends on the course designer. Some classes may include just one lope-over pole, while others can have more than two dozen poles.
“The lope-over is a big challenge,” John says. “Back in the 1970s and ’80s, a lope-over consisted of maybe four to six poles that were elevated. It didn’t matter how the horse loped, you just didn’t want to hit the poles. A lot of bad movers were in trail because they couldn’t do pleasure. Now you’re looking for an almost pleasure-style horse doing trail. This makes the lope-over one of the most important parts of the trail course. You want a good-moving horse and a well-cadenced pace in negotiating the lope-over. It’s a challenge to achieve.”
There are usually six to 10 obstacles in a class. Each obstacle, which is also considered a maneuver, is scored on how the horse negotiates the maneuver itself and any penalties incurred while going through the obstacle. On the score card, the judge scores maneuvers in one box and penalty points in another box. Scores for each maneuver can range from plus 1.5 (excellent) to minus 1.5 (extremely poor). Penalty points vary, depending on the severity of the penalty. For example, breaking gait over the poles would incur a minus 3 penalty, which would be noted in the penalty score box. Because breaking gait also affects the overall negotiation of the obstacle, the judge would also likely put a minus 0.5 penalty in the maneuver score box for that obstacle.
Zero is considered an average score for each obstacle or maneuver, while 70 is considered an average score for the entire course. Competitors start the class with a score of 70. The score goes up or down from there, depending on how well the horse negotiates each maneuver and any penalty points incurred. Penalty points are subtracted for specific faults, such as ticking the pole (minus 0.5 point), hitting or stepping on the pole (minus 1 point), knocking down a pole (minus 3 points), breaking gait (minus 3 points), et cetera. While it can be hard to decipher between a “tick” and a “hit,” technically, a tick is a very light hit, while a hit is a harder hit and makes more noise when the horse connects with the pole. There is no real penalty for change of pace, John notes, but this is undesirable simply because it will negatively affect your execution of most obstacles. The final score is tabulated by deducting all the minus points and adding all the plus points for all the obstacles. A very good score at a top show could range from 74 to 78.
Approach is Critical
“I think approach is the most important part; it needs to be just right,” says John, who stresses the value of developing cadence and rating the first pole. “The horse needs to rate the first pole right because this starts the configuration of the whole lope-over.” “Rating” the pole means that the horse acknowledges the pole a few strides away and looks at it to adjust his striding as he approaches the pole. One obstacle might consist of several poles, and a rider might have to make two passes through. Because the obstacle may be designed with different spacings between the poles, it is helpful to know how many strides your horse should have in between.
“I encourage my riders to count their strides when they’re practicing,” John says. “I want them to be able to tell me if they got the strides correct. You know this by measuring the distance between poles and knowing how many strides your horse should have in between.” John finds that beginner and intermediate riders are usually more concerned with keeping the horse loping and on the right path, and often don’t know if they got the right number of strides in. He urges his riders to use a tape measure to mark 6 to 7 feet, and then walk it off in their own steps. “This way when they’re practicing and setting another pole, they will know how many steps equal 6 to 7 feet.”
Can the size and stride of your horse make or break your lope-over? This really depends on the configuration of the lope-over and how well the rider knows the horse and the horse’s stride. “A big, long-strided horse is going to have a hard time shortening, but I’ve seen small-strided horses also have trouble when the poles are set closer to 7 feet apart,” John says.
One way to definitely improve your show-ring performance is to take advantage of walking the course whenever this is allowed, John notes. “This allows you to step off the paces and know the distances so that you know where to place your horse during the lope-overs. It’s very important to do this if the show allows it because this is where you really learn.”
Trail courses will vary according to the level of challenge. For example, poles in the lope-over can’t be elevated in Novice classes, and the configuration in the lope-over will typically be easier than in other classes. In Senior trail, Open rider, and often in Amateur and Youth ages 14 to 18 classes, you will find elevated poles and tighter, harder turns in the lope-over configurations.
John stresses that a critical part of executing the lope-over is your visual focus. It’s natural to want to look down at the poles, but you need to train yourself to look up and ahead to where you’re going next. “Focus on where you want to go. If you look down you won’t see the path ahead of you, and where you look affects where your horse goes,” he explains. “Your hands and legs coordinate with where you’re looking, so your visual focus is important.”
Lope-over Exercise for Beginners
Whenever John is creating lope-over exercises for beginners, he uses a single pole on the ground and builds from there. This is the place to start if you’ve never tried a lope-over or if you aren’t confident you’re doing it correctly. Emphasizing the approach is key to successfully negotiating any obstacle: John coaches his riders to work on maintaining a steady pace and cadence as they approach the pole. Always practice the approach on both leads, too.
“You don’t want to speed up or slow down as you approach,” John cautions. “Practice loping in a circle over one pole and concentrate on achieving a steady, even pace and cadence as you approach and after you go over the pole.”
Sometimes a horse will try to jump the pole. This can be because he is new to lope-overs, but often it’s because he’s loping too slowly. If the horse doesn’t have enough pace to lope over the pole evenly, he’ll find it easier to just hop over it.
“I see this a lot when the horse is just learning and has a beginning rider,” John says.“If this happens, you need to get the horse to ‘step into the bridle’ by applying more leg pressure while holding the reins evenly to make him step into the bridle while he’s loping. The best choice is to lope around a bit and get the horse stepped up in the bridle and then go over the pole again.”
Only after your horse is consistently loping over one pole smoothly and evenly should you add another pole. Remember, poles should be spaced in 6 to 7 foot increments.
Exercise for Intermediate Riders
You’re ready to move on to these exercises once you have conquered the lope-over with one or two poles. Your horse should know how to rate the first pole well, keeping his gait smooth and maintaining an even cadence. At this stage, John will make a longer configuration out of the lope-over, using four to six poles total. Set up the poles with a slight curving configuration. Your goal is to learn how to keep the same rating and cadence as you mastered going over just one or two poles in a straight line.
To start, lope over the poles and then move away from them and continue to lope in a circle. Make sure your horse is loping evenly and smoothly before guiding him back over the poles again. “A lot of intermediate riders are still in a hurry to do their obstacle,” John explains. “I’ll see a lot of riders go into an obstacle well, but then adrenaline takes over, and by the time they get to the last pole they’re speeding up. You have to work at getting back to a slower cadence, and it takes time away from the poles to do this. It’s important that your training isn’t always over the poles.”
John points out that many novices fall into this category and want to do poles over and over again. “You need to step back and just do some adjustment of the lope itself, and then go back over the poles.”
Once you and your horse are comfortable negotiating a curving lope-over of four to six poles flat on the ground, you’re ready to increase the difficulty of the exercise. Now’s the time to start introducing one or two elevated poles.
“You need to start learning how the lope feels over an elevated pole,” John notes. “The horse will pull his legs up harder when going over an elevated pole, so the rider needs to learn this feeling since this affects the rhythm. If a rider isn’t prepared, he or she can fall forward, which can make the horse stop or break gait, and it’s is a huge penalty.”
In actual competition, poles can be elevated 4, 6 or 8 inches, with 8 inches being the highest allowed. Start by introducing an elevated pole at 4 inches. If you want to have a higher pole, make sure it’s not the first pole the horse will encounter in the lope-over. For example, elevate the first pole 4 inches. Have the next four poles on the ground, and elevate the sixth pole 8 inches. Make it easier on yourself and your horse by introducing elevated poles gradually. Practice until you can negotiate the lope-over with two raised poles evenly and smoothly.
Exercise for Advanced Riders
Before moving on to these exercises, you should be able to easily perform the intermediate level tasks above. For advanced riders, John will set up a configuration of two lope-over obstacles containing some elevated poles set at varying heights. He designs the exercise so that it requires a lead change between the two obstacles. For example, the rider negotiates a left lead lope-over obstacle, and then changes leads in a small area and goes into a right lead lope-over obstacle.
To add additional challenge, vary the order of elevated poles and change the heights. Elevate the first pole to 8 inches and then have the fourth pole at 6 inches. Then change the order and the height of the poles.
Again, John encourages his riders not to overdo the pole practice and instead include training sessions without the poles. “This is what I’ve found makes the most progress,” he says. “If you’re starting to have problems and the horse isn’t listening to your cues or is having pace problems, it’s not going to improve as you go over a pole. Your horse will get slower or faster or lose cadence. So you need to go out of the poles and work on getting things even again, then go back to the poles,” John says. If you’re fighting pace at the same time you’re trying to go over poles, the tendency is for things to get worse not better.”
Make sure your cues are clear and that your horse is listening before trying to work over poles. Practice flying and simple lead changes so that you and your horse are in sync. Practice loping over the poles and then move off to an open area to work on your lead changes before returning to the poles again. For advanced riders, John will often set up poles in the different shapes encountered at shows, such as fans, boxes, dragonflies and diagonal lope-overs. Many of John’s students practice obstacles they had trouble with at a recent show by recreating them at home.
Poles at varying heights, lead changes and different configurations can definitely make the lope-over one of the most demanding obstacles in the trail class. But, as John points out, that’s part of why today’s trail classes are so popular. “Riders know they can practice and get better.”
Read more lope-over dos and don’ts >>
Cynthia McFarland is an Ocala, Florida-based freelance writer and horse owner whose latest book is The Foaling Primer.


Very interesting, please put in more like it
good information. thanks!
This was very helpful.