Training your horse to maneuver through and over various western trail class obstacles will also teach him to calmly negotiate many, if not most, natural obstacles found out on the trail. As a bonus you’ll discover that your own horsemanship skills will sharpen, which in turn will fine-tune your horse’s response to cues.
“We like to start all of our young horses on trail class obstacles as soon as they are riding quietly in the arena. It teaches them to steer and keeps them from becoming bored by riding only on the rail,” say top Appaloosa World Championship trail class competitors, Tom and Phyllis Kirby of Chuluota, Fla.
Trail Class Obstacles
If you plan to show within a specific breed association, the best place to begin is to read the show rulebook of your particular breed so that you’ll know exactly what type of obstacles to expect. Each association rulebook will normally provide a list of both mandatory and optional trail class obstacles. From this list the show committee will typically select six to 10 obstacles.
Generally speaking, most shows will require you to traverse a bridge, ride at a designated gait over at least four poles, open and pass through a gate, perform a side-pass and complete a back-through. Other often-used obstacles include a box, a serpentine, a water hazard, removing an item from a mailbox, putting on and taking off a slicker, ground tying, carrying an object from one point in the arena to another, dismounting and leading your horse through an obstacle or clearing a small jump.
Setting It Up
To put together your practice trail course you’ll need to gather together a few items.
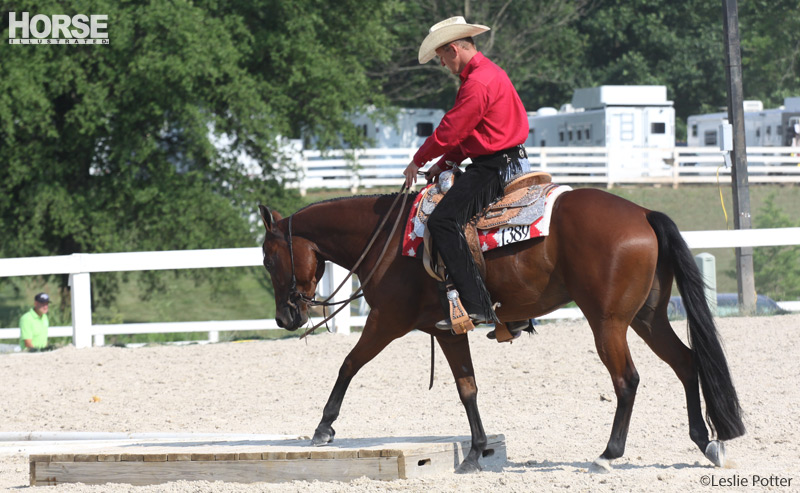
To start off, you’ll need something that will represent a bridge. This might be as simple as a sheet of 3/4-inch outdoor quality plywood, or as fancy as a raised plank bridge with rails constructed out of 2 by 6 inch boards. However, as nice as a raised bridge might be, it’s usually best to start your horse off with a plywood bridge laid flat on the ground, graduating to a more complex bridge as your horse progresses.
Building Bridges
You will find that you can have two bridges within a single sheet of plywood. On one side of the plywood brush on a brightly colored coat of paint, perhaps accented with vivid stripes. Then flip it over every so often. Such a basic change as this may not seem like a big deal to you. But to your horse, it just might look as though you’re asking him to walk off the edge of the earth.
Next you’ll need to amass a number of poles. To start off, 12 poles will be sufficient, though you may want to add more as you and your horse progress in training.
Versatile Poles
When putting together your practice course, you’ll find that the pole is probably the most versatile trail element of all. The back-through, step-overs, the box and the side-pass obstacles are all, by and large, assembled out of poles.
“Poles may also be added to existing obstacles, such as the bridge or gate, to boost their difficulty. But there are specific rules about how high they can be elevated, and if elevated poles are used some obstacles must be widened to make them negotiable,” explains Tom. “Elevated poles must also be secured in some way so that they do not rock or roll if touched.”
Read on for advice on practicing lope-overs >>
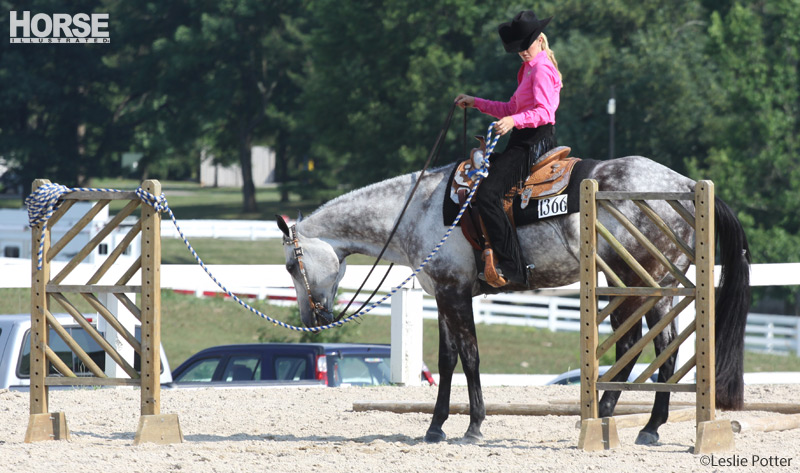
Gates
The last major item is the gate. If your arena gate is easy enough for you to handle from the back of your horse, by all means feel free to use it as part of your practice course. However, be sure that it’s safe to handle while mounted. There should be no sharp edges that could cause injury if your horse bumps into the gate.
Even if your arena gate is suitable, setting up a basic rope gate is also beneficial, as you might run into such a gate at a show. The rope gate is constructed out of two uprights or jump standards. Space the uprights 6 to 8 feet apart, and then fasten a length of rope to one of the uprights. Tie a loop in the other end of the rope so that it will easily drop over the top of the second upright. A wooden dowel or peg set into the upright approximately 6 inches from the top and sticking out a couple of inches will prevent the rope from sliding too far down the post.
Tom advises to practice gates from both directions, left and right, and even occasionally back through.
Read on for more advice on practicing gates >>
Optional Obstacles
A number of cones are useful to have on hand. You’ll use them for serpentines as well as different variations of back-throughs. You don’t have cones? With a little ingenuity you can fashion markers out of many items you already have at home. For instance, medium-sized plastic plant containers will work fine. Just stabilize them with dirt so that they won’t blow away in the first big wind. You might even plant flowers in the pots for a little added color. Old paint cans or small paint buckets will also work well in place of cones. Use the last of your paint to give them a bright new look.
You’ll need additional things for your optional obstacles, so it’s time to bring out the true scavenger in you.
Be sure to include common items such as a mailbox, water box, slicker, saddlebags and tarp or a lariat on your list. While it’s always nice to use the real thing, you may want to use substitutes for those you don’t have. For example, a simple box may take the place of a mailbox, a cotton longe line for a lariat, and a piece of heavy plastic will pass for a slicker.
Don’t forget to include items that produce horse-spooking noises. You never know when you might be required to blow on a whistle or be faced with the challenge of picking up a trash bag of noisy aluminum cans. Be inventive and have fun with it. The more things you introduce to your horse, the better prepared he’ll be, either out on the trails or performing in the arena trail class.
Putting It All Together
Now that you have your obstacles, how do you go about putting it all together?
“For ideas, we save trail class patterns from shows,” Tom says. “Phyllis has a book of them from the Appaloosa World and National shows for the last five years. However these patterns are generally three times longer than what you’d find at your local horse show, and most home arenas wouldn’t hold them. We just use parts of these courses to practice on.”

Dare to Challenge
In the beginning, practice difficult maneuvers such as backing, side-pass and turn on forehand or haunches well away from the trail obstacles. These exercises are complicated enough without the interference of added stumbling blocks.
“To start a new or young horse on trail obstacles, begin with the simple ones first. Maybe just a walking over a pole,” Phyllis says.
Set up a few basic trail obstacles, but keep it simple. In other words, start with a single pole to side-pass over, slowly working up to more complex patterns, such as the “T” or “W.” Demanding too much of your horse too early on will only serve to discourage him.
“The worst thing to do is scare your horse. If your horse is uncomfortable with an obstacle, go back to something else until he’s bored stiff with it. Then try the new one again. For example, walk through the dry water box many times before you try walking through it with water in it,” Phyllis explains.
Each time your horse is able to handle the task at hand, change the obstacles so that there’s a reasonable amount of challenge in it. However, be sure to fairly evaluate the degree of difficulty. A slight challenge to you may in fact be an overly frustrating task to your horse.
Keep it interesting and avert anticipation by altering the obstacles as well as the pattern. You might even practice your trail course from either end. Begin a practice session with the gate one day, then the next time you might finish with the gate.
“We change our practice pattern often,” Phyllis says. “Even if we don’t move the obstacles every time we practice, we never practice it in the same order. Horses learn by repetition, and we don’t want them to learn a pattern. We only want them to learn how to think their way through an obstacle.”
“Repeating a pattern over and over will allow your horse to anticipate. This will get you into trouble when your horse begins to think he knows the pattern better than you,” Tom adds.
While practicing at home it’s always a good idea to stop your horse at any point when working an obstacle. A hesitation of a few moments before signaling him to continue will teach him to be patient.
“Some horses are anxious to please while others just want to get it all over with. In either case, they will start to rush and that usually results in ticks and knocks,” Tom says.
Training your horse for western trail class is not only challenging, it can be very rewarding. As you and your horse progress, you’ll be amazed at how truly maneuverable your horse actually is. You may also find that it has enriched your relationship with your horse.
Find the correct dimensions for your trail obstacles.
Kim and Kari Baker raise Appaloosas in Montana.


Great article! Thanks!
So much to do, so I better get started. But it is a lot of great information.
This is an awesome article, thanks 🙂