Enter our 12 Days of Christmas Giveaways here!
0 ITEMS
  • My Account
  • Holiday Gift Guide
  • Podcast
  • Webinar
Subscribe Combo
Enable cache13
Home Blog Page 1053

Softening a Horse’s Hard Mouth

6

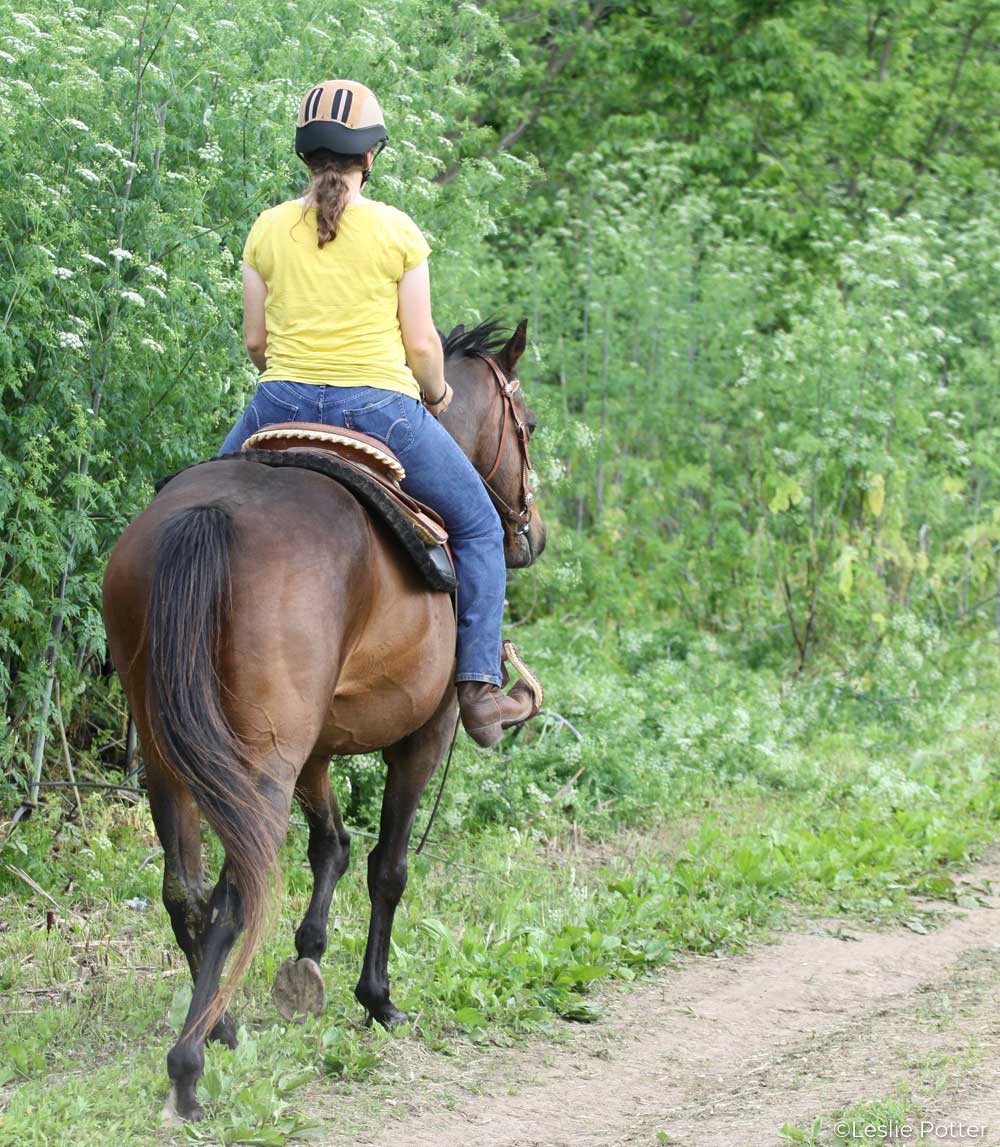
We’ve all experienced it: a horse that won’t give to the bit, pulls back when you ask for his head or just completely ignores your rein cues. Horsemen have a term for this syndrome—hard mouth.

The term “hard mouth” conjures up images of a horse with concrete jaws and steel gums, bracing himself against a skinny little bit that has no hope of making an impression. In reality, the syndrome of a hard mouth is less of a physical issue and more of a psychological one. Horses with hard mouths have simply learned to resist the bit.

“A horse’s natural reaction to pressure is to resist,” says Courtney Meitz, a reining and cutting horse trainer at Willow Glen Equestrian Centre in El Cajon, Calif. “A hard mouth usually develops when we fail to teach the horse to give to pressure, and he gets used to pulling against the bit. Many people go to a more severe bit to control the horse, and pretty soon that one is not strong enough, either. A stronger, more severe bit is only a quick fix, with very limited effectiveness because the horse becomes more and more resistant to it. The horse and rider end up stuck in a vicious cycle.”

Poor training and poor riding skills are usually the culprits in the development of a hard mouth. “Overuse of the hands, transferred to the bit, combined with the lack of training in teaching the horse to respond to the rider’s leg and seat, is where most of these problems usually start,” says Laurie Takoff, owner of Laurian Quarter Horses in Kelowna, B.C., Canada, and a member of the American Quarter Horse Association of Professional Horsemen.

Laurie points out that the problem can even develop in well trained horses that are constantly exposed to riders who rely too much on their hands for control, instead of using their legs and seat.

“This is a problem most often seen in beginner or novice riders,” she says. “For novices, using the hands, arms and upper body for control offers a greater feeling of security in controlling and steering the horse.”

Consequences

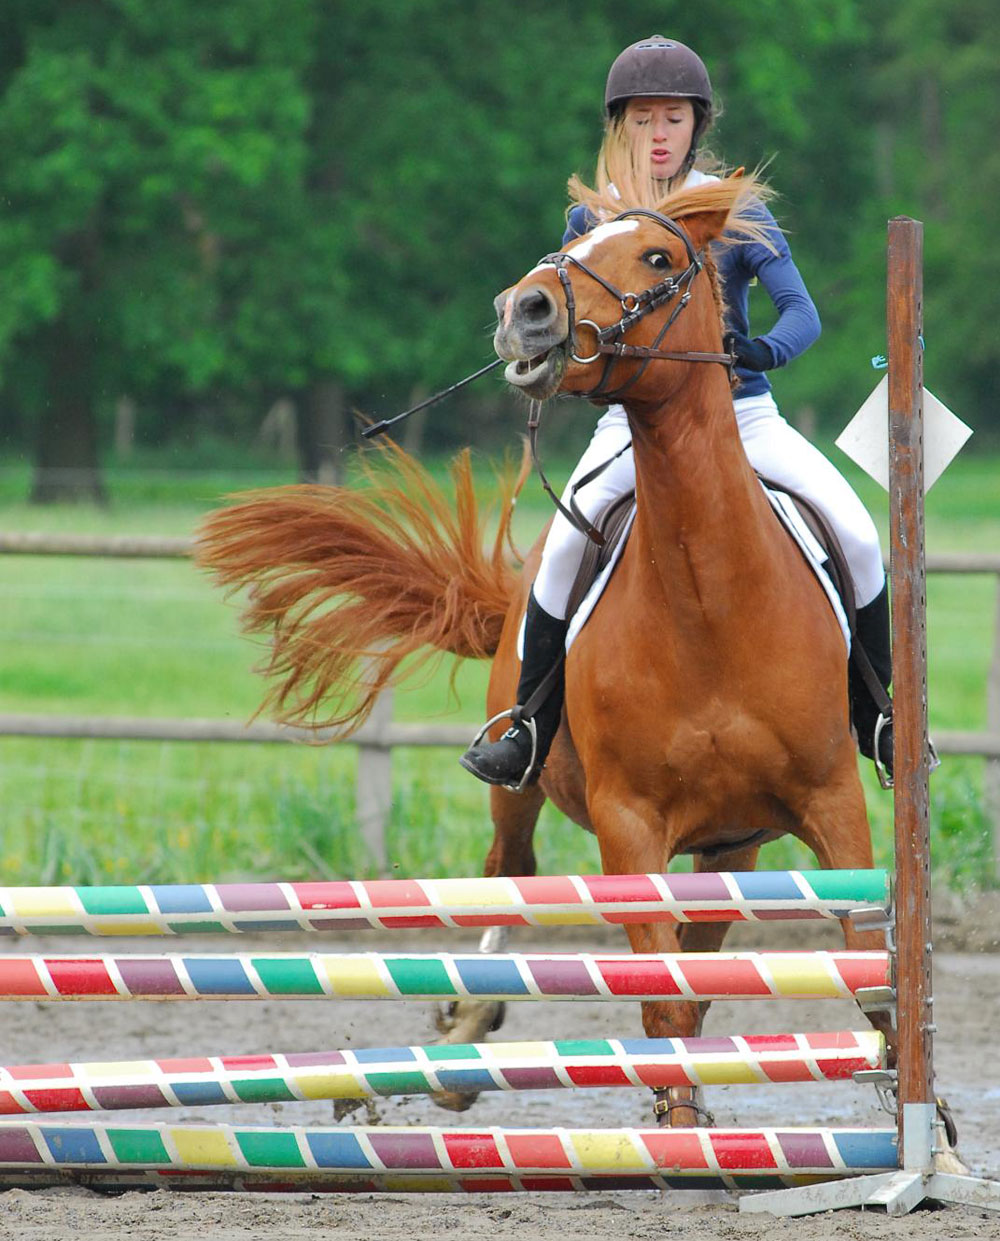
Not surprisingly, horses that have learned to resist the bit are not easy to ride. Problems such as refusing to stop or slow down, the inability to flex or bend, and a tendency to brace the head and neck against the reins, are all issues with hard-mouthed horses.

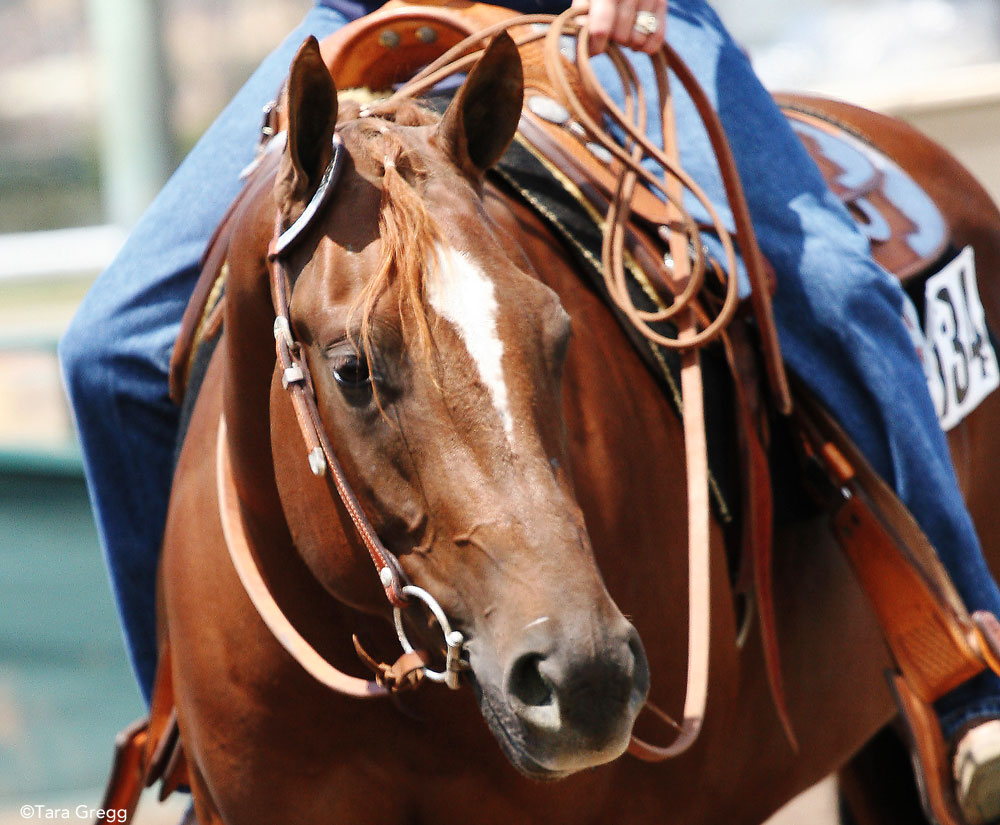
“Hard-mouthed horses are protecting themselves from pain caused by extreme bit pressure in their mouths, or the pressure of the hackamore or bosal on the nose and chin,” says Kim Hayes, riding instructor and trainer in both the English and western disciplines, in Arvada, Colo. “These horses develop defense mechanisms to lessen the pain, such as bracing their heads and necks against the reins, and are difficult to slow down or stop. Hard-mouthed horses also stiffen up when you try to bend or flex them, causing flat turns and jolting transitions. Often, the very things that horses do to lessen the pain cause riders to stiffen up more and pull harder on the reins, creating a cycle of pull—brace—pull harder—brace harder—that only ends in frustration for rider and horse.”

“Hard mouthed horses are commonly known for ‘running through the bit or bridle,’ ” says Laurie Takoff. “This can often develop into the horse becoming very heavy on the forehand and lacking the drive from behind needed to respond properly. I have also seen these horses overflexing at the poll and neck or not flexing enough.”

According to Laurie, overflexing can develop to the point where the horse uses his neck as well as his mouth to pull on the rider’s hands. “When this happens, the rider has a tendency to lean back in the saddle too far in an effort to move the horse’s center of gravity back and gain leverage by pulling back on the reins,” she says. “This can put quite a bit of pressure on the horse’s back and loins, which can develop into chronic pain if not corrected.”

Cures

Hard mouths are not impossible to fix. The key to softening the mouth of a resistant horse is careful retraining. Courtney Meitz starts with bending work.

“The remedy starts by going back to the beginning,” she says. “The first thing I’ll do when I get on a horse with a hard mouth is put him in a snaffle and find out if he knows what the word ‘whoa’ means. If he doesn’t, that’s the first thing he needs to learn.

“I start him off at a walk, then I say ‘whoa.’ If he doesn’t stop, I draw the reins back until he does. As soon as he stops I release him. Then I will walk again and say ‘whoa’ again. If he doesn’t stop, I’ll repeat the above, but this time I’ll ask him to back a few steps. This will explain to him not to push into the bit. Eventually he’ll hear the word ‘whoa’ and know what is coming next, so he figures he may as well stop. When he does it without the rein aid I praise him and let him stand for a while.” However, Courtney also makes sure the horse knows “whoa” on the ground. “If I’ve started the horse, ‘whoa’ in a halter and lead rope is part of leading training. If the horse comes to me with some training already, I’ll go back and make sure he knows ‘whoa’ on the ground.

“[Once the horse knows ‘whoa’] I’ll spend as much time as necessary to get him soft at the walk first. I do this byasking him to follow his nose in a circle. I will take [the inside] rein and slowly bring my hand to the outside of my hip and ask for a little bit of bend. Not too much—I want it to be somewhat easy. How much bend is dependent on the individual horse. A horse that is really resistant I may only ask to the point where I see about  three-quarters of his eye. I’ll eventually bring his nose around almost to his shoulder, but how long it takes to get to that point depends on the horse. As soon as he gives to the rein pressure, I release and let him walk straight—that’s his reward. I do this until I can take one rein, and, before there’s any contact with the bit, he curves his neck, steps over his inside front and walks softly and relaxed on a small circle. Once I have achieved this, I’ll ask for bend in a larger circle, using my inside leg to push him out a little.”

Courtney follows bending work with reinforcing the “whoa” command. The horse should have a good “whoa” at the walk, jog and lope. She then asks the horse to bend as he’s walking in a straight line, and then eventually adds counter-bending, all the while rewarding the horse for giving to the bit.

“It may take awhile to achieve, but trust has to be earned before I can really ask him to be light in the mouth,” she says. “All of this prepares the horse to bridle up and be collected.”

Laurie Takoff also recommends returning to the basics when retraining a hard-mouthed horse, using bending and flexing to teach him to give to the bit. “Suppling exercises are a super way to start working to lighten up the mouth,” she says. “The rider must remember to always use the leg and seat first, and in some cases, voice commands, prior to the reins.”

Whenever working with a horse with a hard mouth, it’s important to resist the temptation to use a harsher bit. “A more severe bit, or switching to a hackamore or bosal, is never the answer to correcting a horse with a hard mouth, since the underlying issue is the rider,” says Kim Hayes. “If you give a rider with hard hands a more severe bit, you only amplify the problem or cause other issues to develop as the horse tries to protect himself from pain.”

Before a horse can be retrained to respond properly to the bit, the rider must have a good seat and balance. Working on a longe line with an instructor can go a long way to developing a balanced seat for a rider, and thus less reliance on the reins for support.

“Once a rider is balanced and using the seat correctly, it’s time to work on softening the horse’s response to bit pressure,” says Kim. “Start off at a standstill, and pull out gently, not back, on one rein until the horse bends his neck around without pulling or bracing against the hand. Keep the hand pressure gentle but steady, and as soon as the horse gives to the pressure—even the tiniest little bit—reward him by releasing the rein. At first, the horse won’t be able to bend around that much, and it’s very important at this point that the rider stop pulling once the horse starts to give.”

Once the horse is giving easily to the bit at the standstill, the rider should work on gentle flexing from side to side at the walk. Next comes the walk-to-halt transition. “Imagine your shoulder blades are like thumbtacks that will drop down into the horse as you ask for the halt,” says Kim. “The idea is to let your weight sink down into the saddle, without slouching or leaning forward or backward. Bend your knees as you ask for the halt to avoid pushing up from your stirrups. You should feel your seat bones ‘plug’ into the saddle like you would push an electrical plug into an outlet. The upper thigh should squeeze gently to slow down the motion in the horse’s back. Practice this walk-halt transition using the seat aids first, reinforcing lightly with the reins after the seat aids are given. Don’t worry if it takes a long time for the horse to stop at first—he needs to learn the new aids too. As horse and rider start gaining confidence in each other, try downward transitions from faster gaits.”

Realizing the causes of a hard mouth is the first step to correcting this training problem. A professional trainer can help the horse learn to give to the bit, and good instruction can teach a rider to have soft hands. With patience, persistence and practice, the hard-mouthed horse truly can develop a softer outlook on life and become a more enjoyable ride.

Other Trouble Spots

Most horses develop hard mouths as a result of poor riding and training, but on occasion physical problems can be the cause of poor response to the bit.

“Back pain should be considered in finding and curing the problem in the hard-mouthed horse,” says Laurie Takoff. “A horse with back pain might learn to pull on the bit in an effort to lift the rider’s weight off his back, thus reliving his pain.”

Laurie also suggests looking over the horse’s tack for potential problems. “Make sure the saddle and girth fit properly, and that the saddle pad is adequate,” she says. “Also, look over the bridle and bit to ensure they fit properly and are not pinching.”

Dental care is also crucial in maintaining a healthy mouth that will readily accept the bit. “Good regular dental attention is important for all horses,” says Laurie. “It never ceases to surprise me how much a comprehensive dental treatment can help.”

Laurie also believes a bit seat can help—which involves rounding and smoothing the second premolars in your horse’s mouth. Ask your veterinarian if this is recommended for your particular situation.

This article originally appeared in the November 2004 issue of Horse Illustrated. Click here to subscribe.


A freelance equine writer, Audrey Pavia is a former editor of Horse Illustrated and author of “Horses for Dummies.” She has trained in western, hunt seat and dressage, and competes in NATRC-sponsored competitive trail riding. Audrey resides in Norco, California, with her foundation-bred Appaloosa gelding, Confetti’s Valentine, and her two cats.

Hoof Abscesses and Puncture Wounds

20

Soaking a hoofNothing can be more satisfying to us vets than a really good hoof abscess. Right from start to finish, they can make our day. It starts with the call, pretty much always the same, “Horse was fine yesterday; very lame today,” and ends with the owner overjoyed that the diagnosis is merely an abscess. Let’s not forget the in-between stuff, such as the really great moment when the vet’s hoof knife hits the spot, making blackish gray stuff pour out. For those who have never experienced a hoof abscess, the moment of relief is, unbelievably, when the pus pours.

What a Hoof Abscess Is

A hoof abscess is an infection within the hoof in an area called the lamina. The lamina consists of hard and soft sections, designated the insensitive and sensitive lamina, respectively. The hard lamina is essentially the hoof capsule, and the soft lamina is the tissue that connects the hoof capsule to the bone, also known as the white line. On the bottom of the hoof, called the solar surface, the sole of the hoof connects to the hoof wall at the white line.

Abscesses can develop many different ways. The most common is at the solar surface when an area of the sole becomes compromised, and bacteria are able to get under the surface of the hard lamina. Once under the protective barrier of the hard lamina, the bacteria find themselves in the perfect growing environment—warm and moist (and plenty of food from the blood supply to the hoof). As they grow, bacteria produce toxins that actually eat away healthy tissue, allowing more bacteria to invade additional tissue. This ongoing assault often leads to a “tract” or pocket forming to accommodate the increasing bacteria and pus.

Since the bacterial invasion starts in the insensitive hard lamina, your horse is pain free, and you won’t notice the strong bacteria colony forming within the hard hoof capsule. If the bacteria develop enough, however, they can move out of the hard insensitive lamina into the soft sensitive lamina. This is when the horse’s body realizes there’s a problem.

The body’s first reaction to bacteria is to treat them like foreign objects and try to kill them with white blood cells and antibodies. White blood cells latch on to bacteria and release pockets of destructive components, which kill them. Unfortunately the destructive components of these white blood cells can also harm healthy hoof tissue of the sensitive lamina. Another job of white blood cells is to clean up dead tissue: as tissue is being destroyed by bacteria, more white blood cells are being summoned to the site for clean up. This whole process of white blood cell response is called inflammation.

The result of the body’s retaliation is a collection of dead, dying and growing bacteria, lots of white blood cells and dead tissue. Most often all of this material is fluid like, creamy or thin in texture and often gray or black in color. In the medical world it’s called purulent material, but is most commonly known as pus.

Since the hoof is a rigid structure, as pus develops, it starts to cause pressure within the hoof. This, along with the inflammation occurring in the sensitive lamina, causes pain. Sometimes there is so much pain that the horse will barely put his hoof down. This is when trouble becomes apparent.

Covering Up

Once the abscess has been exposed, the opening has to be kept clean and free from dirt, debris and manure in order for it to heal. Also, since the shoe is typically removed to find the abscess, the hoof needs to be covered to protect it and keep it clean.

Packing the abscess hole with gauze or cotton soaked in Betadine solution then taping the entire hoof with duct tape is a common treatment option. Other alternatives include putting on a protective boot such as an Easyboot or Old Mac Boot, or a combination of both duct tape and a boot. A variety of other boots are available commercially that are also very effective.

Diagnosing a Hoof Abscess

Most often the signs of an abscess are dramatic and sudden. Sometimes a horse can start out moderately lame and become very lame fast. For someone who has never seen it before, a horse with an abscessed hoof can be in so much pain that it can look like he has a broken leg.

Abscesses have some classic symptoms. Hoof tester sensitivity or pain in the area of the abscess, increased digital pulse to the hoof, decreased ground contact of the heels, swelling of the lower leg, pain to percussion (tapping the hoof with a percussion hammer) and an erupted tract of pus are hallmark symptoms. Any combination of these symptoms is enough to make a tentative diagnosis of an abscess.

A veterinarian’s final diagnosis can be made when the area of pain in the hoof is localized and the hoof pared away to reveal a pus pocket or draining tract. If this can be done, the horse generally feels a great sense of relief from the reduced pressure in his hoof. Sometimes when the tract has been opened, the pus runs out, putting on a great show. Other times the pus is very thick and dry and is pushed out with hoof testers or squeezed out as the horse puts his hoof down. If the pus cannot be drained, the hoof is soaked in an Epsom salts and warm water solution to soften the hoof capsule and draw out the infection. Usually in one to two days the abscess opens.

Soaking Hooves

Soaking can be really easy or really, really hard. The easy way is warm water and enough Epsom salts to saturate the water. (The water is saturated when no more salt will dissolve.) Epsom salts solution is usually put in a bucket but works best in a flat heavy rubber feed tub. Water level needs to be above the hairline to promote abscess eruption at the coronary band. The hoof is then placed in the bucket or tub and left to soak for 15 to 20 minutes.

However, sometimes the horse won’t keep his hoof in the water and/or continuously tips the tub. The Davis Boot, Easy Soaker from Easyboot and SmartBoot from Giddyap Girls are a few of the boots that have been designed specially for soaking hooves and can make the job easier.

Poulticing the hoof is another choice for noncompliant patients. The hoof is poulticed by putting poultice material, magna paste, ichthammol, sugardine or Uptite poultice on the entire sole of the hoof then covering it with duct tape or some sort of boot.

If your horse is willing, soaking and poulticing are optimal: daily soaks followed by a poultice wrap.

Causes of Abscesses

The majority of abscesses start at the solar surface at the angle of the bars. As the sole grows out, the bar sometimes folds over some dirt or debris, trapping it under the sole. Once this happens bacteria are trapped under the sole and begin to grow. As they grow the bacteria eat away at the sole and start traveling, usually dissecting under the sole and along the white line, traveling upward toward the coronary band.As the abscess gets deeper and bigger it becomes more painful, sometimes causing the leg to swell as it gets close to the coronary band.

Unsanitary horsekeeping, such as sloppy living conditions that include a footing mixture of mud, manure and urine, soften the sole and make it more susceptible to infection. Hooves that are picked infrequently hold manure-and-urinesoaked bedding in the frog sulcus that can also cause the sole to soften and become infected.

Bruises can turn into abscesses. Bruises occur when the hoof suffers some sort of concussion either from an opposing hoof or object (rock, et cetera) hitting the hoof wall, or by stepping on something, usually stones. A bruise is basically a pocket of blood that develops when some blood vessels are broken. This pocket of blood is a wonderful growing environment for bacteria. As the hoof grows out, the bruise grows out, allowing bacteria to invade the area and develop into an abscess. Sometimes the bruising is severe enough that the body develops a strong inflammatory reaction that causes a “sterile” abscess. This is an abscess with no bacteria, rather only inflammatory cells and debris.

Penetrating foreign objects may also cause abscesses. A farrier’s nail hole may become infected and develop into an abscess. More commonly, though, the horse steps on a foreign object, usually a nail, and it drives into the sole, taking dirt and bacteria in with it. When the foreign object is pulled out the sole closes up, sealing itself and the bacteria in the hoof. If the area is not opened up immediately to clean out the bacteria and other debris, an abscess can form.

The most dangerous penetrating wound to the hoof is a puncture to the navicular bursa, most commonly caused by the horse stepping on a nail. With this type of injury, the nail or other foreign object finds its way up and through the back third of the frog and into a small sac of fluid between the navicular bone and deep digital flexor tendon called the navicular bursa. When this happens, bacteria and debris get into this sac of fluid. Once the object is pulled out the area seals itself, allowing a perfect environment for bacterial growth. If the navicular bursa becomes infected it can be very painful, and since it is located so deep in the hoof it can be very difficult to treat. If the infection spreads from the navicular bursa to the deep digital flexor tendon sheath, the infection can travel up the leg, making it almost impossible to treat and ultimately costing the horse his life.

Treatment

Thankfully, abscesses are for the most part easy to treat once they have been diagnosed. The goal of treatment is to expose the infection, flush it out as much as possible and keep the area draining so that another abscess can’t form. Once the abscess is exposed, either on the solar surface or at the coronary band, the area is flushed with antiseptic to kill the bacteria and clear all of the pus out of the tract or pocket. The hoof is then usually soaked in a warm Epsom salts solution to help draw out and kill more of the bacteria. Painkillers and anti-inflammatory medicine, such as bute, are given to relieve the pain and to decrease inflammation. Occasionally oral, intramuscular, intravenous or topical (on the abscess itself) antibiotics are used. The average down time for the horse is five to 10 days.

Puncture wounds from nails or other objects are in a whole different category and need to be treated much more aggressively. If possible the hoof is radiographed (X-rayed) with the nail or foreign object still embedded so that the direction and depth of the penetration can be determined. The object is removed and a contrast solution is injected into the penetration tract. This contrast solution appears as bright white on a radiograph. If the navicular bursa has been penetrated then the contrast solution easily drops into the bursa, and the entire bursa and penetration tract are bright white on the radiograph.

If the bursa has been infected, then the horse is laid down under general anesthesia, and a section of the frog removed to expose the navicular bursa. At this time the bursa is flushed and treated at the site of infection. The area is kept open and flushed daily. The horse is put on strong antibiotics, and the hoof/open frog area is covered with a hospital plate (special shoe with a full metal plate covering the entire sole that can be removed and put back on). If all goes well, the bursa doesn’t become infected, and the hoof fills in with scar and hoof material, which can take two to four months.

Differential Diagnosis

Abscesses tend to be very easy to diagnose, but it’s not always so. Sometimes the horse is only slightly or moderately lame, and the pus pocket/draining tract can’t be found in the solar area. The question then arises, “Is this an abscess or is it something else?”

If an abscess is suspected but can’t be found, soaking the hoof in a solution of Epsom salts and warm water helps bring the abscess “to a head,” causing the pus to erupt either at the solar margin or more often at the coronary band of the heels. The length of time before this occurs can vary dramatically with atypical cases requiring seven to 10 days soaking and packing with poultice or ichthammol to draw out infection. However, if the abscess hasn’t resolved after three days, other sources of the lameness should be explored and ruled in or out.

So what if it’s not an abscess? The alternatives are not as easy to fix: fractures of the coffin bone, navicular bone or pastern bone; torn tendons and ligaments; laminitis and a host of other obscure problems.

No one likes to see their horse in pain, and certainly no horse likes to be in pain, but for a veterinarian, horse owner and horse, finding that pus and draining it sends all involved “skipping down the barn aisle happy.”

Read more about treating hoof abscesses.

Janice Posnikoff, DVM is a dressage rider and equine practitioner in Southern California.


This article originally appeared in the November 2004 issue of Horse Illustrated. Click here to subscribe.


Stop Jumping Refusals

28

How to remedy refusals and run-outsWhat happened? You were galloping down to a jump, your horse’s ears were up, and your eyes were analyzing the approach for a correct take-off spot. In your heart, you sensed a blue ribbon. But then, your horse made a sudden decision to avoid the jump, spraying sand against the arena railing and nearly sending you up and over his neck.

If refusals and run-outs are becoming habit, it’s time to take a serious look at why sometimes your horse just says, “No!” Here are four common stopping scenarios, their possible causes and ways to rehabilitate your riding and your horse’s mindset.

The Sliding Stop

Apparently you were unaware that your horse had potential as a National Reining Horse Association champion. But sure enough, he can be cantering down to a jump with all the zeal of a steeplechaser when, right at the base of the obstacle, he slams on the brakes. Amazing, isn’t it, the way that he can stiffen his front legs inches away from the ground line, and then literally sit down on his haunches? Unfortunately, the sudden loss of forward momentum can send you hurtling through space and into the jump rails.

In many cases, the sliding stop is a refusal borne from pilot error. That can be a tough criticism to accept. Yet often a horse slides to a stop at the base of a jump because he realizes at the last instant that he simply cannot clear the hurdle from where he’s been placed. An otherwise honest horse—one that generally jumps without hesitation—that surprises everyone by abruptly stopping at an occasional jump may merely be saving both himself and his rider from disaster. This horse simply needs a better ride.

Note: While a horse that refuses jumps must be punished so that it doesn’t become a habit, there is a difference between educating the horse and abusing him. One or two smacks of a crop behind the rider’s leg are enough to explain to the horse that he has disobeyed a command. Spanking the horse in front of the girth is useless. The horse’s motor is located in his hindquarters.


On the other hand, a horse that incurs a multitude of bad rides soon learns that it’s just as easy to slide to a stop as to go over the jump from an awkward take-off spot. He becomes what’s termed a “dirty stopper.” Such a horse is forever waiting for a rider’s split second of indecision. Being dropped at the base of the jump, meaning the rider slackens the reins and assumes a defensive posture in the saddle, is the cue a dirty stopper lives for. The only correction is for a more skilled rider to school the habitual stopper. At any point that the horse slides to a stop, the rider must discipline the horse with a smack of the crop behind the girth. An even better solution? Be an accurate, determined rider.

“I am So Not Going There!”

At least the dirty stopper makes it to the base of the jump. The jump-shy horse is so committed to not jumping a particular obstacle that he will proclaim his intent from several strides away, perhaps as soon as he rounds the corner and grasps where he’s heading. His body language seems to scream, “You have got to be kidding!” This emotional conveyance is combined with histrionics, such as bulging eyes, flared nostrils, pricked ears and a neck elevated like a giraffe. When urged forward, the expression can turn into outrage, with pinned ears and a swishing tail. Defiant, the jump-shy horse may even rear when the rider demands that he approach the jump.

Green or young horses that are overfaced beyond their level of experience may balk at spooky or challenging jumps. Older horses can carry this act to the extreme, particularly those that have learned how to get the best of novice riders. Oh, what thespians they are! Their performance begins as soon as the novice aims them toward the offending obstacle. Then they cease their forward motion and add flourishes such as whirling or bolting to further intimidate the rider.

To prevent jump shyness, the green horse should be slowly introduced to the same sort of jumps he’ll encounter in the show-ring. A variety of obstacles, such as artificial flowers, miniature paddock gates, little wooden boxes covered with artificial turf and striped poles can all be used at home to acquaint the green horse with his new job environment. Any jump that spooks the green horse at a show should be re-created at home for the next schooling session. And the wily veteran horse that begins his refusal process in the corners needs a hiatus from the beginner’s riding school program. (He may also need a veterinary exam to rule out soundness issues.) When he’s convinced by an experienced rider that his melodramatic antics only bring forth retribution, he’ll become trustworthy again.

Drifting Away

Lines are the mainstay of hunter and jumper courses. If a horse and rider cannot maintain a straight pathway, there’s a good chance they’ll miss the related jumps in a line. For example, the horse jumps safely into the first element of a line, but upon landing he begins to drift or bulge off to the side. With each stride, the drift becomes more evident. Soon he’s no longer aimed at thecenter of the upcoming jump. In fact, he may be staring straight into the standards. His only option? Bypass the entire obstacle.

Some horses have a natural tendency to drift. It’s noticeable from the time they begin their careers over jumps. First it should be determined if there is an underlying unsoundness that is causing the horse to favor bearing weight on one side of his body over the other. Once that’s ruled out, the rider must focus on teaching the horse to be straight in his flatwork and to carry himself in a balanced frame of self-carriage. Plus, the horse must be taught to respect the rider’s aids. Regardless of whether the horse is green or a seasoned campaigner, if he does not respond to subtle pressure from the rider’s leg, he will not move laterally within a line of jumps to remain on a straight flight path.

Sometimes, drifting inside a line of jumps becomes a lazy habit, especially in dull horses that are nonchalant about their jumping. Or the rider may not realize just how crooked he or she allows the horse to travel. An easy solution is to use ground poles to mark a sort of alley within a line of jumps. The poles can be set about 6 to 8 feet apart, perpendicular to the jumps. They act as straightening poles and will thwart a horse’s desire to drift and reinforce a rider’s attempt to ride a straight line from one jump to the next. Another tip is to add a cone, marker or human helper at the far end of a line, directly in the center. When a rider has a focal point to aim for, sometimes it’s easier to concentrate on maintaining a straight pathway.

Horse refusing a jump
Photo by Jean-Louis Vandevivère via Wikimedia Commons/CC BY-SA 2.0

Ding Dong Ditch!

Just as horses prefer to drift in one direction more than the other, the horse that habitually runs out at a jump tends to do it in one direction, too. The worst run-out scenario is the horse that has learned to eagerly approach the jump and then, at the last instant, drop his shoulder, duck to the outside of the jump and then scurry off.

At its most benign, the cause of a run-out may be as simple as a green horse that is genuinely scared of the jump. He cannot think fast enough to organize a sliding stop, so the path of least resistance is to simply cruise around the jump. Seems like a simple enough plan. The dastardly “runner outer,” though, is well aware that running out is a very, very bad thing to do. So he cloaks his intentions until the moment of take-off, and then dives off to the side. Worse, since he knows that punishment is coming, he bolts into a gallop, as if he can avoid the repercussions by running away.

There are two important methods for correcting a run-out. First, slow down. The primary cause of a run-out is that the horse approached the jump at too fast a pace. A fast pace intimidates the green horse and it gives the conniving horse the upper hand. At a slower pace the green horse has time to think and prepare for the jump, and the naughty horse remains under the rider’s control. When addressing a run-out, the horse’s pace should be reduced to a manageable trot on the next approach (lower the element to an appropriate height). It’s much easier to contain the horse and place him at an accurate take-off spot when trotting. Second, when disciplining a horse that has run out at a jump, bring him to a halt. Then turn him in the opposite direction that he ducked away from the jump. For example, if the horse ran out to the right of the jump, pull him to a stop, and then turn him to the left. Do not complete the circular route he wanted. That just reinforces his evasion.

Regroup and Ride On

Oh, the horror of it all! How can you contain your embarrassment, disappointment and utter humiliation when your horse refuses or runs out during a show? Perhaps you can take heart in knowing that even at the highest echelons of show jumping, such as the Olympic and World Cup events, some of the best riders experience the same despair. Yet they don’t make a public display of their emotions. They quietly regroup and ride on, perhaps approaching the fateful obstacle a little differently. Or they might add a smack of the crop or an audible cluck at the base of the jump. Then, once outside the show-ring, they analyze what led to the refusal or run-out and strategize so that it won’t happen again.

You, too, can accomplish much by keeping your cool when your horse stops at a jump. Stay focused on your goals. Stop and settle your horse. Determine what caused the refusal or run-out. Decide how you are going to correct your riding and your horse on the next approach. Then remain vigilant for the remainder of the round so that the fault isn’t repeated.

Having an instructor or trainer watch your rounds and guide you in the warm-up ring is invaluable, especially if you’re dealing with a horse that refuses or runs out. They may be able to spot weaknesses in your riding that contribute to the stopping problem. And there’s certainly no shame in having a more experienced rider hop on your horse and school him in a class or two. Besides, having moral support and expert advice will encourage you to stay in the saddle, keep your courage and ride on!

Cindy Hale is a regular contributor to Horse Illustrated and the author of Riding for the Blue and A Passion for Horses.


This article first appeared in the October 2004 issue of Horse Illustrated magazine. Click Here to subscribe!

To Clip or Not to Clip?

0

Unless you live in the tropics, winter riding means dealing with frigid temperatures, icy footing and frozen extremities. And oh yes, did we mention that woolly mass of fuzz that replaces your horse’s once slick and shiny coat? This layer is Mother Nature’s way of providing horses with the protection they need to survive winter. Depending upon your plans for winter riding, this is good news or bad news.

Leave a horse’s coat alone to grow naturally through the fall, and he’ll grow hair capable of protecting him through most winter conditions. Horses can’t quite go it entirely on their own; they do need some sort of shelter from the combined forces of wind coupled with rain or snow.

As veterinarian Elizabeth K. Stanley from Stonefield Equine Clinic in Winsted, Conn., explains, “The oils and hair in a horse’s winter coat will shield him from wet and cold, but add wind to that scenario and an unprotected horse will get into trouble.”

This is why horses in the wild naturally seek shelter under trees or outgrowths, and why a wild herd stays banded together, rump to rump, to provide protection from wind in a storm.

Dr. Stanley keeps her 31-year-old retired eventer, Floyd, at her farm, and notes that “he hasn’t worn a blanket in years.” She provides Floyd with a three-sided run-in shed for winter housing which, in conjunction with his heavy coat, allows him to live comfortably outdoors all winter.

Provided you give your horse winter shelter and proper care in harsh conditions—available fresh water, generous nutrition and appropriate shoeing as determined by your particular footing conditions—your horse will make it through winter just fine without added blanket expense or worry on your part.

The bad news? Just try to ride with all that hair. Exercise your horse enough to work up any sort of lather, and you’ll spend hours drying him off. In winter you can’t just let a horse get sweaty, then fend for himself in the cold.

So you’re faced with a dilemma: to clip or not to clip? Would you rather deal with hair or blankets? Or some of each?

Weighing Your Decision

First, determine what kind of riding you plan to do this winter. If you don’t have access to an indoor ring, does winter footing and weather limit you to walks down frozen roads for the next few months? If so, why clip at all? Those winter strolls won’t work your horse into a sweat, so you won’t have to worry about drying him off.

On the other hand, will you be moving to an indoor ring and riding actively all season? Then a full-body clip or hunter clip is probably in order. You’ll need to purchase several blankets to protect a fully clipped horse properly—a sheet and various stable rugs, which can be layered for changing conditions; a quarter-sheet to keep his back warm on really cold days; and a turnout rug for outdoor protection.

But if you’re like most of us, your riding schedule probably fits somewhere in between these two extremes. And if your level of riding activity varies mightily according to the weather, these partial clips may be the perfect solution.

The Best of Both Worlds

Several clipping options allow you to get the best of both worlds—remove hair where your horse sweats the most, but leave enough to provide warmth. Which one you choose depends on your level of riding activity, your climate, and your horse’s turnout, barn and lifestyle conditions.

Even the most modest of clip jobs, however, requires some sort of blanketing. When you remove a horse’s hair you expose his skin to the cold. If you clip, you’ll need to commit to daily blanketing and unblanketing.

Strip Clip
Strip Clip

The Strip Clip:

Short, cold winter days reduce many of us to weekend-only riding. If that’s your situation, this clip might work for you. Remove hair only in a thin strip from the horse’s jowl down the underside of his neck and under his chest. Only go as far here as needed; you can stop just at the girth area or continue the clip under and along his belly.

You can also take this clip one step further, clipping a large triangle from his neck to his flank. You’ll remove all the hair under his belly this way, plus you’ll trim hair from the lower part of his shoulder as well.

This clip leaves hair everywhere a horse needs it most—along his back, flanks, head and upper neck. Your horse would probably do nicely and continue to live outdoors with just one medium weight stable (for indoors) or turnout blanket to protect his naked areas.

Trace Clip
Trace Clip

The Low Trace Clip:

You plan to ride all winter but you don’t have an indoor ring. Your horse’s work load will depend on the weather—walking in bad footing, regular work when your outdoor ring thaws. This clip will allow your horse ventilation in active training, while giving him protection during those long cold walks.

Remove hair in a triangle starting from underneath his jowl down to his chest. Then swing the line back, starting about four to six inches above his elbow, straight to his hindquarters. You’ll also remove the hair beneath his belly, and you can remove hair underneath his chin, too, if you prefer. Because the upper part of his hind legs will be free of hair, you can afford active riding without worrying about excessive sweating.

A horse with a low trace clip could probably still live outside, but will need greater protection in turnout and certainly one warm stable blanket even when indoors.

The Medium Trace Clip:

If you live in a climate where winter provides more active riding days, where faster work or jumping might be possible, choose this clipping option. Start as per the low trace clip, but swing the line back from a much higher point—from midway down his shoulder, back to a line that ends about half-way down his hindquarters. (The line will hit a level that’s about even with the bottom of your saddle flap.)

A horse should not live outside with this much hair removed unless he’s in a temperate region—and even then he’ll need blanketing. This clip will probably require one medium stable rug, one medium turnout and a stable sheet or lighter blanket to layer under both in extreme cold.

High Trace Clip
High Trace Clip

The High Trace Clip:

This clip is designed for horses that maintain a regular work load in the winter. The advantage to this clip over a full-body clip is that hair is left along his back and upper neck for protection during cold-weather rides, so you shouldn’t need a quarter sheet for riding.

You may opt to clip part or all of the head with either the medium or high trace clip. Once you clip a horse’s head, however, remember that you’ll have to limit his turnout time in severe weather, since you can’t protect his vulnerable face and ears with regular blankets unless you buy him some sort of hood.

The high trace clip demands that you blanket your horse just as you would a horse with a full body clip. You’ll need two to three layers of stable and turnout blankets, which can be rotated according to the weather.

Blanket Clip
Blanket Clip

The Blanket Clip:

Perhaps you plan to work actively indoors all winter, yet you’d still like to go outdoors when the weather suits. The blanket clip removes all hair from his body, except for a square patch along his back, loins and croup much like that of a quarter sheet. The line of the blanket clip should reach the bottom of your saddle flap.

You’ll need to blanket this clip as you would the horse with a high trace clip.

Hunter Clip
Hunter Clip

The Hunter Clip:

This clip is another choice for active riders. Though it doesn’t offer much warmth, and the horse will have to be blanketed as if he were fully clipped, the hunter clip does leave some hair for protection in the saddle area and on the horse’s legs.

How to Clip Straight Lines

Partial clip jobs, like the trace and blanket clip, make for faster clipping since you’re only removing hair from part of the horse. However, you need a steady hand and an experienced eye for this type of clipping. The lines on these clips are very apparent. Here are a few tips on how to keep yours straight:

  • Use sharp blades. You can’t clip a straight line with a dull blade. Always clip your lines at the start of your clipping job, before your blades have dulled. Make sure your blades are clean and oiled before you attempt to cut lines. If you’re lucky enough to have two pairs of clippers, keep one set for lines and use the other for body hair.
  • Stand your horse on an even surface. You can’t clip a straight line if your horse is standing on uneven ground, or if he’s resting a hind leg.
  • Mark your lines. Use chalk, nontoxic colored markers, masking or adhesive tape, or a damp bar of saddle soap to mark your lines before you clip.
  • Use a yardstick or a horse-measuring stick to ensure your lines are equal heights on both sides of your horse’s body.
  • Keep your horse quiet while you clip. You can’t clip a straight line on a moving target.
  • Turn your clippers: To neaten lines, try turning your clippers sideways as you go. Or, place the top of your blade against the line and lift straight away from your horse’s body.Clipping your horse gets rid of that unwanted hair, but once you make the cut, you’re committed to blanketing him, a routine that gets both expensive and cumbersome.

Choosing Blankets

Making blanket statements about blanketing—pardon the pun!—is difficult since conditions vary so much in different parts of the country. You need to consider your horse’s living conditions, plus the climate where you live, as you make blanket selections.

Here are some tips to guide you. Special thanks to Cyndy Williams, a buyer for Dover Saddlery (Dover, Mass.), for providing much of the information here.

  • Just as high-tech fabrics have revolutionized athletic clothing for people, you can now find fabrics that wick moisture away from your horse, waterproof blankets and outer shells tough enough to withstand the abuse horses give them in rough and tumble turnout play.
  • Blanket designs, too, have changed. You can choose among “extras” for blankets like leg straps, gussets that allow for shoulder movement in turnout rugs, hoods, high cuts that cover the withers and neck, even designs that protect your horse’s belly.
  • For outdoor (turnout) blankets, you can choose from a thread-count, known as denier, from 600 to 1700. The higher the denier, the tougher the outer shell of the rug.
  • Look for turnout blankets without a back seam—or make sure the back seam is reinforced—on the top of the blanket. Seams always allow for the possibility of water leakage.
  • Shoulder gussets and tail flaps allow greater protection/freedom of movement in outdoor rugs.
  • Stable and turnout blankets alike come in a variety of “fill” levels—from 180 grams to 400 grams—which determine the warmth of your blanket. Remember that a horse can catch cold from too much warmth. Overblanket him, especially in the barn, and he can sweat and ultimately catch a chill.
  • Turnout blankets can double as stable blankets provided they stay dry. Never leave a horse stabled in a wet rug. Depending on your weather conditions, you’re probably better off having separate indoor and outdoor blankets. You can always layer a stable blanket underneath a turnout blanket for added warmth.

Drying Your Horse’s Winter Coat in Cold Weather

If you do choose to leave your horse unclipped, be prepared to dry him properly once he’s worked up a sweat under tack.

Curry his wet hair as best you can to release some moisture. Then cover him in an Irish-knit or anti-sweat sheet that contains “holes” in the fabric, allowing the air to reach his coat. Cover this with a wool cooler or a high-tech cooler that will wick moisture away from the horse.

If his coat is really drenched, you may need to change these rugs as they become saturated. Once he is dry, remove the wet rugs. You wouldn’t spend hours in a wet towel after your shower, would you?

Winter riding doesn’t have to be a chore, and with these options, the right hairdo for your horse is in your reach.

This article first appeared in the October 2004 issue of Horse Illustrated magazine. Click Here to subscribe. 

Horsey House Hunting

2

For many city dwellers, the dream of moving to the country and keeping horses at home might have to remain a dream. But there are still pockets of horse property available here and there in suburban settings.

Horse farm

While much different than rural living, buying a small horse property in an equestrian community can bridge the gap between buying a big spread and boarding your horse. The trick is to know how to begin your search, and determine what works best for your needs and your budget.

Horse Property Basics

Your first step is to find a qualified real estate agent to help in your search for the right place. Retaining the services of someone who knows the ins and outs of buying horse property in your area of choice is an absolute must. Shannon Kessler, a Realtor with Prudential Hunter Realty in Arroyo Grande, Calif., says, “A knowledgeable Realtor will save you a lot of effort. Horse property specialists know the needs of horse people as well as the land and access to trails, neighborhood support, et cetera.”

Horse barn
Photo: Tracey Helmboldt/Shutterstock

Once you secure an agent’s services, take the time to think about exactly what you want in your dream place. “Determine what you want to do with your property,” says Shannon. “Do you need an arena, a barn or just a shed row? Will you be hauling out or riding to get to the trails? Visit small horse facilities you admire, and knock on doors in the area. This is also a great way to get to know your potential neighbors.”

Wendy Kaufmann, a horse property specialist with Prudential California Realty in Orange, Calif., recommends researching and ferreting out horse-oriented areas where you might want to live before you even start house shopping. “Locate areas that are vibrantly and actively horse-oriented,” she says. “Make sure the area offers the amenities that you particularly desire, whether it be a community arena, a local parade or drill team group, Pony Club, 4-H, trainers, good trails, et cetera.”

Do-It-Yourself Horsekeeping

Before embarking on the purchase of small horse property, consider the following:

  • Stall cleaning: You must clean your horses’ stalls at least once a day, preferably twice if your horses spend a lot of time inside. Failing to do so will result in unhealthy conditions for your horses, a plethora of flies and a lot of angry neighbors.
  • Feeding: Horses should be fed anywhere from two to three times a day. If you or a family member can’t be home to do it at roughly the same time each day, you’ll need to hire someone to do it for you.
  • Exercise: Horses that live in box stalls or small paddocks should be exercised on a daily basis. Leaving a horse standing in his stall for days on end without exercise is unhealthy and often results in a potentially unsafe horse with pent-up energy.
  • Property Maintenance: Horses are tough on their surroundings. You’ll need to stay on top of repairs to fencing, waterers, stall footing and other areas where horses live.
  • Manure disposal: If your community doesn’t provide manure pickup service, you’ll need to find a way to dispose of your horse’s waste yourself. This may mean composting and finding a place where you can donate it, such as a nursery or other facility.

Start Shopping

Next, look at as many properties as you can in your price range, and use a critical eye when you consider each one.

“When evaluating a property, focus on the actual usable area of the lot,” says Alicia Thompson, a Realtor with Coldwell Banker Pinnacle Peak Realty in Scottsdale, Ariz. “Is there an arena? Sufficient turnout area, or large pens or stalls? If the property has an existing horse facility, is it workable for your use? If it requires renovation, how much? What would be the costs? Sometimes you are better off with a property that has no horse facilities in place and building your own.”

Wendy Kaufmann recommends evaluating the home’s land to determine if you can achieve your horsekeeping goals within the confines of the topography. “People sometimes have unrealistic expectations as to what they can do with their land,” she says. “Some things to think about include how much of the land is usable, and whether there are steep slopes and areas that would not drain well in winter months. If the land does not have existing horse improvements on it, see if there is sufficient room to set up enough stalls for your needs and still have an arena and turn out areas for your horses.”

Horse grazing in front of a barn

In addition, Lee Allen, horse property specialist for Realty Executives of San Antonio, Texas,  also recommends you research the details on the trails, zoning and other specifics in the area, including how many horses are allowed on a certain size lot. “Find out about the particular restrictions for the neighborhood, if there are any,” she says. “And find out if there are accessible riding trails too.”

Shannon Kessler agrees it is important to look at the neighborhood association rules and regulations (known as CC & Rs) for the homes in the area, as this will tell you how many horses are allowed per acre, what the scope of preservation of existing trails is, et cetera. “Many neighborhoods are zoned for horses, but are not friendly toward them,” she says. “Look at what your potential neighbors are doing with their properties. If most of them do not have horses, chances are they are going to complain about the dust and smell.”

Avoidable Mistakes

Horse property agents have seen first-time horse property buyers make a slew of mistakes, most of which were avoidable. One of the biggest errors buyers seem to make is not purchasing enough land for what they ultimately want.

“The biggest mistake people make is not looking toward the future,” says Shannon Kessler. “You must ask yourself, ‘how many horses do I plan to have in 10 or 15 years?’ ”

Small horse barn

Not thinking about the details of what you’ll need besides corral space is another problem. “Buyers often overlook things like the need for hay storage, tack storage, shavings and straw storage, manure disposal, farrier facilities, and trailer and truck storage,” says Bill Kraatz of Bill Kraatz Real Estate Services Inc./Huff Realty Inc. in Florence, Ky.

“I’ve seen people make mistakes by not thoroughly checking the covenants, conditions and restrictions [CC & Rs] for the area where they are buying,” says Lee Allen. “I’ve also seen people overstock their property with too many horses as well as buy a place without suitable fencing for their horses.”

“Amazingly enough, in our equestrian property consulting business, the one item most often overlooked by clients is manure disposal,” says Bill Kraatz.

Shannon Kessler agrees that not planning for manure disposal is a big problem with many first-time horse property buyers. “Your neighborhood may have curbside pick up of manure, but if not you must plan to compost it and perhaps deliver it to local garden clubs or nurseries as fertilizer.”

Although buying the right small horse property takes a lot of effort and hard work, the rewards are many.

“After boarding in either a large public facility or in someone else’s backyard, many people eventually experience the desire to purchase a home and put their horses in their own backyard and try it for themselves,” says Wendy Kaufmann. “Ultimately, most who do it decide that it is the best move they ever made.”

Further Reading
Modular Barns
Work Areas in the Barn


This article originally appeared in the September 2004 issue of Horse Illustrated. Click here to subscribe.

Cowboy Mounted Shooting

1


About the Author

Kim and Kari Baker are identical twins who raise Appaloosas on their Montana ranch.

Do you often hanker to slip into authentic western wear, saddle up your horse and travel back in time to when the West was truly wild? If you enjoy fast action events such as barrel racing and pole bending, then you’ll think Cowboy Mounted Shooting is—well, a blast.

Cowboy Mounted Shooting is an exciting blend of exhibition style Wild West shooting and a form of gymkhana. In this sport, you must skillfully rein your horse through a setup of 10 balloons or course of fire. Sound simple? Then add the task of cocking and firing a gun, holstering it then drawing a second revolver, as you and your horse travel through a course of balloons and barrels. Additionally, you and your horse will be timed and so must perform the task at a respectable speed. Each missed shot will add an additional five seconds to your time, as will a tipped barrel. This event is tougher than you might think. In fact, the demands on both horse and rider are much more than they first appear.

If you’re not already familiar with handling firearms and horses at top speed, this is probably not the sport for you. Training your horse to accept the sound of gunfire and the sight of balloons can be dangerous, so assess your skill and comfort level before you decide to pack a pistol and mount up.

How to Play

Each rider, clad in 1800s period western dress, carries two .45 caliber single-action revolvers loaded with black powder blanks and rides an established course that consists of two sets of five balloons.

Gun in hand you’ll charge across the starting line at a fast lope and proceed to target the first five balloons. This first set of balloons will challenge your ability to skillfully rein your horse along an indirect route. With over 70 existing patterns, line of travel will vary from serpentines to circles as horse and rider maneuver through gates and around barrels.

Immediately after the fifth shot is fired, you’ll holster the now empty revolver and draw the second revolver as you round the end barrel. The second set of five balloons is often placed in a straight line on a direct route to the finish line. Called the run-down, you’ll shift your horse into high gear at this point. The tricky part here is that you must not go faster than you can adeptly work the gun.

The Shootist

Unlike most other equine events where only riding skills are judged, the upshot of this competition is also aimed at the rider’s shooting skills.

The Cowboy Mounted Shooting Association (CMSA) has created a class ranking system that’s based on the competitor’s riding and shooting abilities. Competition for men, ladies and seniors are each categorized into five levels. Everyone begins at the entry level and must meet specific prerequisites to move up through each preceding class level.

Juniors aged 12 to 15 years share the same ranking system as the adults, but a special Wranglers Class exists for kids under 12 years of age. They ride the same set course of balloons as the other contestants, but do not shoot a gun while on horseback. Once they’ve completed the pattern on horseback they are then allowed to shoot five balloons under adult supervision while standing on the ground.

The Horse

While nearly all horse breeds are suitable for cowboy mounted shooting, stockhorse breeds dominate the field. “Bloodlines aren’t as important as the horse’s athletic ability or attitude,” says long-time trainer and mounted shooting clinician, Larry Townsend, of Townsend Ranch, near Darby, Mont. “Mounted shooting is very hard on the stability of the horse. Keeping your horse calm yet competitive is tough, and the more competitive you are the more difficult it is.

“Your horse should be sound and in good physical condition as well as able to handle up to four wide-open runs in a single day’s event. He also needs to be very well trained,” Larry adds. Just as in any other equestrian sport, the better the horse is able to respond to basic rein and leg cues, and speed control, the more successful you’ll be.

Resources:

Cowboy Mounted Shooting Association
(480) 683-0485;

www.cowboymountedshooting.com

Single Action Shooting Society
(714) 694-1800;
https://www.sassnet.com

Training Methods

There is no set rule on how to go about training your horse to become a competitive mounted shooting horse. In fact, there may be as many training techniques as there are trainers. But before bringing out the heavy artillery, your first consideration is your horse’s well-being.

“The first step I take in training a horse to tolerate gunfire is to teach him to accept earplugs [designed for horses],” says Larry. It’s imperative that your horse not be ear shy. Once he is comfortable with his ears being touched all over, inside and out, introduce him to the earplugs, which will cut down the noise he hears from the loud gunshots.

“We put the horse in a safe environment then put the earplugs in his ears. Even though he’s used to having his ears handled, he’s likely to shake his head in an attempt to dislodge them. You can stand by patiently, replacing the earplugs each time the horse shakes them out [until he gets used to them].”

Once your horse tolerates the earplugs you’re ready to commence shooting.
One method of training your horse to accept gunfire is to work your horse at one end of an arena, while at the other end of the arena a helper fires off a gun loaded with blanks. Rather than trying to restrain your horse, allow him to speed up if he needs to, then bring him back to a walk and have your helper shoot off another round. As your horse becomes used to the sound of the gun, begin working in circles at the center of the arena until you are satisfied with the results, then progress to the same end of the arena as your helper.

The next step is for you to handle the gun yourself. Once your horse tolerates gunfire shot from off his back at a walk, you can begin to speed things up. First at a trot, then lope and finally at a gallop. If he becomes overly excited when the pace quickens, transition down before advancing again in speed.

While most trainers use the above method, or a version of it, the same results are obtainable even out riding the trails. “I take my single action Colt .45 with blanks on a ride in the mountains. After a few hours of riding I find a long ridge and put my horse into a lope. When my horse starts to tire, I break him down to a walk and shoot a round. If he reacts to the gunfire, I lope him longer, then break down to a walk and shoot again. I continue this until he doesn’t react to the gunfire at a walk. After a month of this I shoot at a trot, then the lope, always looking for the same desired result,” explains Larry.

“Any exposure to the sound of gunfire is extremely helpful,” Larry says. Many prefer to start off with their horses loose in a pasture or corral where the horses are free to move at liberty. Another choice is to begin with therelatively quiet pop of a cap pistol, then progress to .22 blanks and finally graduate to the louder .45 Colt blanks used in CMSA competitions.

Balloon Blowout

To avoid a blow up, you’ll have to inflate your horse’s confidence around balloons. While the actual popping of the balloons shouldn’t bother a horse that has been trained to accept gunfire, the sight of these eerily floating orbs still may upset him.
When first introducing your horse to balloons, do it in a safe area and manner.

Begin with a balloon that is about one quarter filled with air. Once your horse remains relaxed when you touch him with the balloon, and he doesn’t react badly when it’s waved or batted around him, your next step is to fill the balloon with more air. At this point he has learned to accept a single balloon while being handled, but he needs to accept them in numbers. Now is your chance to decorate your horse’s barn, corrals or paddocks with a colorful bouquet of bobbing balloons.

OK partner, now that you and your horse are all geared up and ready for action, it’s time to mount up and burn some powder. Here’s hoping you get a drop on those ornery desperadoes you’ve been trailing and you’re quicker on the trigger.

This article first appeared in the September 2004 issue of Horse Illustrated magazine. Click Here to subscribe to HI.

Meeting Your Horse’s Nutritional Needs

11

Horse Illustrated MagazineMeeting a horse’s nutritional needs isn’t always easy. Many owners mistakenly feed their equine partners as if they were top Olympic show jumpers or United States Equestrian Team endurance champions. But the reality is that many horses are not fed according to what their true workload is. Achieving the right combination and balance of roughage, protein, fat and carbohydrates takes some research, as well as trial and error. Too much of a good thing can result in founder, colic, kidney strain or obesity. Too little can rob a horse of essential nutrients and cost you a winning performance or worse. Most importantly, a successful feeding program balances calorie input with energy output. Here are some basic guidelines for finding the right formula based on your horse’s need. These rules of thumb, along with advice from your vet or equine nutrition expert, will help you devise an appropriate feeding plan for your horse.

A balanced diet is essential to a healthy horseThe Basics
While calorie needs fluctuate with activity levels, some basic equine requirements remain constant across the meal spectrum. High-quality forage, either pasture or hay, should make up the bulk of any horse’s diet, from couch potato to Kentucky Derby winner.

With a gut designed for almost non-stop grazing, horses should consume between 1.5 to 2.5 percent of their body weight daily. This means that an average 1,000-pound adult horse should consume 15 to 20 pounds of hay per day, with additional grain supplements depending on condition and activity level. In their wild state, horses’ natural forage is a mixture of grasses, clovers, grains and the occasional herb or woody shrub. This provides a variety of minerals and vitamins, as well as fat and protein levels that vary with the seasons. Feeding a single type of hay year-round eliminates this nutritional diversity. The trick is to recreate the natural balance as closely as possible while still meeting all of the nutritional demands created by an artificial training regime. This is commonly done through the feeding of grain “concentrates.”

Concentrates
Any grain, grain mixture or manufactured feed product is referred to as a “concentrate” because it provides more calories and energy per mouthful than hay or pasture grass. Thus, it takes less time to consume the same amount of calories available in concentrates than in hay or grass. Concentrates are generally low in fiber and high in starch and fat. Feeding a concentrated feed along with hay and/or pasture is a way to ensure that working horses consume enough calories, vitamins and minerals to keep up with their energy demands.

Concentrates come in many forms-grain mixtures, pellets, ground meal and even liquid. Almost all have been processed to some degree, to improve digestibility, combine ingredients or extend the shelf life of the product.

Grain has at least 30 to 50 percent more digestible energy per pound than hay. Corn packs the most energy per pound, followed by barley, then oats. Measured in volume, corn is twice as high in calories as oats.

The most common methods of processing grain are the crimping, rolling, flaking or cracking of oats, barley and corn. This is done to open the outer layer of the grain seed to allow for easier chewing and digestion. Without this processing, much of the grain would pass through the digestive tract untouched. These grains are frequently combined in a mixture with molasses to reduce dust. This is called a “sweet” feed. Molasses also adds carbohydrate energy to the mixture, but in such a small amount as to be insignificant. A small number of horses with extreme sensitivity to sugar may get “hot” or “high” on sweet feed, and thus perform better on a dry mixture.

Commercial grain concentrates may also contain pelleted vitamin supplements. These balance out any nutritive deficiencies that may be lacking in the hay/grain combination. In some cases, a pelleted “complete” feed will combine chopped roughage with grain in a pre-set mixture and eliminate the need for feeding hay. Because these pellets are quickly consumed by most horses, the diet may lead to boredom-induced vices such as cribbing, weaving or wood chewing. Sometimes pelleted feeds have been known to cause choke in horses. One remedy for this is to soak the ration in water for 10 to 15 minutes prior to feeding, or feed a low-protein hay or chaff as filler.

Energy Needs
According to the National Research Council , if the following gaits are performed for two hours a day, an idle horse would have increased energy needs as listed (in percentages):
  • Slow walk, 12 percent
  • Fast walk, 18 percent
  • Slow trot, 46 percent
  • Fast trot or slow canter, 97 percent
  • Medium canter, 136 percent

In other words, a horse working at a fast trot for two hours should be fed twice as much as a horse that is idle. Additional calories should come from a mixture of both hay and concentrated feed.

Increase the amount of hay as exercise intervals escalate, but gradually add to the grain ration over time to avoid colic or other digestive disorders.

Fat
Fat has a number of benefits for the working equine. Not only is it 85 percent digestible, it does not contribute to a risk of colic or founder because it is carbohydrate-free. It produces 30 percent less heat than protein in the metabolic process, and it is an easy way to increase calories without increasing volume-not to mention fat helps produce glossy coats!

Essential fatty acids (EFAs) are nutrients responsible for promoting healthy skin and lustrous coats. EFAs are not produced by animals and must be supplied in their diets. Fat can be incorporated in a feeding regime by adding oils, rice bran or any commercial fat supplement. One cup of vegetable oil contains 240 grams of fat, the equivalent of 1.2 pounds of corn or 1.5 pounds of sweet feed. Thus it can be substituted as part of the daily grain ration. Adding fat to a concentrate is as easy as pouring it on as a top dressing. But note that oil can turn rancid in warm weather, so be sure to store it in a cool place.

Not all oils are created alike. Pure wheat germ oil is a rich source of vitamin E (an antioxidant), as well as essential fatty acids such as Omega 3 and Omega 6 (not found together in oils like corn oil). Essential fatty acids are required for the healthy functions of every cell, because they increase the horse’s oxygen consumption, metabolic rate and energy levels. Essential fatty acids are required for the functioning of kidneys, nerve and brain, immune system, cardiovascular system, gastrointestinal tract and digestion, muscles and performance.

Flax seed oil and flax seed meal (whole seeds cannot be digested) are high in Omega-3, -6 and -9 fatty acids, plus lignans, B vitamins, potassium, lecithin, magnesium, fiber, protein and zinc. With 25 grams of protein for every 100 grams of seeds and an ability to stabilize blood glucose levels, flax has become popular with many performance horse trainers.

Rice bran is another excellent source of fat and vitamins, similar in texture to cornmeal. Stabilized rice bran is often found to contain 20 percent fat (raw rice bran is very unstable; therefore it can become rancid within 24 hours if not stabilized).

When fed with a dry grain mixture rice bran can fall to the bottom of the feeder where it will be left behind by finicky horses. Thus, it is better to add rice bran to a sweet feed or chaff (chopped hay) where it will bind with the other ingredients (water can also be added to mix it in, since it is water soluble).

Work Levels

IDLE HORSE
While two riding lessons a week may qualify as hard work for you, any horse that is ridden or exercised less than three hours a week is considered “idle” from the standpoint of caloric needs. Good quality hay, fed in the amount of 1.5 to 2 percent of total body weight, (15 to 20 pounds per day for a 1,000-pound horse) can deliver all of the nutritional qualities of a balanced diet for an idle horse. The key is selecting the best quality hay and the appropriate type. Horses thrive on hay with a crude protein level of 10 to 12 percent. Excessive protein can cause kidney problems, skin allergies and developmental bone disorders. Alfalfa has the highest level of protein, as much as 28 percent in some cases. If you must feed alfalfa, avoid hay that is cut at the height of the growing season or grown specifically for dairy cattle. Better yet, look for an alfalfa/grass combination, or alternate feedings with a grass or grain hay, such as timothy, fescue, oat or barley hay. Grass hays typically have low levels of crude protein, as little at 6 to 8 percent; thus they are a good filler to combine with alfalfa.

If feeding exclusively a low-protein grass hay, or if the pasture forage is less than ideal, then a modest grain supplement is in order for an idle horse. A daily ration of between 2 to 3 pounds of a fortified grain mixture can help provide adequate vitamins and minerals for the average 1,000-pound horse.

Suggested daily menu: Idle Munching
10 lbs. orchard grass or fescue hay
5 lbs. first or last cut alfalfa hay

Or:
18 – 20 lbs. Bermuda grass hay
3 lbs. sweet feed

LIGHT WORK
A pleasure horse or recreational trail horse that is ridden an hour or two a day, five or six days a week, is doing light work. Even an equitation or pleasure horse in training does not burn the kind of energy that a jumper, barrel racer or polo pony does. Yet most owners tend to overfeed their pleasure horses out of a misguided belief that they are doing “hard” work.

While it is true that daily exercise burns more calories than standing in a pasture, the nutritional demands do not increase appreciably. An “easy keeper” with an efficient metabolism may be perfectly healthy on a diet of good quality hay.

But horses with a higher metabolism, older horses or show horses that need extra calories to keep their competitive edge, can benefit from the daily addition of a concentrated feed supplement. In addition to 15 to 20 pounds of hay per day, up to 5 pounds of 10 to 12 percent crude protein grain mix (broken up into two or more feedings) may be added on days the horse is worked.

Suggested daily menu: Eating Light
10 lbs. orchard grass or fescue hay
5 lbs. alfalfa hay

Or:
12 lbs. alfalfa/grass hay
3 lbs. crimped oats or barley

MODERATE WORK
Horses that are worked between seven to 12 hours per week, that regularly break a sweat during work and are required to sustain extended periods of exertion or deliver frequent intense bursts of energy fall into the category of moderate activity. This includes most hunters, ropers, reiners, cutters, lower-level dressage horses, gymkhana and competitive trail horses.

Most horse owners often consider this type of work “heavy.” But show horses in moderate work are less likely to be overfed than horses in light work, because overweight individuals are at a distinct disadvantage in competitive sports.

A horse in moderate work can easily meet his increased energy demand with a modest increase in grain. Up to 10 pounds of sweet feed daily may be appropriate for a horse in regular, moderate work, in addition to a daily hay ration of 15 to 20 pounds. Grain rations should always be increased gradually and never given in amounts in excess of 5 pounds at one time. Providing grain hay, such as barley or oat, as part of a balanced forage mixture will also add nutritional value.

Suggested daily menu: Moderate Meal Plan
8 lbs. orchard grass, fescue or
alfalfa/grass hay
8 lbs. oat or barley hay
6 – 10 lbs. sweet feed

Or:
15 lbs. oat or barley hay
5 lbs. alfalfa
8 – 12 lbs. crimped oats or barley

HEAVY WORK
Racehorses, polo ponies, eventers, jumpers, endurance horses and upper level dressage horses in daily training are considered to be in heavy work. Their total weekly work time may not be any greater than a horse in moderate work, but these disciplines require athletic performance at the highest level and therefore have the highest energy demands. For instance, 90 minutes of interval training for an endurance or racehorse uses almost twice as much energy as a dressage horse working at a medium trot for the same amount of time.

Horses in heavy work may have difficulty consuming enough calories to maintain optimum weight, as lengthy training sessions reduce meal times, travel can disrupt feeding schedules and in some cases, individuals may simply be too tired to eat.

Suggested daily menu: Heavy-Duty Dining
15 lbs. oat or barley hay
10 lbs. alfalfa hay
10-12 lbs. sweet feed
top dressed with 2 cups oil

Or:
25 lbs. alfalfa/grass hay
5 lbs. complete pellets
10-12 lbs. crimped oats
or barley
Top dress with 1 lb.
rice bran

Horses in heavy work should consume between 2 to 3 percent of their body weight daily in feed. In order to meet this demand, they may require as much as half of their intake, by weight, in concentrates.

Premium commercial feeds with fat added or top dressing your own grain mixture with wheat germ, soy, canola or coconut oil is a practical necessity for keeping weight on hard-working horses-and has the added advantage of boosting endurance. Free choice availability of quality hay is almost always in order, although some horses become finicky and bored with their selection when constantly confronted with the same menu. If this happens, try offering a mixture of hays, breaking grain feedings up into several small meals a day or offering turnout on irrigated pasture for a few hours every day.

Further Reading
Complete Feeds
Choosing Good Hay

Sarah Christie is a lifelong horsewoman and experienced endurance competitor.


This article originally appeared in the August 2004 issue of Horse Illustrated. Click here to subscribe.

9 Tips for Better Jumping with Your Horse

55
Hunter Show Horse

Here are some basic philosophies to keep in mind when jumping:

  • Build confidence from the start. Never test a young horse’s courage over fences; give him a chance to learn how to be brave in the first place. For example, one famous Olympic-level event horse wouldn’t jump into water as a youngster. He wasn’t timid; he simply didn’t understand what he was being asked to do.
  • Start any jumping session with a review of flatwork basics. Warm your horse up properly on the flat, and check that he moves promptly forward and back from your aids at all three gaits before you start jumping.
  • Always use an experienced lead horse when you’re introducing a new jumping concept. Horses are herd animals. Let a youngster see his wise old buddy do it first, and he’ll think it’s OK, too.
  • Trot jumps first. Trotting will pay off in spades down the road. Trotting teaches your horse to remain calm on the approach to his fences and encourages him to rock back on his hocks and jump correctly.
  • Never give your horse the option of refusing. For the first several months of your horse’s jumping training, keep the jumps so small that he can go over them from a standstill. If your horse questions a jump, never let him turn away and reapproach the fence. If you allow this, you’re teaching your horse how to say no. Instead, quietly keep your leg on, for as long as it takes, until your horse can hop over the jump from a halt or walk.
  • Go with your horse, however green his effort. Green horses jump in all sorts of awkward ways. Make sure you reward your horse’s endeavor by following him in the air with your upper body and arms, even if he jumps from a standstill. Be ready to grab mane or hang onto a neck strap, which you shouldn’t be shy about using. If you catch your horse in the mouth as he attempts to jump, you’ll quickly teach him that this game is not fun.
  • Train progressively. Let’s say you progress to a three-element grid one day. Great. But the next time you do grid work, start again with one element and gradually build to three. Begin cantering jumps another day? Terrific. But trot jumps as a warm-up the next time you jump, then try cantering. Review the steps you’ve learned before you go on.
  • If you get into trouble, make it low and simple. If your horse loses confidence for any reason during a jump session, don’t take a chance. Quickly lower the jump or simplify the question.
  • Find a ground person to help you. Just in case you need to lower jumps or change a grid, you need a helper on the ground. By the time you get off to change jumps and get back on, your horse will have had way too much time to think about whatever is worrying him.

Liked this article? Here are others on jumping your horse:

Stop Runouts and Refusals


Exercise Your Way to an Effective Approach


Showing Jumpers


Improve Your Hunt Seat Equitation

Horses and Stinging Insects

9

As the warm days of summer begin to really heat up, so does the temperament of the season’s stingers and biters. These testy creatures slither, fly, crawl or buzz around us for most of the summer, and we invariably give them little if any thought, unless we’ve been stung, bitten or had some other unpleasant surprise encounter.

Closeup of a bee

While most cause little harm to the general population of humans and horses, others are capable of producing serious lesions or may even trigger severe allergic reactions. Let’s take a look at our most common stingers and biters—bees, wasps, hornets, fire ants, spiders and venomous snakes.

Social Stingers

Bees, wasps, hornets and fire ants will vigorously attack in defense of their nests. The instant burning sensation from a sting is the insects’ foremost weapon in driving foreseen enemies away.

In most sting scenarios, pain and inflammation are primarily limited to a small area around the sting site, although dramatic swelling might occur if your horse receives a sting around the muzzle or eyes. Depending on the horse and how many stings he received, an allergic reaction could be slight to very serious.

How to Identify a Sting

In general, horses rarely exhibit serious reactions to a single insect sting. In fact, very often you will only learn that your horse has been stung when you stumble upon the small, soft swelling during a grooming session.

“Should your horse exhibit excessive swelling, irritability, pain or hives, he is potentially having a bad reaction to the insect venom,” explains Dr. Nancy S. Loving, DVM, of Boulder, Colo. “Hives indicate that the horse has developed an allergic response. Usually this condition is transient, but the presence of hives often precedes a more generalized allergic response that could include swelling and occlusion of the airways.”

Treating Stings

Of all the summer stingers, bees are the only ones with barbs on their stingers. If you find a bee’s stinger left protruding from your horse’s hide, gently remove the stinger, making an effort not to squeeze the venom sac, which inadvertently injects more venom into your horse. “If removal of the stinger can not be easily or safely done, it’s best to have your veterinarian attend to the problem,” says Dr. Loving.

For any sting, whether it results from a fire ant, bee, wasp or hornet, applying an ice pack to the sting site for 10 to 15 minutes will cool down the painful burning sensation, plus impede further swelling. “A dab of Icthammol or a baking soda poultice might also be soothing and will act as a drawing agent to pull out the inflammation,” advises Dr. Loving.

Stings accompanied with hives or that involve the head will require extra attention. Monitor your horse closely. Any time there is swelling in the head area, stay alert for signs of discomfort or trouble breathing. “Usually it’s best to arrange veterinary evaluation and treatment rather than wait until a more serious issue develops,” says Dr. Loving.

Along Came a Spider

A bite from a black widow or brown recluse spider, although not usually a life threatening problem for your horse, can create a difficult lesion to heal. “A typical reaction to a spider bite creates local inflammation and sloughing of affected skin and soft tissue,” says Dr. Loving. “Horses occasionally develop mild to moderate systemic symptoms, such as fever and depression.

“The bite should be treated as any wound, with careful attention dedicated to avoid infection. Your veterinarian will remove any necrotic (dead) tissue, then will minimize further inflammation with anti-inflammatory medications, plus administer a tetanus toxoid booster. Depending on the extent or seriousness of the bite wound, your vet may also put your horse on systemic antibiotics,” explains Dr. Loving.

Slithering Snakes

Venomous snakes are divided into two categories—the elapids, such as the coral snake, and the pit vipers, which include the copperhead and cottonmouth (water moccasin), along with 13 species of rattlesnake.

Snakebites in horses may be a more common occurrence in some parts of the country than others. “However, snakebites in veterinary practice seem fewer in number than one might actually expect, considering the numbers of snakes and potential encounters,” says Dr. Loving.

More often than not, a horse is bitten while out grazing in the pasture rather than out on a trail ride. Whether out of curiosity or by accident, most bites occur on the horse’s muzzle or face.

How to Treat a Snakebite

While a sizable number of viper snakebites don’t actually result in the injection of venom, they are still quite serious. “Contact your veterinarian immediately, as it is important to reduce the effects of deadly clostridia bacteria that are injected along with the bite,” says Dr. Loving.

“Minimizing tissue destruction is based on the principles of wound care. Your vet will clean the wound thoroughly and administer an appropriate antibiotic treatment along with anti-inflammatory medications to minimize swelling and edema. If the bite is on the muzzle or face, your vet will probably use a scalpel to open the wound so that it won’t swell shut. Leaving such a wound open to the air will help reduce the proliferation of anaerobic bacteria.”

Just as in spider bites, the use of a tetanus toxoid booster and systemic antibiotics will reduce the chance of infection. Ask your vet for any first-aid instructions while you wait for his or her arrival.

Depending on the size and species of the snake, as well as the size of the horse and the location of the bite, prognosis for your horse’s complete recovery may range anywhere from poor to very good.

Preventing Stings and Bites

If you notice a troop of insects flying back and forth from a certain location, stay clear of the area until you can safely check for a nest. Set aside time to fully explore your property. Carefully check for nests around barns, sheds and horse trailers. Whether you can personally take care of nest removal will depend on the size of the nest, where it’s located and whether or not you are allergic to wasp or bee venom, but there are always professionals capable of the task.

Horse grazing in a pasture in front of a small barn

While bees usually build their nests in hollowed-out logs or trees in wooded areas, wasps and hornets will often construct their paper nests right under our noses. They prefer the open eaves of barns and sheds, as well as inside horse trailers.

Subterranean nests are much more difficult to find and destroy. Some cantankerous wasps, like the Yellow Jacket, will construct their underground nests, not only in open pastures and hay fields, but may also burrow deep inside your stack of barn-stored hay, or inside open-ended pipe fence panels. Once found, the inaccessibility makes them very hard to destroy. If their nest is inside a structure such as a pipe fence panel, you may be able to deal with it on your own, while a nest that is actually underground could house a large colony, making it difficult and dangerous to handle without the help of a professional.

Trail ride

On the other hand, fire ant colonies are by and large quite easy to locate. This is due to the domed effect of an ant colony’s excavated soil. Contact your local agricultural agent to determine your attack strategy for controlling fire ant colonies.

Spiders are sneaky little beasts, so your best defense is to keep your barn clean. This means you must eliminate all spider nests. Most spiders build their webs in out-of-the-way areas, such as high above in the barn rafters or tucked back in dark corners.

While it’s impossible to prevent all snakebites, you can reduce the odds of a snake encounter by keeping a clean barn to discourage snakes from moving in. Spilled feed invites rats and mice into your barn, which in turn attract snakes.

Whether you like these critters or not, they come with the territory of spending time in the great outdoors with your horse. You may not be able to avoid them altogether, but to decrease the risk of you or your horse getting stung or bit, the first line of defense is to be observant.

Further Reading

Authors, Kim and Kari Baker are long time Appaloosa breeders living in northwest Montana. Besides breeding horses this twin duo also combine their knowledge and talents as equine photographers and writers.


This article first appeared in the July 2004 issue of Horse Illustrated magazine. Click Here to subscribe to HI.

Herbal Remedies for Horse Health

9

Ever wish there was a way to calm your horse, help him heal or reduce his pain naturally? According to equine herbalists, and even some veterinarians, herbs provide effective aid for a variety of equine mental and physical issues. In fact, you’ve probably seen some common herbs in the supplement section of your local feed store. But what is the purpose, safety and effectiveness of these products, and how might they fit in with your horse’s health care program?

Hilary P. Self, a medical herbalist and director/co-founder of Hilton Herbs, based in Somerset, England, international purveyors of herbal- and plant-based products for equines and canines, explains that herbs and herbal products, when used correctly in horses, can help prevent or minimize the onset of certain disorders, treat various physical and behavioral conditions (both acute and chronic) and strengthen general health by giving the body the ability to heal itself. But Hilary says the way herbs are used and their role in equine health is often misunderstood.

Why Herbs?

Herbal Health:
Another Viewpoint

Not everyone in the veterinary community believes herbs have much of a role in prevention and treatment. Kevin G. Keegan, DVM, Diplomate of the American College of Veterinary Surgeons, associate professor (Department of Veterinary Medicine and Surgery), University of Missouri, Columbia, says, “Purveyors of herbal treatments for horses and humans suggest that herbs are useful for a variety of medical conditions. Mostly these conditions are vaguely described, difficult to definitively document, usually self-limiting or just plain made up. The potency of most herbal products is low. This is why in most cases they are not dangerous to use. It is also why they don’t work to any significant extent.”

Dr. Keegan also expresses a concern for the lack of regulations that govern herbal products. “They are considered a food supplement rather than a pharmaceutical,” he says. “Therefore, you never really know what you are getting in terms of purity or concentration.”

If you use herbal products, be sure to tell your veterinarian prior to administration of any pharmaceuticals. Dr. Keegan warns, “Although the risk is slight that herbal products will interfere or adversely interact with concurrently administered medications, at least give your veterinarian the chance to investigate the possibility. There are some notable exceptions in humans and animals where the administration of herbal products has caused injury and death.”

There’s no doubt that pharmaceuticals offer powerful and effective treatments for a myriad of various short-term and chronic problems. But they are more effective for some problems than others and, depending on the particular drug, carry a risk of side effects—a special concern for long-term use. Consequently, many people seek an alternative or complementary therapy and traditional plant-based remedies—namely herbs, such as yucca, garlic, goldenrod, milk thistle and many others.

Herbal use for medical and veterinary applications is not new. For centuries, herb and plant materials were the basis for most human and veterinary medicines. Through the ages, the specific chemical agents in plants that produced the therapeutic effects were identified, isolated, extracted, and eventually, synthesized; today’s medicines are almost exclusively produced from chemical substances as opposed to natural plant sources. With their long history in medical tradition and relationship to their pharmaceutical cousins, herbal complements and alternatives make a lot of sense to some people.

“Herbs and herbal products have their indications and limitations,” states Allen M. Schoen, MS, DVM, director of the Veterinary Institute for Therapeutic Alternatives in Sherman, Ct. Dr. Schoen is a member of the Veterinary Botanical Medicine Association and lectures on herbal medicine at the School of Veterinary Medicine at Tufts University. He says herbal products have their place in equine prevention and treatment if there is some justification for use based on studies, traditional use or experiential evidence. “Their most appropriate use is when medications are not working or are having side effects, where surgery is not a reasonable option or where there is no appropriate conventional medical treatment. Sometimes, clients prefer to try herbs before trying a medication that may have significant side effects. However, herbal products should not be used when an appropriate medication or surgery is indicated.”

Prevention and Treatment
Hilary Self has been using herbs in equine preventative medicine and treatments for more than 20 years, working with and receiving referrals from a local veterinarian. She says, “The biggest problem is to make the owner understand that generally herbs, as a treatment, do not work in the same way or as quickly as conventional medicines. People have become so used to giving a pharmaceutical and seeing the symptoms disappear overnight that they can lose heart or patience with complementary therapies. What they forget is that the conditions manifested in their horses have often taken years to develop, therefore it’s unrealistic to expect them to be cured overnight.”

According to Hilary, herbal treatments not only help alleviate clinical signs, they

Further Reading

  • A Modern Horse Herbal by Hilary Page Self (Half Halt Press).
  • Complementary and Alternative Veterinary Medicine: Principles and Practice by Allen Schoen, MS, DVM, and Susan Wynn (Mosby).
  • Complete Holistic Care And Healing For Horses—The Owner’s Veterinary Guide To Alternative Methods And Remedies by Mary L. Brennan, DVM, and Norma Eckroate (Trafalgar Square).
  • The Herbal Handbook for Farm and Stable by Juliette de Bairacli Levy (Faber & Faber).

potentially relieve the root cause of the problem. “Herbal medicine looks at the whole horse,” Hilary says. “For example, with an arthritic horse, you would use herbs with anti-inflammatory and analgesic actions, such as devil’s claw, yucca, turmeric, willow, meadowsweet and yarrow; herbs to stimulate circulation and improve blood supply to the affected area; herbs to support the removal of inflammatory waste products from tissue; and herbs that encourage excretion of toxins from the body by supporting the liver and kidneys. Arthritic joints have a propensity to accumulate acidic inflammatory waste products in the area, so it’s beneficial if you can use herbs that will not only cleanse the affected tissues of the waste products but also then support the body in the removal of these products via the kidneys.”

When used in prevention, herbs should be given three to four weeks in advance of the “danger period” to allow the herbal properties to get into the body system, Hilary explains. “For example, a horse prone to seasonal allergies (allergic rhinitis, sweet itch, et cetera) should be administered the appropriate dried herbs well ahead of time. Another example is preparation for winter when a horse’s immunity may be lowered or there is an increased risk of viral infection. Obviously, prevention only works if you know of a pre-existing problem, but every physiological system of the horse can benefit from the prophylactic use of herbs.”

When You Use Herbs
Be informed and responsible when administering any product to your horse. First, make sure you know what condition you’re addressing via a proper veterinary diagnosis. “Once owners have a diagnosis, they are in a better position to choose which herbal product will be most suitable,” says Hilary.

Next, make sure your veterinarian knows about any herbs you intend to give your horse, especially if the horse is on other medications, and consult with an expert on which herbs to use. “Definitely, talk with either a veterinarian trained in herbal medicine or a trained herbal expert,” advises Dr. Schoen.

Just because herbs are natural doesn’t mean they are harmless. Misuse can cause harm. Follow label instructions and veterinary advice on usage, as overdosing could pose a risk to your horse. Don’t combine too many products, either. “Many owners seem to think using a ‘cocktail’ of supplements is a good idea,” Hilary says. “They mix a variety of herbal, homeopathic, aromatherapy and vitamin supplement products together, with no thought of the cumulative effect on the horse. I always liken this to a person taking a couple of Valium, plus some Prozac, and washing the whole lot down with a large gin and tonic!”

If you compete, check your show association’s list of banned substances before administering herbal products. Some herbs will “test” positive. Introduce the herbs gradually, as you would any new feed, and monitor for reactions. Adverse side effects are rare, but horses are individuals and can exhibit allergic reactions, Hilary warns. “Introduce the herbs slowly and build up to the full dosage over seven to 10 days. Generally, if the horse is going to exhibit any allergic reactions, they will tend to occur in the first 24 hours.”

Finally, be patient and give your herbs a chance to work. “It takes approximately three to four weeks for dried herbs to get into the system and start to have a beneficial effect,” Hilary points out, “and five to 10 days for herbal tinctures to be effective.”
With careful research on your part, herbal remedies can be another effective health aid for your horse.

Further Reading
An Herbal Sampler

Marcia King is an award-winning freelance writer specializing in animal health and welfare topics.


This article originally appeared in the May 2004 issue of Horse Illustrated. Click here to subscribe.

0FansLike
0SubscribersSubscribe
We use cookies to help personalize content, tailor and measure ads, and provide a safer experience. By navigating the site, you agree to the use of cookies to collect information. Read our Cookie Policy.
OK