Enter our 12 Days of Christmas Giveaways here!
0 ITEMS
  • My Account
  • Holiday Gift Guide
  • Podcast
  • Webinar
Subscribe Combo
Enable cache13
Home Blog Page 1057

Longeing Gear

2

Longeing

You can’t expect to adequately control a horse, especially an energetic horse, if you are longeing in a loose halter. If you do longe in a halter, it must have a very close fit and not be able to twist sideways into the horse’s eye when there is tension on the longe line. You may find you have more control with a longeing cavesson which is designed for longeing and fits snugly. The longe line attaches to a ring on top of the noseband, so you don’t have to reattach the line when you change directions.

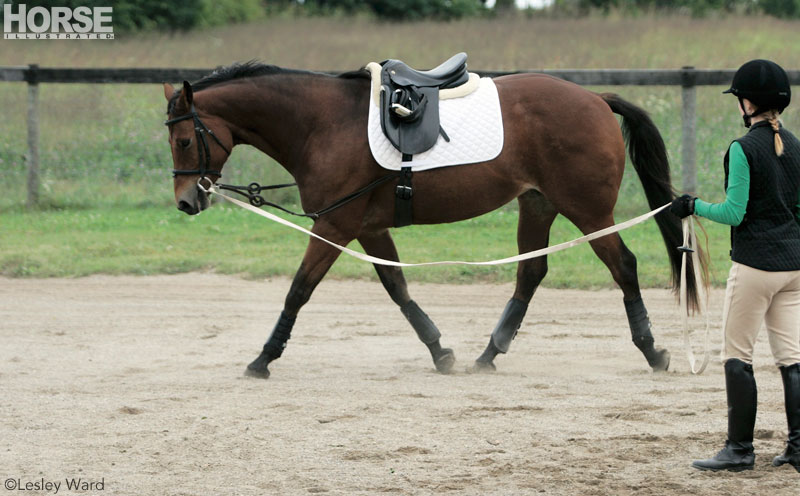
When longeing in a bridle, the longe line can be attached in two basic ways. You can pass the line through the inside bit ring (closest to the handler), over the horse’s poll, and then attach it to the bit ring on the opposite side. Or you can run the line through the inside bit ring, under the horse’s chin and attach it to the bit ring on the opposite side. Remove the reins, or secure them by placing them over the horse’s head and twisting both reins from bit to throatlatch; pass the throatlatch strap through the reins and fasten.

Many trainers like to use the Pessoa longeing rig, which operates on a pulley system and encourages the horse to use his hindquarters and is useful for setting the head. Another option is to use side reins, with a surcingle or a saddle, which can help the horse learn to carry himself in a balanced manner. If you’re not sure how to adjust, have an experienced horseperson help you.

Trainer, coach and competitor Lynn Palm recommends using a flat cotton longe line, never nylon, which is slippery, twists easily and can burn your hands. “You often see people with the longe line tangled in loops around their hands,” she says. “You should have the line ‘stacked’ in your hand in large loops so it doesn’t get tangled.” It’s also a good idea to wear gloves.

Use protective leg gear, such as splint boots or polo wraps, to protect the horse from injury due to over-reaching or brushing.

The longe whip acts as an extension of your arm, keeping the horse out on the circle and encouraging him to move on. “Practice using the whip and keeping your longe line organized before you get out there with the horse,” Lynn encourages.

Read on for tips on safe longeing >>

Complete Feeds for Horses

5

Want to streamline your feeding program? A “complete feed” might be the way to go. These feeds, available from most reputable feed manufacturers, have both grain and roughage in them and are designed to at least partially replace the forage (hay and/or pasture) in your horse’s diet. They provide concentrated nutrition, but because they compress all that feed into a more convenient format, they have to be fed carefully.

Here’s why: Long-stemmed forages have to be chewed and digested slowly, thus occupying your horse for several hours each day. But a pelleted or textured (sweet-feed format) complete feed can be gulped in mere minutes. So a horse that isn’t receiving tough, fibrous stuff to chew may consume more feed, more quickly—potentially leading to major weight gain, or even colic or laminitis. He might also become tempted to develop stereotypies, or vices, such as cribbing, woodchewing or stallwalking, because he doesn’t have enough “chew time.”

That doesn’t mean you should avoid complete feeds; but you might want to heed the following advice:

  • Read the feeding directions carefully and never exceed the amounts listed on the bag or label (adult horses should consume no more than 1.5 to 3.0 percent of their bodyweight in total daily feed).
  • Unless there’s a really good reason to totally eliminate hay from your horse’s diet (such as a severe case of heaves or very poor teeth), continue to feed a small amount of long-stemmed hay along with the complete feed. Dr. Martin Adams, of Southern States Cooperatives, recommends about half a percent of your horse’s body weight per day in hay as a rule of thumb when you’re feeding a “complete” ration. Check the package directions for more guidelines, which may vary depending on the fiber content of the feed.
  • Feed hay before the complete feed to allow your horse to partially satisfy his hunger. This will make him less likely to gobble his pelleted or textured ration.
  • Make sure fresh water is available to him along with the hay. A horse that drinks while he’s eating long-stemmed fiber will experience gut fill, which will also slow down his appetite.
  • If you can’t feed your horse long-stemmed hay, consider feeding him soaked hay cubes or roughage chunks before the complete feed. In such products the hay is chopped into short pieces, but it will still help fill him up to some degree.
  • Feed small amounts of the complete feed spread out over three or four meals a day, rather than offering only one or two large meals. This will enable your horse to digest the feed more thoroughly as well as cut down on the boredom factor.
  • If your horse tends to inhale his feed like he never expects to see another meal, slow him down by placing a couple of large, smooth rocks in his feed tub. Or choose a complete feed made of small pellets, and serve them in a shallow, wide feed tub placed on the stall floor. That way, your horse will have to work to pick up all the pellets.

Karen Briggs is a freelance journalist, equine nutritionist and the author of Understanding Equine Nutrition.

Coping with the Loss of Your Horse

44

The grief experienced over the loss of a horse can be deep and profound. Even if you made the decision to euthanize your horse to release him from pain, it does not make your loss any easier to bear.

While we all will grieve and heal in different ways, rest assured that grieving over the loss of your horse is completely acceptable—and honorable. After all, your horse was likely a member of the family and you spent many wonderful hours together. So, let yourself feel the pain and grieve the loss. When you are ready, you’ll be able to move on and cherish the gifts that your horse gave you while you were together.

Along with the memories you’ll have forever, here are some ways to keep your horse close to your heart.

  • Make photo frames from the last set of shoes. Sand and paint the shoes, then glue a photo to the back of the shoe and weave a ribbon hanger through the nail holes.
  • Plant a variety of flowering bulbs that come up in the spring. Every year, when the flowers poke through the earth with their fresh and vibrant colors, you’ll be reminded of your horse.
  • Hold a ceremony to celebrate your horse’s life. There are no rules here. Do whatever you deem appropriate, and invite those you know were important in your horse’s life—or celebrate all by yourself. It’s up to you.
  • Plant a deciduous tree or flowering shrub in a location where you can watch it during the year. The progression through the seasons can be a metaphor for the shared experiences you had with your horse and the growth you both experienced.
  • If you’ve saved some of your horse’s mane or tail hair, braid a bookmark, a window ornament, a wristband or whatever item would be most meaningful to you.
  • Buy or make a special piece of jewelry—maybe with a horse motif or engraved with your horse’s name—that you wear all the time. Whenever you notice the jewelry, you’ll be reminded of your horse.
  • Create a keepsake memory book of photos, written stories and recollections.
  • Horses change our lives and teach us exactly what we need to learn… if we listen. Jot down the lessons you think your horse taught you. The good, the bad and the not-so-pretty.
  • Do something good to honor your horse. You might volunteer at your local equine rescue organization or therapeutic riding center. Choose a cause that speaks to you, and think of your horse as you participate in whatever activity you choose.
  • Commission a drawing or painting of your horse from photographs you have, or create one yourself.
  • Donate your favorite horse book to your local library, with an inscription dedicated to your horse. Or donate a year’s subscription to your favorite horse magazine or breed journal.
  • Start a new 4-H club or Pony Club chapter to introduce kids to horses, or become a leader of an existing club.
  • Donate time, money or a needed item to your local vet clinic in memory of your horse.
  • If your vet euthanized your horse, send them a card expressing your thanks for their support through this trying time. Vets are people, too, and they find it just as hard to say goodbye to a beloved animal as we do.

Finally, as you’re grieving, it may help to read the story titled “Rainbow Bridge,” which you can easily find by searching online. You likely will cry more tears as you read it, but they will be good, healing tears.

The website www.hoofbeats-in-heaven.com offers support, resources and links to other worthwhile sites for those grieving the loss of a horse.

Remember, as you’re grieving, you may feel like you’ll never get over the loss of your horse. It will take time, but eventually the thought of your horse will bring good memories to mind and a smile to your face rather than tears to your eyes.

Until that time comes, nurture yourself in healthy ways and spend time honoring your horse in whatever manner best suits you.

“No heaven can heaven be, if my horse isn’t there to welcome me.”
–Author Unknown

Further Reading
Dealing with the Loss of a Horse
Grief Counseling for Horse Owners


The author dedicates this article to her childhood equine partner, Surino, a true friend who passed away in 1985.

Extend the Jog and Collect Benefits

3

Western pleasureWhen schooling, the majority of western riders focus their attention on establishing consistently slow and steady gaits, which are essential for competition in many western events. However, there is a downside to reducing a horse’s speed—he can lose the smoothness and fluidity of a normal stride.

When a horse is required to slow down his speed by unnaturally shortening the length of his step, he’s compelled to tighten his muscles and place excessive strain on his joints. The results are coarse gaits that appear choppy and mechanical, and an increased tension and stiffness in the horse’s body. To prevent this from happening, give a horse the chance to move in a long frame at an extended jog or trot, which will lengthen muscles, increase the flexibility of joints and allow his entire body to stretch and relax.

A restricted stride can cause a horse to emphasize action in both the knees and the hocks. This is due to the lack of impulsion coming from the hindquarters at reduced speed. This style of movement is also frowned upon in the show arena.

In addition to the physical benefits gained by a longer stride, a horse’s gaits will also improve. When a horse is asked to engage his hind end and drive under his body with his hocks, he will naturally increase the length of his stride. The longer stride will reduce the unwanted lifting motion of the knees and hocks, because the legs will have the freedom to move forward with full range of motion. When the horse is brought back to the slower speeds, the work at the extended jog will make him more physically capable of traveling with a flatter and more sweeping stride.

Though underutilized by many western riders, incorporating the extended jog and working trot can significantly enhance the gaits of the western performance horse.

Dale Rudin has trained various breeds and competed in western performance events in Southern California. Her philospohy emphasizes a willing attitude while developing a high level of physical performance.

Avoid Frostbite at the Barn

0

Because responsible horse owners must venture outdoors regardless of below freezing temperatures, we are more likely to be frostbitten. Winter riders are especially prone. But frostbite and its damage can be avoided.

Buckskin horse in the snow

Frostbite happens when skin tissue—usually fingers, toes, earlobes, chin, cheeks or nose—is damaged by exposure to temperatures below 32 degrees Fahrenheit.

Ask the Vet: Can horses get frostbite?

Frostnip (first degree frostbite) is the ice country horsekeeper’s everyday curse. Pale, tingly skin is its trademark. Frostnip raises no blisters, causes no permanent damage and can be safely treated at home.

However, repeatedly frostnipped tissues are susceptible to superficial (second degree) frostbite. Gently but firmly pressed, frostbitten skin feels crusty on top and soft underneath. The area is numb, and it will appear waxy. As it thaws, it becomes red and painful.

Within 24 hours, clear fluid-filled blisters may appear. Superficial frostbite generally requires medical treatment.

You’re not likely to sustain deep (third degree) frostbite on a brisk winter ride but riders who fall and get hurt can be at risk. Affected skin is cold, hard and bluish-gray. Side effects may include hypothermia indicated by slurred speech, confusion and loss of coordination. Deep frostbite can lead to permanent tissue damage, blood clots and gangrene—it’s a medical emergency, don’t try to treat it yourself.

To soothe frostnip or very mild superficial frostbite, soak injured areas in lukewarm running water for 20 minutes.

An alternative: soothe the area with warmed damp towels. Don’t dunk frostnipped or frostbitten skin in hot water, don’t rub it (especially with snow or ice), and don’t warm it using heat devices, such as blow dryers, heating pads or hot water bottles.

Swathe yourself in a comfy blanket and sip a warm decaffeinated beverage. Avoid smoking (smoking inhibits circulation to extremities), caffeine and alcohol (alcohol spurs rapid cooling of blood). Take aspirin or ibuprofen for discomfort. Don’t pop blisters if they form.

Avoid frostbite altogether by layering outdoor clothing (air pockets help retain warmth), shielding body parts from bitter arctic wind and deep cold and avoiding exposure when exhausted, ill, intoxicated or wet.

Wherever there’s ice and snow inhabitants are bound to get chilled, but avoiding dangerous conditions will ensure you stay happy and healthy this winter.

Sue Weaver has weathered many Midwestern winters.

Preventing EPM

22

Since equine protozoal myeloencephalitis (EPM) can leave a horse neurologically damaged in spite of treatment, conscientious horsemen seek ways to prevent this devastating disease. There are 2 ways to protect a horse—with vaccination, and limiting exposure to the protozoa (Sarcocystis neurona) by keeping feed and water from being contaminated by opossum feces.

THE VACCINE – Fort Dodge Animal Health received conditional license approval for their EPM vaccine in December 2000, and has been conducting further studies to determine effectiveness of the vaccine and to alleviate questions and concerns, making progress toward fulfilling the requirements for a full license. There is now evidence that the EPM vaccine will stimulate a mediated cell response against the protozoa, according to work done at the University of Missouri.

Rob Keene, DVM (who works at Fort Dodge Animal Health) says Fort Dodge is also working with Ohio State University to develop a challenge model, to reproduce EPM in the laboratory so the vaccine can be tested more fully. A field performance study is being done at Texas A&M and the University of Florida, using cases from eight additional veterinary teaching hospitals and 3 private practices.

Keene says the main thing in the decision about whether or not to vaccinate your horse is risk factors. “If you live in an area where opossums are in abundance, or use feeds that are not heat-treated or that might be contaminated with opossum feces, your horses are at risk. Stress seems to be involved in precipitating the disease. Horses engaged in stressful careers, heavy training, being frequently transported or subjected to any other kinds of stress could benefit from vaccination,” he says.

“Before a horse becomes exposed to risk factors, it should be vaccinated. A 2 dose series 3 to 6 weeks apart, followed by an annual booster, seems to protect most horses. If you are in a situation where you can’t control exposure to opossums, however, some folks are thinking about twice a year vaccination, but this has not been established as a recommendation,” says Keene. “If a horse has been treated for EPM and recovered, many of the universities are suggesting that the horse be vaccinated, along with any other horses in that group. If you have one horse on the farm that has EPM, the risk is there for others.”

MINIMIZE EXPOSURE – Efforts should be made to keep opossums away from horses, horse feeds, and water sources. “The University of Florida has successfully set up opossum-proof facilities. And Ohio State uses electric fences to keep opossums from getting into pastures. It’s expensive, but you can fence them out of paddocks and pastures,” says Keene.

To protect feeds, use covered containers for grain, pellets and supplements, and a fence around haystacks that no opossum can get through (small mesh netting). Be careful about purchased feed; always use heat-treated grains and pellets.

“Just because it’s in a pellet doesn’t mean it’s safe. It may not have been heated enough. Contact the feed manufacturer, to find out. Feed must be heated to at least 156 degrees Fahrenheit in order to kill the protozoa,” Keene says. “A recent paper by Dr. William Saville (Ohio State University) on various disinfectants that might be helpful around the barn indicated that there’s not much that is effective against the EPM organism except steam cleaning. Heat is the best plan for disinfecting premises.”

Treatments are available. Ask your veterinarian.

Heather Smith Thomas is a rancher and freelance writer based in Salmon, Idaho.

Flawless Riding Position

13
Western Morgan

A good equitation rider will always stand out by creating the impression that horse and rider are one, riding effortlessly and effectively so that it appears he or she could just as easily be sitting up there having a cup of coffee as completing a horsemanship pattern. Accomplished eq riders have worked hard to achieve this. To get the most out of your practice, follow these tips:

  1. Don’t stop riding when you use your reins. The horse must drive up to the hand. Don’t let your energy drop just because you’re giving a cue with the reins.
  2. Let your seat find the saddle. Riders often come up out of the saddle. If this happens, think of pushing in with your belly button and find the saddle.
  3. Keep your toes pointing forward, aligned with your horse’s body, not pointing in or out or coming forward of the cinch.
  4. Ride every day. Good equitation comes from muscle memory. You don’t want to have to be constantly thinking about it.
  5. Keep your lower back soft. It is the hinge that allows your pelvis to move with the horse’s motion.
  6. Shoulders must be stay level and aligned. Maintaining the proper hand and arm positions will help prevent your shoulders from twisting.
  7. You have to be able to use your body parts separately; for example, you don’t want your shoulder lifting when you lift your hand.
  8. Rather than a solid curb bit, beginners should start with a loose jaw bit (cheekpieces of the bit are hinged) with a slobber chain, which gives some warning when the rein is used. Make sure you start your request by just taking out the slack and try to get a feel for the response. If you don’t get the desired response, you can increase the pressure slowly with a bump, not a jerk. Jerking your horse is likely to adversely affect your body position, not to mention your horse’s.
  9. Keep your elbows bent and wrists straight and relaxed. If your arms are stiff you won’t have the give and take you need to establish subtle communication with your horse’s mouth.
  10. Make your practice sessions challenging. Work on tasks that require coordination. Just sitting perfectly still constantly in one position makes a rider stiff. You want to be still, but not paralyzed. Think of it as flowing with the horse.

Ronda Quaid is a freelance writer and working toward perfecting her reined cow horse skills.

Horse Injury Rehabilitation Overview

0

A variety of injuries can sideline a horse. Treatment and rehabilitation will depend on the particular injury, the severity of that injury and your individual horse, his age, overall health and intended use. For example, the success rate for treating fractures in foals is much higher than in adult horses, as there is less weight on the injured limb and they heal quickly.

Horse on stall rest

The first step with any major injury is always prompt veterinary attention. Be sure to discuss realistic expectations with your vet. Certain injuries may heal to the point where a horse can have a comfortable and happy life as a “pasture ornament” but won’t be able to be ridden. For instance, depending on the configuration of the fracture, some pelvic fractures heal so successfully that the horse can return to athletic soundness, while in other cases the horse is left with permanent lameness.

After surgery or recommended treatment, your veterinarian will outline a  rehabilitation program, based on your horse’s specific injury. Stall rest is standard with any major injury, but the length of confinement will vary. With some cannon bone fractures the horse will be riding again five months later, while a complicated fracture can require stall rest and confinement for up to a year. Rehabilitation of a bowed tendon typically requires a minimum of six months and as much as 16 months, though not all of this will be spent in a stall. With most fractures the horse is confined to a stall for anywhere from 60 to 120 days.

Once an injury begins to solidly heal, your vet will tell you when you can begin exercising the horse (usually limited to hand walking) and for how long. As rehabilitation continues the horse may be allowed restricted turnout in a small paddock. In many cases, your veterinarian will want to lightly sedate the horse before it is turned out for the first time to lessen the chance of the horse re-injuring itself by racing around. If there are no complications and healing progresses well, many horses with injuries will be able to be turned out regularly, or even be back to work.

Further Reading
Equine Tendon and Ligament Injuries

Emergency Contact Information

17
Horse in Stall

Every horse owner’s worst nightmare is a phone call in the middle of the night from a boarding stable operator or horse sitter, reporting that the horse is sick, injured or worse.

As terrifying as such a phone call can be, it’s vital that whomever is caring for your horse has access to emergency information so that you and other important contacts can be reached. Being able to reach you, your veterinarian and your insurance provider in a timely manner can mean the difference between life and death for your horse.

If you are boarding your horse, provide a source for emergency contact information that you can securely attach on the outside of your horse’s stall. You can print the information on your computer on an 8 1/2 x 11 piece of paper and have it available. Click here to download a free stall card to keep your horse’s information readily available.

The sign should contain your horse’s name, your name and all your phone numbers. You should also give the name of your veterinarian and his or her emergency contact numbers. If your horse is in training, provide the name and phone number of your trainer. If your horse is insured, include the name and 24-hour phone number of your insurance company. It’s also a good idea to add farrier information and other important notes, such as allergic to hay or doesn’t cross tie.

If you are leaving your horse in the care of a horse sitter, make sure they have your mobile number, and keep your phone with you and turned on while you’re away. Also be sure to leave the name and phone numbers of where you will be and during what dates so they’ll have an alternate way to track you down.

Make sure your horse sitter has the name and phone number of your veterinarian and the name and phone number of your horse’s insurer. Leaving your horse’s insurance policy number is also a good idea.

By providing caretakers with this important emergency contact information, you will be sure your horse will get help when he most needs it.

Audrey Pavia is the author of Horses for Dummies.

Clipping Countdown

1

The ever-increasing fuzz on your horse’s coat tells you that winter is on its way. If your horse’s winter coat is causing him to overheat during workouts, it might be time to think about body clipping.

Follow these easy steps for hassle-free clipping.

1. Clip a clean horse. Give your horse a soapy bath, and allow him to dry completely, before you clip him. Vacuum or towel-bathe him in cold weather. Dirt on your horse’s coat will make your blades clip unevenly and can even strain and overheat your clippers.

2. Clip in a well-lighted area. You can’t clip what you can’t see.

3. Make sure your clippers are in good repair. Nothing is worse than getting halfway through a clipping job, only to have your clippers die on you. Send them out to be cleaned and oiled once a year.

4. Use new blades, or sharpen your old ones. Clipper blades should be resharpened after five or six body clips.

5.  Keep your clippers cool with oil or cooling spray. Clippers heat up when they work hard. When this happens, stop for a moment, dunk running clippers in blade wash, or spray them with a cooling product. Oil blades and clippers frequently. Towel off excess oil or cooling products before continuing.

6.  Assemble all your tools before you start. Organize your equipment so you don’t waste time and test your horse’s patience by running hither and yon to fetch essentials.

7.  Know the horse you are clipping. You can’t clip a moving target. Take time to acquaint your horse to clippers, and clip him in stages, if needed, to keep him relaxed. Find a patient friend to hold your horse while you work. Consider sedation by a veterinarian if your horse won’t stand still for the job.

8.  Use a sturdy, outdoor extension cord that’s long enough to stay safely clear of entanglement in your horse’s legs.

9.  Be patient. A good professional needs two hours to body-clip a horse. Mere mortals take longer.

10.  Clip appropriately. First time clipper? Then tackle only large, easily clipped body areas first. Use a trace or hunter clip, where you leave difficult areas like the legs, face and elbows untouched. Removing your horse’s winter coat obligates you to blanket him accordingly. A full body clip requires extensive blanketing; other clips, which leave more coat intact, require less. Your blanketing budget should match the clip you select.

Learn More: Show Grooming Countdown

Annie Eldridge is an upper-level eventer and HI’s regular English Training Talk columnist.

0FansLike
0SubscribersSubscribe
We use cookies to help personalize content, tailor and measure ads, and provide a safer experience. By navigating the site, you agree to the use of cookies to collect information. Read our Cookie Policy.
OK