Enter our 12 Days of Christmas Giveaways here!
0 ITEMS
  • My Account
  • Holiday Gift Guide
  • Podcast
  • Webinar
Subscribe Combo
Enable cache13
Home Blog Page 1061

Selecting the Right Riding Vacation

0

Riding on the beachA riding vacation can supply memories for a lifetime. To ensure those memories leave you with smiles instead of regrets, explore your options and ask the right questions before choosing a trip.

If you want to take a cattle drive, are you in shape to spend much of the day riding? A working ranch can provide a true glimpse of cowboy life, but do you really want to experience the not-so-glamorous tasks of branding and vaccinating calves? Pack trips offer thrilling vistas, but mountain trails can be nerve-wracking if you’re scared of heights.

Once you’ve narrowed down your vacation choices, contact several past guests. Ranches should gladly provide names of former guests you can call or e-mail. Ask their honest opinion of the trip, horses and riding conditions. This step can save you money and frustration, so don’t skip it! 

Be realistic about your riding abilities. If you consider yourself an advanced rider, you must be able to safely ride and control your horse at a gallop. Also consider the type of riding you’ve done–have you ridden out in the open or over rugged terrain? “Most people are pretty honest, but we do get the person who says they’ve ridden their whole life, but they mean arena riding, which is different than what we do here,” says Bonnie St. Clair, who handles reservations at Grapevine Canyon Ranch (www.grapevinecanyonranch.com) in Pearce, Ariz.

A 10,000-acre working cattle and guest ranch, Grapevine Canyon has 80 horses and accepts only 30 guests at a time. Guests can ride up to six or seven hours each day. “Rides are divided according to abilities,” says Bonnie. “The more you know, the more you can do.”

Many ranches require that you ride in an arena first to prove you can handle your horse before trail riding or working cattle. Let the ranch choose a horse based on your abilities. “Explain what you want so the wranglers can pick the right horse for you. Then, after you ride, let them know if you’re happy or unhappy with that horse,” advises Bonnie. “Sometimes there are personality conflicts between horse and rider. We let people change horses if they want to test their abilities or ride something different.”

Questions to ask the ranch or outfitter:

  • What is the maximum number of guests?
  • How many horses do you have?
  • How many people are typically on each ride?
  • Are rides divided into slow-and faster-paced or by rider ability?      
  • How much time can I ride each day?
  • Are lessons or instructional rides offered?     
  • If we are working cattle, how much time is spent on the ground?
  • Will we be riding on steep trails? (Important if you’re afraid of heights!)

Further Reading
Travel Guide for Equestrians

The author is a freelance writer based in Florida who spends her vacations in the saddle.

Sacking out with Ken McNabb

1

If you’ve used spooky, cinchy or head shy to describe your horse, trainer Ken McNabb prescribes a round pen sacking out at liberty.

Ken introduces new sights, sounds and sensations using the relationship established in his basic round pen steps. If something troubles the horse enough to make him leave the trainer, he must go back to work until he’s willing to accept these new challenges.

Ken starts by presenting his hand at the horse’s nose where he can see and smell it, and then proceeds to rub him all over. If at any point the horse reacts, even if it’s as small a reaction as lifting a leg, flinching or a twitch, spend some extra time on that spot until you get no reaction at all.

“The more time you spend on this, the better,” Ken stresses, “and make sure you stay in front of the horse’s ribs.”

Repeating this process with a coiled rope, Ken runs it up the horse’s face, over his ears, down his legs, under his belly and over his hip, convincing him this is just another part of the trainer to be trusted. “Make sure you work both sides, and do it firmly–not enough to run him off–but with confidence,” Ken explains. “If you’re nervous and edgy, he will be too.”

Next Ken introduces a Navajo blanket. Folding it into a small square, he begins at the nose then rubs it over the horse’s head covering his eyes and eventually rubs his entire body. Coming back to the horse’s head, Ken opens the blanket one fold larger and repeats the process until the blanket is full size.

“Use your imagination. The blanket around his belly like a cinch, flap it and drop it. This controlled environment is where you want him to experience noisy, unexpected objects for the first time, not out in the hills,” urges Ken. “It’s up to you to expand your horse’s comfort zone.”

Should the horse become nervous with any of these new objects, go back to the place where he was last comfortable to reassure him, and start over. Again, if he just can’t handle it and leaves, he must go back to work doing some of the turns he learned in the preliminary round pen steps.

When you’re confident your horse can accept whatever you present, he’s ready for another round of sacking out while wearing a saddle.

The author is based in Central California.

Signs You Have the Wrong English Bit

12

Horse show

Have you noticed that your horse is flipping his head when you take up contact with the reins? Does he seem to open his mouth as a form of resistance? How about the position of his headset? Is your horse coiled up like a spring, with his chin on his chest? All of these may be symptoms that you are using the wrong English bit on your horse.

While many frustrations under saddle are associated with training issues rather than problems with the bit, issues with tack can also make your horse difficult to ride. For example, a horse that literally tries to take the bit from your hands by flipping his head or rooting forward and down with his mouth probably needs a tougher bit. Don’t go too far to the opposite extreme, however. If you’ve been using a smooth snaffle, switch to one

Finally, a horse that avoids rein contact by arching his neck and pinning his chin nearly to his chest is said to be “behind the bit.” In most instances this is caused by a combination of a feisty horse, a rider using hand aids that are too strong and a much too severe bit. By returning to a milder bit and working on simple exercises on the flat, the horse should learn to accept the bit and the rider’s hands. If you investigate alternatives in bit choices, you’ll be on your way to more successful rides under saddle.

Rumor has it the author has enough bits to start a museum. 

Leading Your Halter Horse to Victory

14

Like contestants in a Miss America pageant they strut and parade their exceptional beauty and perfect bodies. Their glossy coats reflect the sunlight like varnish, emphasizing every movement and highlighting the sinuous curve of muscle rippling as they walk into the arena. You’ve bought a registered horse with flawless conformation and you think he’d stand a great chance in halter classes — if only he didn’t look like such a backyard buddy. His coat doesn’t glisten and his muscles aren’t defined like the beauties you see at shows. What can you do to give him that winning look?

We’ve asked judge and veteran competitor Bambi Thomas for her advice on creating a champion out of your “diamond in the rough.” Follow her program and you’ll see dramatic results — and some blue ribbons on your wall.

Eye of the Beholder

“There are several key factors in preparing, fitting, conditioning, and grooming a horse for halter,” says Bambi. “First, you have to start with an individual that has good conformation to begin with, and, in my eyes, the prettier the better.” The halter horse is judged on conformation and beauty. The horse should be of correct frame and structure, conditioned and fit, have a gleaming hair coat and, ideally, have that special eye-catching spark. He should also lead in a relaxed but bright manner and stand quietly but with alertness: Head up, ears forward, eyes wide and open, neck stretched and arched.

The ideal temperament depends somewhat on the class and the handler. “I like a horse that’s a little high-strung,” says Bambi. “More up than you’d see in a pleasure class. I think a horse that walks into the ring and is a little cocky or a little sassy is going to catch your eye. But for youths, you want a horse that’s a little more settled, a little easier to handle because they’ll do a better job exhibiting that horse.” That goes for novices as well.

In a halter class, the handler enters the ring at a walk, leading the horse in a straight line to the judge. Next, the handler is asked to jog or trot by the judge. Finally, in a line-up, the handler squares the horse; for stock breeds (Quarter Horses, Appaloosas, Paints, et cetera) this means standing straight on all four legs, not stretched or parked out. As you may have already discovered, this is easier said than done. Since many handlers are experienced or even professionals, they make it look easy. And it should — look easy that is. But don’t be fooled. To get that look, you’ll have to spend time and work before you ever enter that ring. Don’t worry, though, if you break everything down into steps, you’ll find yourself heading into that ring with confidence and a horse worth the final look.

Under the Skin

So your horse has the perfect conformation and the best temperament. In a class full of such physical perfection, how can you maximize your champ’s chances? First, you want the judge to see him so healthy he literally glows from inside out. “You have to have them healthy on the inside before they’re healthy on the outside,” says Bambi. “We feed a pelleted feed by Purina, Strategy, which is 14 percent protein. In conjunction with that, we also feed whole western oats and high quality alfalfa hay.” Schedule an appointment with your veterinarian to discuss changes in your horse’s diet. Tell her your goals and let her know what your horse is eating now. She may recommend testing your hay for nutrient analysis to get a more exact fix on what he’s receiving — so you’ll know what’s safe to supplement, and what not to overfeed.

A key part of your horse’s healthy look is regular exercise. Not only will that firm up and sculpt muscle, but it’ll improve his overall health and that will affect his coat.

To get that sculpted look, Bambi works her horses on walk, jog and trot (a stepped-up jog) exercises in a round pen with a 5-inch base of sand, 6 days a week, no more than 10minutes a day — but she works them hard one day, then lightens up the next. “Every other day I’ll really get in there and make him work, make him blow. The next day, he works the same length of time, but it won’t be quite as hard. This is how you get the muscles shaped and hardened up: You stress the muscles one day, give them time to repair the next, and they build back stronger.”

To help sculpt a finer looking neck, Bambi uses neck sweats. “We want a nice, pretty clean neck with a lot of shoulder definition,” says Bambi, “so we work them in neck sweats, and then let them stand, tied in their stalls, sweating in neck sweats for about 60 to 90 minutes.” Afterwards, Bambi rinses them off and, after they’re dried, curries, brushes and vacuums the horse.

Which brings us to the final step in creating that healthy glow: grooming. And this doesn’t just mean spraying on products that add a sheen to your horse’s coat. While these may take up the shine a notch, they should only be used as a supplement to your hard work. Not only does Bambi groom the horse prior to workouts, she also spends time grooming before putting the horse back in the stall. There’s just no substitute for “elbow grease.” The more time you put into brushing, the glossier your horse will be naturally. Also, avoid overbathing. Rinsing off sweat after workouts is fine, but use shampoo sparingly, and when you do use it, make sure it has conditioners in it, or that you apply a conditioner afterward to avoid drying out all your efforts for a winning coat.

Step at a Time

While you’re putting the shine on your halter horse’s coat, you should also be polishing your horse’s performance. Bambi begins training youngsters as soon as they’re weaned, about 3 to 4 months of age. If your guy is older, don’t worry: Training youngsters is basically the same as for adults except sessions are shorter and more frequent — about 5 minutes each, three or four times a day. Before starting training, the horse should be accustomed to wearing a halter.

For the halter class, the horse must lead, “whoa,” and square up. If your older horse is a bit rusty or rough on these, you might wish to retrain him as if he were a youngster. In teaching a weanling to lead, Bambi introduces the pressure of give and take on the halter by placing the baby in a supervised stall with a drive rope, and letting the youngster step on the rope as he walks around. “After a couple of days of them stepping on this rope and giving to the pressure, they’re starting to learn to whoa and to give to the pressure on their face,” says Bambi. Then Bambi starts leading them in the stall. “I pick up the lead rope, use a give and release, encourage them to take a step or two forward and reward them. When they crowd, I just bump them over, and reward when they’re correct. I do the same when they pull away from me.”

To teach the horse to walk toward her, Bambi stands in front of the horse and encourages him to take a couple of steps, clucking and telling him “walk.”

Along with leading, the horse learns that “whoa” means to stop and stand still. Because the youngster has already learned to stop when he feels pressure on his face (through stepping on the drive rope), Bambi simply attaches the verbal command, “whoa.” She says, “What’s so nice about this is that they’re learning themselves, so when I restrain them, they’re already used to that action.”

As the horse begins to understand the concept of “whoa,” Bambi slowly teaches the horse how to square up. She begins simply by picking up the feet and placing them where they should be positioned, cueing the horse with “whoa” to ask him to stand still. This step takes much patience, practice and repetition. “When you first start, keep working with one foot, because you pick it up, tell him ‘whoa,’ and he’s going to move it. So pick it back up, put it down where you want, and tell him ‘whoa.’ It’s a lot of repetition and youmay be working with just the one foot for the whole session.”

It’s not uncommon for the horse to keep the foot just worked with in place, but then move two others out of position. Again, Bambi patiently replaces each foot with a “whoa.” Or, the horse may stand with his weight shifted unequally. “They may want to teeter-totter,” Bambi says, “where they don’t want to put the weight on, for example, the one rear foot. I walk back, pull the hip over a little bit, tell them ‘whoa,’ and step back up front. I’ll be there 2 seconds, and there goes the weight off the foot! I might walk back 20 times during that session and just pull that hip over. That may be the only thing we do during that session.” Don’t rush the process. Putting in the extra effort now to establish a firm foundation will pay off later in the ring.

As the horse matures and begins understanding his cues, Bambi starts refining those cues and working toward more perfection in the square. As she squares the horse up, Bambi asks the horse to step up to her, rather than backing into position. “If you back a horse that’s a little cow-hocked, they’re going to be toeing out and bringing those hocks in close together,” she explains. She also teaches him hand signals by association: Moving her wrist toward her body means to come forward a little bit, pushing her wrist toward the horse means to back up a little bit.

In squaring the horse, Bambi prefers to use the right rear foot as the stationary foot, so when she steps the horse forward and the stationary foot is where it should be, she tells the horse whoa. “Then, using my hand and my wrist, if I want the horse to come forward, I bring my hand forward. You can actually move that left hind foot — back, front, back, front — until he finally gets it to a spot that’s close to where you’ll tell him whoa, and he’ll stop and put it down.

“Then, I’ll reach up with my right thumb and touch the horse’s withers; take my toe of either foot, touch the horse a little bit on the left front coronary band, push a little bit with my left hand, and the horse will move that front left foot back. When I get the movement I want, I quit, release and say ‘whoa.'”

To bring the right foot back, Bambi keeps her position, reaches her fingers over to touch the opposite side of the withers and touches the horse’s right foot with her left toe.

As a final element, Bambi defines a special cue to release the horse. “I rattle or flick my wrist at him, and then back him up two or three steps to release him from his pose,” she says. “I never just turn him and walk right out of the pose or, if I have to step from one side to the other side during a show, the horse thinks I’m stepping off him, and might pull out of position.”

Bambi sprinkles halter training sessions of 2 to 5 minutes each into daily routines two or three times a day, rather than drilling in one extended session. As she pulls a horse out of the stall prior to grooming, she may ask him to square up. Ditto as she walks the horse from the grooming area out to the roundpen, and again before she puts the horse away. “It doesn’t matter if you’re in the wash rack, in the barn, or out in the middle of the field or roundpen,” she says. “It gets to be second nature for them.”

Showing Off

Once the horse is ready for show, the handler must properly present the horse. As the exhibitor, you should walk your horse straight out to the judge, with the horse’s nose aimed toward the judge’s chest. This allows the judge to see how the horse tracks from the front. When walking to the judge, and later when trotting your horse by, you should take care to walk or trot a straight line. “If you’re not walking a straight line, the horse isn’t going to look like he’s very straight,” Bambi warns. “The horse’s legs will look like they are going every which way.”

When your horse is in the line up and being presented to the judge, both horse and handler should look like they’re awake. “Get your horse squared up and ready to be presented when the judge comes around,” suggests Bambi. “Stand at the front of the horse, off to the side and have the horse’s head up. While I don’t like to see someone at the end of the lead rope swinging it around or blowing into the horse’s nose, an exhibitor can make quiet clucky sounds or snap their fingers a little bit to get the horse’s head and ears up. But as the judge goes back to look at other exhibitors, don’t ask the horse to keep his ears up the whole time; save that for when the judge comes back for his final look.”

Of course, your horse should be nicely groomed — mane neatly pulled over and banded, tail long and flowing, and wearing a clean halter that fits correctly, with the nosepiece positioned at the bottom of the cheekbones — not hanging down on the face. Silver trim should be polished. “If just one horse wears the halter, try to purchase a color of leather that complements the horse,” Bambi says. “If you use the halter for several horses, go with a medium color leather, because that goes with a multitude of horse colors.”

Don’t neglect yourself as the handler, either. You, too, should be well-groomed, wearing a properly shaped hat, cleaned and pressed shirt, clean starched jeans or slacks that don’t hang inches above your boots or drag in the dirt, and cleaned and polished boots. Stand straight and quiet — you’re presenting the horse, not yourself — face the judge and pay attention to your horse.

By following in Bambi’s footsteps, you, too, can bring out the best of your horse.

Preparing for Vet School

21

The hours are long, the weather doesn’t always cooperate, and some clients don’t pay. Yet for those dedicated to the profession of veterinary medicine, the rewards of saving a life and helping an animal heal make up for any other frustrations.

Dr. Jim Thompson, associate dean of students and instruction at the University of Florida College of Veterinary Medicine, explains the main requirements of this exciting, but challenging, career to help students evaluate their aptitude:

Solid science and math education background
Keen desire to solve scientific problems
Good communication skills
Basic business skills
Ability to delegate work and manage people
Practical experience
Also remember that you must enjoy working with both people and animals since, as Dr. Thompson points out, “the animals never show up by themselves!”

So, how can you prepare for vet school?
“If you’re in high school, lay the foundation with a good science knowledge base,” advises Dr. Thompson. “Biology, chemistry and physics are the three key sciences. Get some experience in the veterinary profession as a veterinary assistant to be sure this is what you really want to do. If you intend to be an equine practitioner, you need direct experience in that field.”

Beyond time in the classroom, Dr. Thompson urges students to engage in independent learning and read up on veterinary related topics. “As a doctor, you’re required to continue to learn throughout your life. I encourage students to keep a journal of cases they’re seeing and then to read more about those topics on their own, outside of school.”

With hundreds of applicants competing to fill limited openings at each vet school, good grades and experience are important if you hope to be accepted. “Experience is a critical aspect of the application,” says Dr. Thompson. “Without it, you will not be admitted.”
 
You may want to be an equine veterinarian, but once you are accepted into a veterinary school, your studies will not focus solely on horses. “In the University of Florida program, all vet students take the same curriculum for the first 2 1/2 years,” Dr. Thompson explains. “During the last 1 1/2 years, students focus on their career interests.” For example, students wanting an equine-centered practice would take courses such as equine reproduction, equine medicine, equine surgery, large animal pathology and more.

The author is a freelance writer based in Florida.

Learn about scholarships for vet students.

Western Pleasure Headset

17

Western AppaloosaHeadset Defined

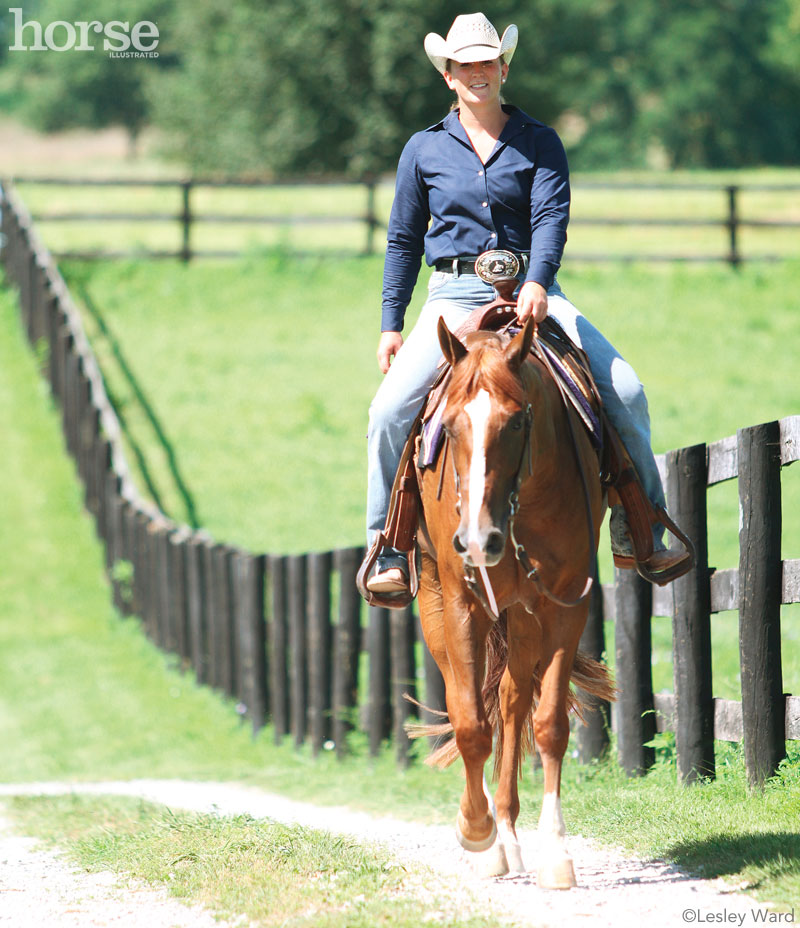
The ideal headset for the western pleasure show horse can be seen on a horse that carries its neck flat with the rest of its topline.

“He will have a totally level topline from his poll all the way to his croup, and he will carry his nose about 3 to 5 inches ahead of the vertical,” says Steve Heckaman, an American Quarter Horse Association (AQHA) judge, trainer and show-ring veteran. “You don’t want to see a horse so nosed out that he’s trying to escape the bridle, and who looks like he wouldn’t give his head and come to you if you picked up the bridle reins.

In contrast, you don’t want a horse that’s behind the vertical, that looks like he’s intimidated to hold his head. You want to see a horse that’s really relaxed and really comfortable with where he’s carrying his heat and neck.”

Conformation First

To succeed in western pleasure showing, it’s best to start with a horse that’s conformationally suitable for this discipline.

“The more conformationally correct the horse is, the better and easier his chances are of athletically being able to do what we’re asking,” says Heckaman. “We like to see a horse with a long pretty neck that comes flat out of the top of the wither; instead of a neck that comes straight up out of the shoulder. It’s more difficult for a horse to relax his neck at the wither and balance himself if the neck comes straight up out of the shoulder.”

A suitable western pleasure horse should also be long across the topline of his neck and short on the bottom line, which makes it easier for the horse to carry his neck at the ideal level,” says western pleasure trainer Kelli McCamy, who has won several AQHA Congress and World Championships, and whose stallion, Impulsions, is a leading AQHA sire.

But McCamy cautions against a really long neck. “I used to think that the longer the neck, the prettier and the more elegant, but those long necks are really hard to train to carry level. They want to carry them too low or too high.”

Training

Heckaman emphasizes that achieving proper head and neck carriage is the end result of step-by-step training. “If a horse uses his body correctly, he’ll put his neck and head in the right spot. It’s a matter of teaching a horse to balance.”

Because the big money events in western pleasure showing are the futurities, many show horses are trained for western pleasure as 2-year-olds. But, conformation permitting, a horse of any age, regardless of previous training, can be trained to show in western pleasure classes. Retraining mature horses already schooled in other disciplines is similar to training green horses; you go back to the beginning and establish a way of moving, balance, trust, and responsiveness.

“It’s not much different,” Heckaman says. If you have an older hunter, for example, you want to collect his trot. You just go back and school him with the give-and-take to round himself up and shorten his stride up a little bit.”

Regardless of whether you are schooling a youngster or retraining a mature horse, training a western pleasure horse to carry its head correctly takes time. It’s a slow process, because horses learn best through repetition, says McCamy.

Proper head carriage has nothing to do with the type of bit used. It is a mistake to think that a good headset can be achieved by using a high-port curb bit that forces a horse to cam its head a certain way. Trainers like McCamy and Heckaman don’t use bits at all when starting western pleasure horses. McCamy begins by suppling the neck and withers first. Using just a halter and lead rope, she works on the ground with the horse, asking it to bend its neck to one side and then the other. This teaches it to bend its neck and withers in a relaxed manner so that these points will be supple and responsive, she says.

The only training aids that McCamy uses are a sidepull and a fork. A sidepull is a lightweight, halter-like headstall with two pieces of rope that go over the nose, and with rings at the side which the reins are attached to; a fork is like half of a running martingale. It attaches to the girth, and comes from between the legs with two rings that the bridle reins go through,” explains McCamy. “This needs to be very loose; nothing that pulls their head down. It’s not really training them at this point to drop their head in a certain position, it’s just telling them where they can’t go.”

McCamy rides with the sidepull and fork for up to three months. “It’s a slow process,” she says. “But this method teaches them to be flexible in their withers and their poll, and eventually, with repetition, you’ll achieve a good headset without using undue restraint.”

Heckaman also uses the sidepull and the same suppling exercises when riding. “I teach them to follow their heads,” says Heckaman, who asks his horses to give their heads by following the pressure on their noses. Once they do this, he rewards them by releasing the pressure.

From there, the horses are introduced to a mild snaffle. “We start to refine them a little, going back to the basics of asking them to give to pressure with the give-and-take, then releasing them when they give it. We begin working on the lateral movement, taking the right rein and asking them to give their head to the right, then the left rein, asking them to give their head to the left.”

Heckaman works on the horse’s body the same way. We teach them to move away from leg pressure much like we do with their head,” explains Heckaman. “If we put our leg on them and ask them to move forward, once they move forward, we take our leg off. As they start refining, we teach them to move the shoulders around their hindquarters, then their hindquarters around their shoulders, again with a give-and-take from our leg, until we have them responding to leg pressure.”

Fixing Faults

Sometimes, despite good training, headset faults still occur. The key is to recognize the specific fault and then work to correct it accordingly.

Being behind the bit.

This occurs when the horse is not relaxing its head and neck, which puts the horse “behind” the desired horizontal-vertical relationship between the head and neck, and gives the appearance that it is over-arching its neck and tucking its nose in.

“If a horse is not relaxing his head and neck, if he’s tending to strain it a little more than we want, then we encourage him to reach forward more with his head and not come back,” says Heckaman. “If the (mature) horse wants to stay behind the vertical, I’ll go to a milder bit, then lunge-trot the horse, take him out to the pasture, extend the lope, get him up and moving a little bit, get some forward motion in there, and try not to back the horse off. A horse won’t go behind where his legs are going, so if I can get his legs extended, his nose will follow his legs.”

Too far ahead of the vertical.

Heckaman suggests using equipment that will create a little more sensitivity, such as a lighter snaffle. “And do some exercises to supple the neck and poll,” he says. “Soften the mouth and make him give his head a little more, so when you release the rein, he goes into a more balanced position.”

Heckaman advises working on exercises that ask the horse to bend its head. “Take his neck and head from side to side, encouraging him to go forward with the legs, but asking to give his head,” says Heckaman. “Make sure one rein is independent from the other rein, and then alternate reins, asking him to give his head to the right and move forward, then asking him to give his head to the left and move forward.”

If conformation causes the head carriage to be ahead of the vertical, then the rider needs to continually work at helping the horse to stay at the desired vertical.

“You can make a horse put his head in the correct place,” says McCamy, but it’s a constant problem and you’ll have to work on it every single day.” Like Heckaman, McCamy develops flexibility by pulling lightly on alternate reins as the horse is moving forward. “They will eventually drop their neck, and when they do, release them,” says McCamy, who prefers doing this exercise in a snaffle and fork.

Too low to the ground (peanut roller).

McCamy and Heckaman recommend picking the horse’s head up to the desired level, or even over-elevating the head a bit, and to teach the horse through repetition to ease away from the pressure by raising its head.

Riding with an over-check can also help a horse that carries its head too low. Notes McCamy, without you having to constantly pull all the time, this teaches them that the more they raise their head up, the less pressure they have; the more they lower their head, the more pressure they have.” To make an over-check, take a small rope, and either (1) tie it from the top of the bridle from the poll back to the saddle horn or (2) attach it to each side of the bit, then run it across the nose, up the forehead, underneath the bridle, and back to the saddle horn. McCamy warns against tying the over-check too tightly to the saddle horn. It should not prevent the horse from comfortably lowering its head to a desired position. Lunge the horse five to ten minutes first, to ensure that it won’t resist the device.

Staying in frame.

Keeping the horse working within its frame is most important, because it is both the trainer’s goal and it is what the judges are looking for. Only a balanced horse can do this.

“A lot of riders get a horse out of its true frame by trying to fix the horse’s head,” says McCamy. “They constantly pull with their hands so much that they lose the legs, slowing the horse’s movement so the horse can’t go forward. This is where your legs come in. You’ve got to keep the horse going forward to keep the horse in his true frame.”

To avoid “falling out of frame,” correct head carriage should be taught in conjunction with teaching proper balance and movement. “If you’ve got a trained horse that you’ve worked on by repetition,” explains McCamy, “you’ve got a horse that carries his head properly.”

McCamy says that when getting ready for a show, she doesn’t worry about headset. If it’s already there, then it’s just a matter of keeping the horse moving, keeping him in his frame, keeping him collected and keeping him moving properly, she says.

“On the other hand, if you have a horse that’s not been to many shows, and he wants to look around a little bit, then the night before show (I’ll) ride him with the fork,” says McCamy. “This helps keep his attention, keeps him focused, and reminds him where that head is supposed to be.”

No Short Cuts

When developing the western pleasure horse, certain training aids, such as the fork, sidepulls, and an occasional over-check, used in conjunction with sound training techniques, can help the horse understand your expectations.

According to McCamy, training aids can give you a mechanical advantage when teaching a horse, with less trauma. “You can certainly train a horse to carry his head properly without training aids, but you may end up doing a lot more jerking and pulling and putting the horse under a lot more pressure.”

But training aids are not intended to be used as shortcuts or time-savers. When used with a program of repetition, training aids teach a horse to move away from pressure, rather than pulling against it.

“That’s what we’re teaching with the sidepull and the fork,” says McCamy. “Repeated procedures are less traumatic than jerking and pulling all the time.”

Any training aid that’s misused or overused can be abusive and damaging. “I’ve seen people lunging their horses with the bridle reins tightly tied between the legs,” says McCamy. “The neck is all bowed up and the head is behind the vertical. When a horse is pulled in this much and overdone, he can’t go forward, so it hampers his natural gait. Too many training devices hamper movement.”

Draw reins and martingales have their place in certain instances, for very short periods of time, but when novices rely on them, you can damage a horse, says Heckaman. “People tend to ride a horse in draw reins, and pull the head down and into a frame and hold it there. Then the horse gets dull on the snaffle and gets down on their forehand.”

According to Heckaman, using restrictive training aids creates pull points that are different than when the contact is direct. “If you ride in a martingale, with the reins running through the martingale and to the bit, whenever you pick up the reins, the martingale pulls more down between the horse’s front legs,” he says. “Then, when you take the martingale off, you’ve got more of a straight-line pull from your hand to the horse’s mouth, so it feels different. So you end up going back to school the horse to respond to straight-line contact, anyway.”

There are no shortcuts to finishing the western pleasure horse and getting nice head carriage. “It takes a lot of time,” McCamy says. “A horse is trained by repetition only. When the horse is properly trained, when you take the time to train the horse and the conformation is pretty correct, everything else just falls into place and the headset will be there.”

Further Reading
Soft Hands

Horse and Rider Spa Treatments

24

Your horse works hard. You work hard. Don’t you both deserve a little pampering and stress relief?

A day at the spa could be just the ticket. Spas have been bastions of human relaxation for centuries. Horse spas now offer the same sorts of pampering for our four-legged partners. All at a cost, of course.

But what if money’s a little tight? No matter! Most things you and your horse can find at a spa can also be done at home and the barn for a fraction of the cost.

Here are some of the horse/human treats you’ll find at a spa. With a little ingenuity, you can incorporate these into your barn or home and get all the benefits of going to a spa without the big expense.

Hair Care

For your horse: If the weather’s warm enough, bathe your horse with the most luxurious equine shampoo and conditioner you can find. When dry, your horse will smell great, look stunning and be the envy of the barn or neighborhood (until he rolls).

For you: Splurge on a lavish shampoo and conditioner. Wash, rinse, repeat. Then apply the conditioner and wrap a soft towel around your head. Read Horse Illustrated while your hair soaks up the nourishment. Rinse.

Take some time to pamper you and your horse with a spa treatmentMassage

For your horse: Invest in some good massage therapy books and start massaging your horse. He won’t care if you’re not a pro (but mind the bone structure and keep away from inflamed areas and recent injuries).

For you: Check to see if your city has a massage therapy school. You can often get a superb massage from the students at a great price. Or, indulge yourself and hire a professional. It will be worth every penny.

Chiropractic

For your horse: Ask for recommendations from your vet, farrier or riding buddies for a chiropractor certified by the American Veterinary Chiropractic Association.

For you: Some AVCA-certified chiropractors also work on humans. Round up several fellow horse owners and schedule appointments at the barn on a single day. You may even get a group discount.

Stretching

For your horse: Good equine massage therapy books often have detailed instructions on stretches. Pick a couple stretches and do them after you ride. Your horse will love you (even more) for it. Watch a video of stretches for horses here.

For you: Check out books for equestrian-related stretches. A few are Fitness, Performance and the Female Equestrian (Howell Book House, 1996); Yoga for Equestrians (Trafalgar Square, 2000); and The New Total Rider (Half Halt Pr, 2001).

Acupressure

For your horse: Study an equine acupressure book (one is Equine Acupressure: A Working Manual (Equine Acupressure Inc., 1999) to become familiar with the acupoints. Practice on your horse.

For you: Find a human acupressure book. Gather your riding buddies and have an acupressure session at someone’s home, followed by an evening of equine videos and a potluck.

Gourmet Treats

For your horse: Core and slice one apple. Cut a carrot into bite-sized chunks. Moisten a couple handfuls of raw oatmeal with water. Drizzle all with molasses. Serve to a deserving horse after a quiet massage. Get recipes for homemade horse treats here.

For you: Pick one: slice of cheesecake; chocolate truffle; premium ice-cream bar. Top with your choiceof exotic fruit. Savor and enjoy, then head for bed with freshly laundered sheets, of course.

The author is continually exploring ways to spend time with Final Edition PR, her agreeable Arabian gelding.

Evaluating Your Instructor

7

Most riders would rather not think about changing trainers. We become attached to our instructors, often glamorizing and idolizing them. But no one trainer knows everything, and not every trainer is right for every horse and rider. If you’ve begun questioning your trainer’s methods, it may be time to reassess your relationship and possibly move on.

There are some obvious reasons to change trainers. Your goals may have changed since you began working with your current trainer, particularly if you started together while you were a beginner and didn’t know the difference between jumpers and hunters. If your current trainer prepares speedy jumpers and you want to show in the local hunter division, you may need different training methods and a new trainer.

Riding Lesson


Seeing the Signs

Perhaps you chose your riding instructor because you were new to the sport and a friend recommended her. “She’s been teaching a long time,” your friend said. Yes, but has she taken a lesson lately? Riding instructors, just like teachers in any changing, evolving field, need to keep up with current theory and practice. Anyone with a horse and a ring can hang up a shingle, call himself a riding instructor and attract customers. All too often, inexperienced adults shell out good money to learn what they think is “real” riding simply because a friend or relative recommends a teacher, or the lesson price is right.

Does your instructor encourage questions, or does she shut you down with comments like “You’ll learn that in time” or “At your level, you don’t need to know that”? If you are asking questions, you’re obviously ready to hear the answers, even if you or your horse is not physically able to perform the movement or technique yet. Questions, no matter how simple or complex, should be welcomed and encouraged. Even if your instructor doesn’t know the answer on the spot, she should find out and get back to you, not make you feel stupid for asking.

Often our horses are wiser than we are when it comes to judging people. After your trainer rides your horse, is he changed for the worse? When bad trainers climb aboard a horse, the horse usually obeys…for a while. But as soon as the student mounts and tries again, the horse is a thousand times worse, often rebelling against the trainer’s harsh or rough methods. If your horse has begun bucking, shying, rearing or running away with you since you’ve started with this trainer, he may be trying to tell you something.

Quiz Yourself

If those flutters in your stomach aren’t just from show nerves, it may be time for a change. Here is a checklist to tell if it’s time to search for a new trainer. Ask yourself the following questions:

  1. Does your instructor show you techniques that other equestrian friends say are wrong or unsafe?
  2. Does he or she give conflicting messages, saying that it’s okay to ride a horse this way now, in this situation, but does not or cannot explain why you should not ride that way in the future?
  3. Does he or she insist that mileage will cure a lot of bad habits?
  4. Do you feel nervous, unsafe or insecure on your horse or on the lesson horses? Is this feeling taken seriously by your instructor, or are you told to “toughen up”? If you do feel nervous, is it going away or increasing with time? A good instructor will help you relax. A bad one will make you more nervous as time goes on.
  5. Do you feel you look and ride differently than other people you see in videos or at shows?

If your trainer is also working with your horse, ask yourself these questions:

  1. Has his attitude changed with the new trainer? Is he sour, spooky or suddenly unpredictable?
  2. Has he been going lame more frequently?
  3. Does your trainer urge equipment on you and your horse that you feel he doesn’t need? Does your trainer insist that a martingale, spurs or other equipment will cure a vice or bad habit without explaining fully how these devices work?
  4. Does your trainer get up on your horse or another horse to demonstrate a new concept, or does he or she avoid riding your horse?

Yes, So What Now?

If any of the above hits a nerve, the first step is to communicate how you feel with your trainer. Often, simple miscommunication is the culprit, and not necessarily bad training. Perhaps you haven’t clearly stated your goals, or your trainer has never explained her philosophy to you. Once you express your misgivings and concerns, your trainer may fill in the gaps and you two can move happily back on track. But if you really feel you’re getting nowhere fast, you will better off to start looking for a new trainer.

Attend local shows as a spectator and watch which students you admire the most. Then find out the names of their trainers. Visit their training facilities and schedule a private session with the instructor. Additionally, try taking lessons with different people before you make your final decision. Ask about your prospective trainer’s background, emphasis, theories and practices.

You’re spending a lot of time and money on you and your horse’s education, and you need to train with someone whose philosophies and goals align most closely with your own. If you’ve tried communicating with your trainer and nothing changes, it may be time to move on. Just remember the old adage: Don’t burn your bridges behind you. The horse world is a small place. There is no need for angry words or vengeance plans if you’ve been subjected to haphazard training. You never know when you and your horse may need a safe haven on the other side of the bridge. Even though it’s time for moving on, barn friends should always be cherished.

Read on for advice on finding a lesson program >>

How to Make a Breakaway Halter

18

During turnouts, it’s best to remove your horse’s halter—halters can get hung up on fencing, trees, et cetera, leading to potential injury.  However, if your horse is hard to catch when turned out, you may need to leave a breakaway halter on him.

Commercial models incorporating leather crownpieces, hook and loop fasteners, and thin leather “fuses” are readily available, but you can also make breakaway inserts for halters yourself.

Breakaway Halter
A commercially produced halter with a leather breakaway strip
  1. Remove the crownpiece buckle from a junk halter the same width as the one you’re using to craft a breakaway for.
  2. Find a scrap of buckskin or thin, soft leather cut from a worn out purse, boot or coat. Cut a strip of leather the same width as the halter and 8 inches long.
  3. With a leather punch, punch a single hole in the center of the strip, 3 1/2 inches from one end
  4. Double the leather strip so the hole is centered at the fold, and feed the salvaged buckle through that hole, shorter end up.
  5. One inch below the first hole, punch two more holes about 1/4 inch apart.
  6. Thread a thin leather thong up through both holes and tie a simple overhand knot. Trim the thong, then punch another hole 3/4 inch below that. It’s finished.
  7. To use it, buckle the crownpiece strap of a regular nylon or leather halter into the insert’s buckle, then the insert’s twin tongues into the regular halter’s buckle.
  8. Remove the insert before tying your horse: it’ll pop in an instant if he spooks or leans back. But always reinsert it before turning your horse out. Breakaway inserts save horses’ lives.

How to Train Your Horse to Neck Rein

19

Neck reining to a western horse is like a steering wheel is to a car. Without it, you have no control over where you go. It’s one of the first fundamentals a western horse learns, and without good neck-reining responses, a horse won’t do well in western pleasure, reining, barrel racing or most other western events.

Fortunately, training a horse to neck rein is a simple process — or so says trainer Clark Bradley, and he should know. During his long career, Bradley has brought along hundreds of horses, and he’s taken more than a few of those to the top ranks, claiming championships in National Reining Horse Association Futurity classes and at the AQHA Congress in versatility, western pleasure futurity, junior reining, senior reining and team roping.

Western horse and rider riding along a fenceline

Getting Started

For the uninitiated, neck reining is the cue that tells the horse which way to turn. Neck reining uses a loose, indirect rein across the horse’s neck to encourage the horse to move away from the pressure; both reins are loosely held in one hand, which is positioned above the pommel at about waist level.

Explains Bradley, “You give your cue with the pressure of the outside rein against the neck. If you want to go to the right, pick your hand up towards your right shoulder and lay the left rein lightly against the horse’s neck. On a finished horse, the true neck rein is a loose rein: There’s only pressure against the neck and no pressure with the bit at all.”

The neck-rein cue should be very light, and the reining hand should never cross an imaginary line from the horse’s neck to the rider’s shoulder.

Bradley likes to introduce neck reining during a horse’s first mounted lesson. He says that since a green horse must be taught steering anyway, neck reining can be incorporated into that process. “The first day you ride a colt, you can ask them to neck rein,” he says. “They’re not going to respond, but it’s a teaching process and it’s not complicated.”

He usually starts horses in a sidepull for the first few months, then moves up into a D-ring or O-ring snaffle. After about six to 12 months of training, he puts them in a broken-mouth bit, such as a short shank snaffle. Training sessions generally last from 30 to 45 minutes a day, five days a week.

During the first several months of training, Bradley rides with both hands, first asking for the neck rein, then rein-forcing with a direct inside rein. “Too many people forget to neck rein,” Bradley warns. “They just pull the nose to the inside and hope the horse turns. They must use the neck-rein cue, first.”

He begins by having the horse walk forward. “Then when I want to turn slightly to he right, I’ll put the left rein against their neck. Then I shorten the inside rein and actually pull their head to the right. As soon as they respond, I release the pressure.” Initially, turns are not large, only about 10 degrees. After obtaining some sort of turn, Bradley rewards with a release, then repeats the lesson a few more times.

The only other aids Bradley uses when teaching neck reining is to keep his legs in the side of the horse to maintain forward motion and to bump the outside elbow with his stirrup or leg to encourage the horse to move his outside shoulder over. “I want the horse’s whole body to turn, not just his head. If that doesn’t happen, I’ll keep pressure on the reins and use the outside leg to make sure that happens.”

Once the horse neck reins well in a circle at a walk, responding to either just a neck rein or both reins, Bradley starts to neck rein at a trot. Many horses can move up to the trot stage in just two weeks, he says.

When the horse can trot a figure-eight in 30-foot circles well, with either a neck rein or with two hands, Bradley begins neck reining at the lope. But he cautions riders not to attempt neck-reining lessons at faster gaits until the horse responds fairly consistently in a slower gait. “I like them pretty broke to trotting before I try to lope them,” he says. “A lot of people try to lope them the first week, and they don’t have enough steering mechanism. They can get in a lot of trouble.”

If Bradley has difficulties getting a turn at a lope, he drops down to a trot or a walk, but always makes sure he gets some sort of change of direction before releasing the pressure. “If you neck rein and neck rein, and then decide to forget it, the horse will forget it, too,” he warns.

Because neck reining is a simple command, most horses catch on to the basics fairly quickly. “After you ride them about a half dozen times, they’ll start to move away from that pressure,” Bradley says.

Make No Mistakes

Although neck reining is one of the easiest commands to teach a horse, there are still a few ways in which a rider can go wrong. The most common mistake is when the rider wants to turn, but the horse won’t, so the rider pulls one hand farther to the inside. “But the farther your hand goes inside, the more pressure you’re putting on the outside rein, which forces the horse’s head to turn to the outside,” Bradley says. If the horse doesn’t turn, make the correction by going to two hands and shortening the inside rein. “Put their nose slightly to the inside and move the horse’s shoulder over.”

Bradley often sees riders using just one rein to get a turn. “A lot of people, especially when they’re riding youngsters, just pull the rein to the right when they want to turn right. Pretty soon the horse just turns his head to the right, but his shoulder is still off to the left, the hips are swung to the left, and they lose the whole body position. You’ve got to use both reins on the horse to keep his body lined up. The head should be slightly to the right, with the body still going straight. Use more left rein to move the horse’s left shoulder over and to keep his body alignment correct. This is important in all stages, but especially in the first few months.”

Another problem Bradley observes is busy hands. “A lot of people, when they’re just riding along, they’re moving their hands all the time, even the advanced riders in the show.” This constant hand movement sends conflicting signals that could eventually make the horse immune to neck reining cues.

Some riders also make neck reining for the green horse unnecessarily complicated. “I want to keep it very simple so the horse can understand. A neck rein means to turn. I use my legs to keep the motion or as a correction,” says Bradley. The only exception, he notes, is a slight leg cue for the finished horse when performing a spin or a fast lope.

By far the worst mistake a rider can make is inconsistency and not following through. Always insist on getting some sort of turn when you ask, and always reward by releasing. Warns Bradley, “If you continue to pull across their neck and nothing happens, they learn to ignore the pull. Every time the rein touches the side of their neck, you must make them turn slightly, then release the pressure.”

From start to finish, Bradley says that it takes six to eight months to get a horse ready to show in a reining class. “If you’re going to a NRHA reining for 3-year-olds, then they usually require 16 to 18 months of training.” But by heeding Bradley’s advice, neck reining could be one of the easiest commands your horse ever learns.

Further Reading
Steer Clear of Neck Reining Problems

0FansLike
0SubscribersSubscribe
We use cookies to help personalize content, tailor and measure ads, and provide a safer experience. By navigating the site, you agree to the use of cookies to collect information. Read our Cookie Policy.
OK