Enter our 12 Days of Christmas Giveaways here!
0 ITEMS
  • My Account
  • Holiday Gift Guide
  • Podcast
  • Webinar
Subscribe Combo
Enable cache13
Home Blog Page 1062

Riding with a Light Touch

5

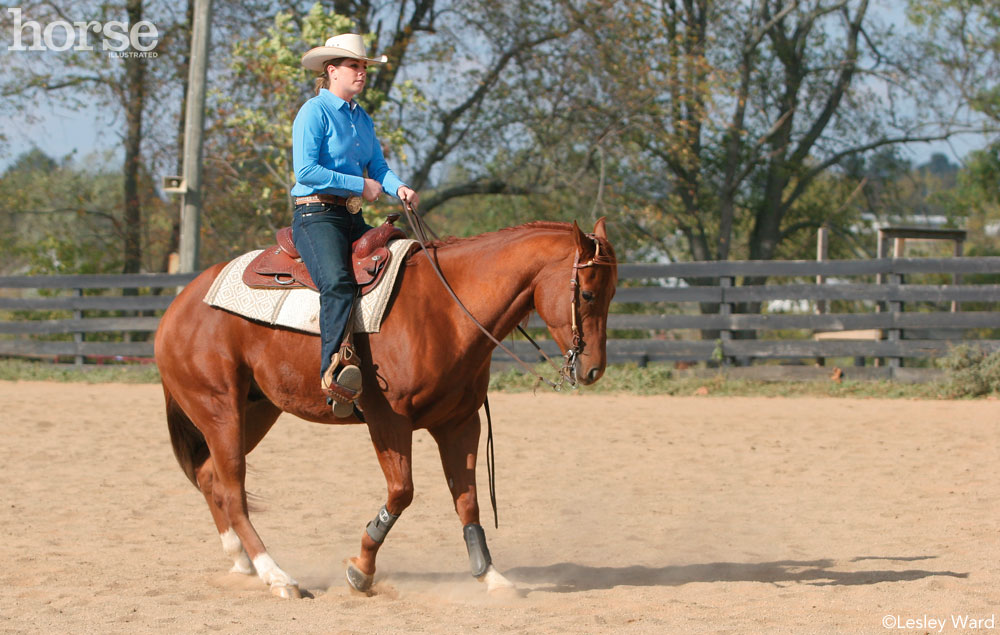
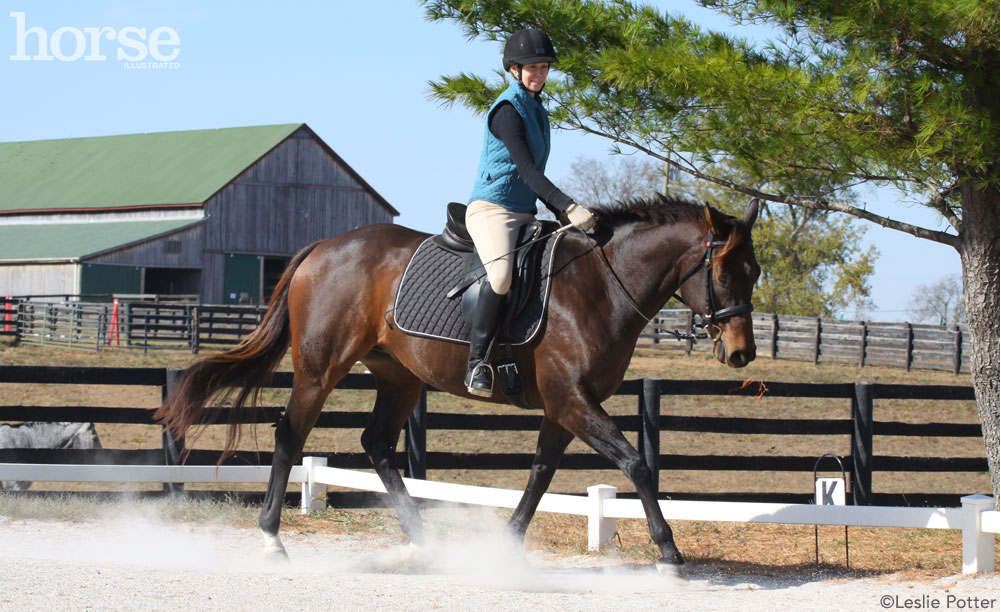
The ideal western horse, according to trainer Patty Meek, is one that “gives to the bridle and is supple, giving both at the poll and to the left and right.” Beyond responding just to the rider’s hand, the horse must also be willing to move forward freely to just a light touch of the rider’s aids. Of course, few horses measure up to the ideal standard, but through consistency and practice of the basics, Meek teaches her horses to become responsive to light rein and leg cues so that they are predictable performers in the show ring.

Western Horse

Starting the Young Horse

To achieve the goal of a supple, responsive horse, Meek uses several exercises to make her horses more attentive to leg and rein cues. From the beginning, she wants them to learn to respond to the lightest possible cue necessary to gain the desired response. To that end, all of her green horses are started in just a smooth snaffle and a western saddle, without spurs or other training aids. “I just stick with that basic equipment. But if I incur problems such as head tossing, I can add a running martingale to correct the problem,” she says. Spurs are never used in the first 60 days or so, but after four or five months, if she is really battling with a young horse to move off a light touch from the heel, she will go to a hunt-seat spur to get the horse to respond better to her leg. “And then I’ll take the spurs off once the horse learns to move off my leg,” she says.

The most common fault she finds in the amateurs’ horses that she trains is a failure to respond to the rider’s leg cues. In order for a horse to be supple in the bridle and attentive to steering, the horse must be coming forward with impulsion from its hindquarters. “Without forward motion, you can’t get suppleness out of the horse through the bridle,” says Meek. She expects a horse to move forward from just a light touch of the rider’s heel, as well as turn to a light touch on the rein. Her young horses all learn this in the beginning.

“I have a light touch, a medium touch and a heavy touch, whether it’s a touch of my heel against the horse’s ribs as a leg aid or a pull on the rein with my hand,” says Meek. “It’s very simple. For example, when I use the bridle, I pull with a light touch on the rein. If there’s no response, I go to a medium touch or pull. If there’s still no response, I’ll go to a heavy touch, and I’ll stay at heavy a couple of times, then I’ll go back to the light touch all over again and see if he responds.” The young horse is learning its job when he consistently responds to just light touches of the rider’s aids. The horse learns to respect the light touch; he knows if he doesn’t respond he’ll be disciplined with a more demanding aid.

The Sidepass

One of the exercises Meek uses on young horses to introduce them to responding to the rider’s leg is the sidepass. This teaches the horse to be attentive to the rider’s leg cues. It also teaches a horse to move away laterally from the pressure of the rider’s leg against his ribs, laying the foundation for neck reining and smooth turns.

Meek begins by making her horse line up so that he faces a wall or the arena fence. “I just let him stare right into the fence. That way, when I leg-aid him to move over, he isn’t going to want to move forward. The fence acts as a block to forward movement, so I don’t have to be pulling on his mouth.” Meek believes that sidepass work should be done equally in both directions to avoid a one-sided horse. She likens the sidepass to opening a door (letting off pressure with one leg) and pushing the horse through the open door with the active leg against the horse’s ribs. “I want him to sidepass to the right, so I take my right leg off his side, giving him an open spot to go to,” says Meek. “And then with a leg aid on the left side, again always starting with the light touch, I push him several steps to the right as he moves away from the pressure of my left heel.”

Although in the beginning she allows a young horse to be a little crooked as he learns to sidepass, soon Meek asks her horse to maintain straightness from head to tail. Technically, the horse should always begin the sidepass by stepping across first with his hips. If he’s leading with his neck or shoulder, he isn’t straight, and needs correction. For example, when attempting a sidepass to the right, if the horse is bulging to the right with his right shoulder, she mentally thinks, “stay straight and move over.” She then picks up contact with her outside (left) rein to straighten the front half of the horse, getting the hindquarters back in a line with the front end.

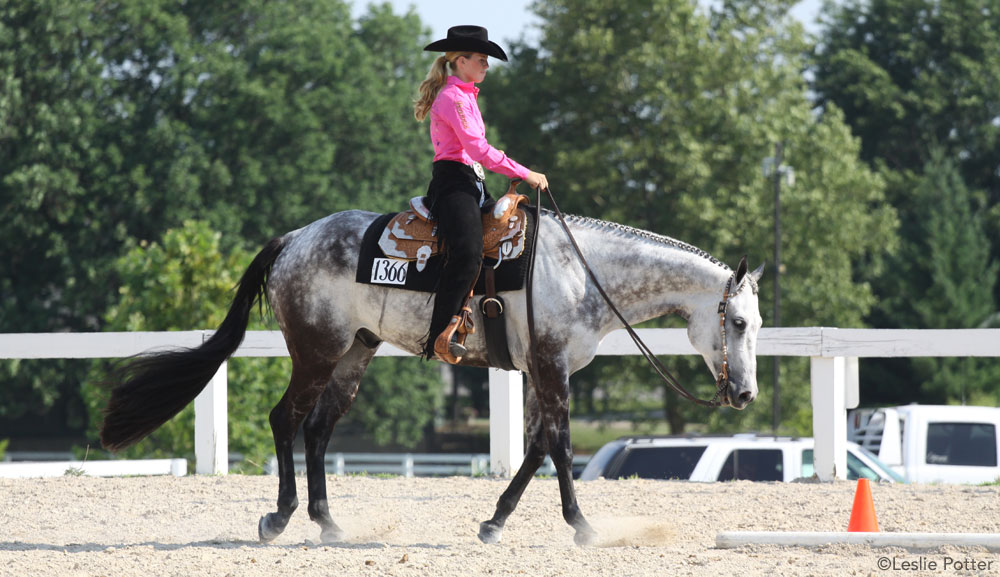
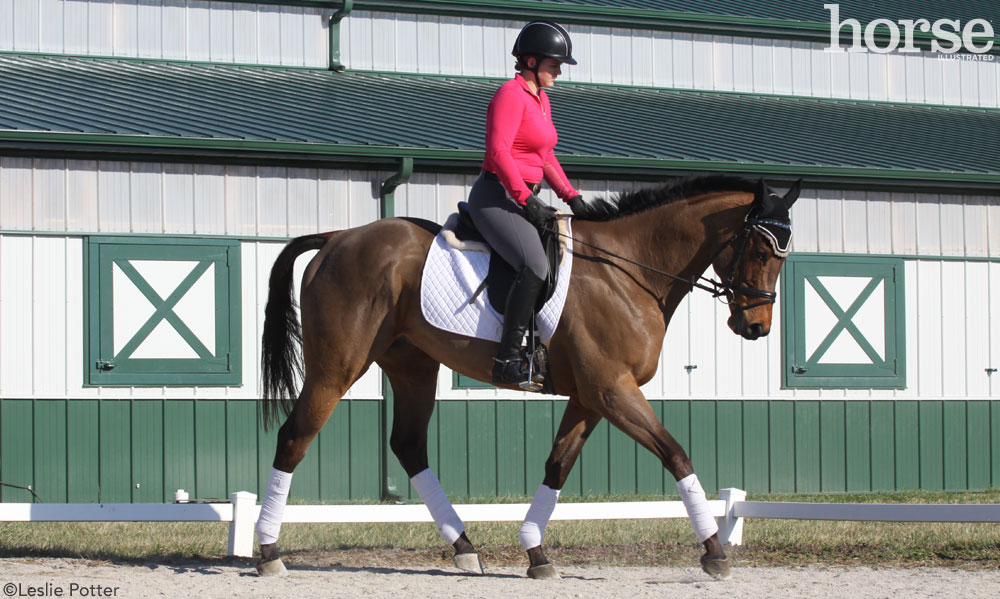
Turn on the Haunches

Another rudimentary skill all western horses must learn is the turn on the haunches. In western horsemanship classes, individual pattern work often calls for a rider to demonstrate this maneuver. Moreover, a horse that is able to pivot effortlessly is a horse that is supple, obedient and responsive to the rider’s leg aids.

With a green horse, Meek introduces the turn on the haunches at the walk. She starts introducing the skill to her 2-year-olds in their third or fourth month of riding, although a horse of any age can be taught in the same manner. She focuses on maintaining a relaxed horse by keeping the drill simple. “They don’t have to do any reining pattern. They don’t have to worry about speed. It’s always form before speed.”

She starts by asking the horse in the arena to walk a circle, and continue walking that circle, making it smaller and smaller. “I use my outside leg as a push leg, and I push harder and harder,” she explains. Soon the horse shifts his weight back on his haunches, and she asks him to halt. “And then I keep pushing and pushing with that outside leg,” achieving a pivot. Then she lets the horse walk on again back into the larger circle in the same direction. “Don’t reverse into the other direction,” Meek warns. “You want to work on consistency, and make sure the horse understands what it is you’re asking of him in one direction before you switch and go the other way.”

As she’s using her outside leg aid to tell the horse to decrease the size of the circle, she sticks with her philosophy of first using a light touch of her leg, then a medium “bump” if necessary, only resorting to a kick of her heel when warranted. Again, the horse must learn to respect and respond to the lightest to touch of her aids. She judges her progress by how light the horse becomes on his side, and how much of a pivot the horse is able to complete without becoming frustrated.

A horse that is resistant and doesn’t understand the drill yet can show frustration in a couple of ways. “It could show up as a head toss, or the tail wringing or the horse’s ears going back. Their whole attitude changes,” she says. In these cases, Meek suggests going back and repeating the circle. “Then I just try to get a quarter of a turn on the haunches. The next time, maybe I’ll be able to get half. I let him walk, try the circle again, circle and circle, then stop and start the turn on the haunches. Think to yourself,” suggests Meek, “‘How much did I get that time?’ As you see the improvement, it will show you that you are on the correct path.”

If a rider is still having trouble, Meek suggests checking the leg aids. If the inside leg is not giving the horse an “open door” to pivot through because the rider is pushing with both legs, the horse has nowhere to go. Also, the horse simply may not be supple enough on the circle.

Western Horse

Walking the Tightrope

One of Meek’s favorite exercises for both green horses and amateur riders is to practice control and suppleness while working in a circle. She asks her riders to pretend that there is a perfect circle drawn in the arena, as if it had been laid out in white chalk or flour. She finds that some of her amateurs, especially those new to her methods, are not thrilled about spending lesson time working on perfecting a circle. “I have to explain to them that returning to the basics once in a while does not mean that they’re starting over. Rather, it’s focusing again on consistency and getting the horse to respond willingly to a light cue from the rider,” Meek says.

Meek likes to have her students pretend that they are walking a tightrope. If the horse and rider team stray off the circle to the left, it could be because the horse is falling in on his shoulder, and the rider needs to pick up that rein lightly, balance the horse and continue. The horse’s nose and his hips need to stay on this imaginary line. This attention to detail keeps the rider focused. “It stops drifting and daydreaming,” she says. “I think when a horse drifts and kind of ‘does his own thing’ then the rider becomes a daydreamer and begins to think, ‘you know, this isn’t really fun anymore.’ But if I can get the rider to think that they’re in this sort of balancing act, then their concentration is better,” and, Meek says, the rider gains a sense of accomplishment by being able to keep the horse slightly bent on that circle and at a regulated pace.

Also on this “tightrope” circle, Meek has her riders practice their transitions. “We’ll work on walk-jog, all the while focusing not only on keeping the horse bent correctly on the circle and supple, but also carrying himself in the proper frame.” Later, horse and rider will work on transitions into the lope. Each time the horse is expected to respond to the lightest touch from the rider’s leg. Consistency at home produces consistency in competition.

“What you need is a horse that responds to you every time you show him, regardless of what mood the horse may be in. Frequently practicing the basics and keeping the horse attentive to light touches of the rider’s aids, makes for a predictable performance. You will end up with a horse that scores consistently not just because he’s having a good day, but because you have trained him to perform at this level.”

Don’t Cut Corners

11

Riding in an arena would be a lot easier if, once the aids had been given for the required gait, the horse simply responded by keeping one eye on the fence and merrily found his own way around. But while many people ride on the rail thinking the horse can almost do it by himself, their corners are probably a disaster. To prove it, pick any corner in a fenced arena and look at the hoofprints in the sand. It’s a fair bet that the arc worn into the track will be a fairly wide one that starts and ends well short of the actual corner. Technically, that’s incorrect. The horse should go deeply into each corner so the arc is a relatively small one.

Dressage Schooling

There are usually two reasons for cut corners: The rider is a novice who has never been taught how to steer through them correctly, or worse, the rider is an experienced person who has let bad habits creep in. The horse, on the other hand, may be unschooled or stiff and thus takes the easier option. In most cases, however, the first reason is the cause of the problem.

To most riders, riding corners properly is completely uninspiring and of little or no importance. But that’s a dangerous notion, especially for dressage competitors. Well-ridden corners can be a valuable source of extra marks—perhaps making the difference between winning a ribbon and going home empty-handed. Even better, they can also provide extra space to work in and allow more thinking time during the test. For example, let’s assume that a halt is required at the C marker on the short side of the arena, and the horse is working on the right rein (going clockwise). If the corner after H is ridden in a wide arc, there will only be a few straight strides before C is reached. That means there will be less time to prepare the horse for a square halt.

However, if the corner after the H marker is ridden deeply, the tighter turn will allow a few more strides on the approach to C. Extra space has been created to get the horse straight, which also leads to a little more thinking time to prepare for the halt. That’s quite an advantage, but it’s not the only one. Riding deeply into the corners adds to the overall presence of the test, and proves that the horse is balanced and supple.

Getting Started

Anyone with basic riding skills can easily improve his or her cornering technique. If the horse is fit and can perform a balanced trot on circles of less than 20 meters in diameter, accurate corners can usually be achieved within a few weeks.

The ideal time to start is during the next schooling session. Warm your horse up for several minutes, and then ride around the arena on the rail, taking the same line on the corners as usual. After a round or two, move to the inside of your track and look at the hoofprints around the corners. Ask yourself these questions: “Is the arc too wide? Could I have kept to the rail a little longer on the approach to the corner and made a tighter turn?” If the answer to both is yes, then there’s room for improvement. Take your horse back onto the track, pick a corner and plan to ride it a couple of strides deeper than last time before making the actual turn. Do it at the walk initially to give yourself extra time to think about what you’re doing and choose the correct line for the curve.

There’s one important point that must not be overlooked at this early stage. Never go so far into the corner that the only way to complete the turn is by making a desperate haul with the reins. That defeats the objective and is bad riding. The turn must always be comfortable for the horse and in proportion to his size and current level of athletic ability.

When you analyze it, riding a corner is really nothing more than making a quarter turn, and the aids for turning are one of the first things we learn asbeginners. Assuming the horse is tracking right, the rider’s inside (right) hand controls the bend and direction, and the inside leg applied near the girth keeps the forward impulsion. The outside (left) hand controls the pace and balance, and the corresponding leg, when lightly applied behind the girth, stops the hindquarters from swinging out.

Assuming there was little problem in riding a deeper corner at the walk, most schooling can be done at the trot. A sitting trot may be preferable to posting during the first few attempts, as a more stable position can help both horse and rider. Don’t start the exercise until the horse is trotting actively and really using himself, which doesn’t mean trotting fast. When the pace is relaxed and steady, aim to do one complete pass around the arena riding all four corners a few strides deeper than normal.

Dressage Schooling

Mental Cues

One vital ingredient to success is the rider’s mind. Try thinking “turn” rather than “corner” or “arc.” When the last stride has been reached on the straight, say to yourself, “and turn,” as if mentally turning 90 degrees. Imagine that your hips and pelvis are actually steering the horse rather than the legs and hands. This can have a very positive effect on some horses, and it is equally useful for changes of direction other than in arena corners.

It may also be helpful to think of the inside leg as the pivot around which the horse will be turned. To reinforce this, a firm push with the outside leg at the girth when making the turn can help achieve a fluid movement. You can really feel that the horse is turning around that inside leg.

Although this may not be the textbook way of doing things, many horses respond favorably to it. Once the desired result has been achieved, however, riders may prefer to go back to the standard methods.

Halfway down the long side of the arena, or at the B or E markers, if they are in place, look straight ahead to the next corner. The horse should be going straight with sufficient impulsion to make the turn. On the first corner, aim to follow the tighter line as previously ridden at the walk. Remember to use the inside leg to keep the forward movement, think “turn,” and don’t be too heavy with the inside rein when asking the horse to bend.

Once around, the next corner will loom up fast. Ride it exactly the same, and then follow on down the next long side and ride the other two corners. With one round completed, there’s usually a great feeling of satisfaction as most horses can handle the additional couple of strides without too much difficulty.

But what if it wasn’t that easy, and the horse found the turns difficult? In that case, the animal may be a novice, unfit, stiff on one side (as most horses are) or in extreme cases there may be some physical condition that needs professional attention. The horse may also have been a victim of what I term the “railroad factor.” In arenas that are heavily used—like at riding academies and boarding stables — a definite groove often gets worn into the track where numerous horses have gone round on the rail. This deep indentation is unlikely to have accurate corners, as most riders are prone to cutting them.

Horses love to use this well-trampled groove like a locomotive on a railroad track. They go where it goes. Sometimes it’s difficult to avoid this on the straight due to space restrictions, but never let it ruin the corners. Obviously, the horse may have to step out of the groove for a few strides when the corner needs to be tighter, and some of them just hate losing their well-worn guide. The answer is to ride assertively with firm leg aids and give a light tap with a schooling whip if the horse slows or seems hesitant to step out of it.

Staying Supple

It’s also worth remembering that although a turn seems like a simple thing to us, it’s not quite so easy for our horses. Instead of being vertical on two legs, they are horizontal on four. The spine and neck are long and flexible, but not hinged, so they must be correctly bent for changes of direction.

With novice and stiff horses, it’s best to get them supple with regular schooling sessions that involve plenty of circles and changes of direction. Always aim to ride the corners positively, even if they’re not very tight at first; it’s all part of the schooling process.

Like humans, equines prefer people who ask politely to those who order or bully. A few gentle vibrations with the fingers on the inside rein rather than a steady pull can help initiate a bend with a novice horse. The hand is almost saying, “Listen to me. I’m encouraging you to turn and there’s nothing to worry about.”

The outside-rein contact should be eased slightly, but not given away, as this can unbalance the horse by allowing too much neck bend. If the hindquarters start to swing out, slide the outside leg back behind the girth and apply a little pressure to correct it. Try not to suddenly kick with the outside leg, as the horse might think you’re signaling for the canter. Never ask for too much at first. Take the corners a little wider and be content with that extra stride or two. Once the horse can achieve this, gradually ask for more until the corners are being ridden as tightly as possible.

Above all, never practice riding corners all through a schooling session or until boredom sets in. And do remember to work in both directions. It’s amazing how many riders seem to school their horses by working two thirds of the time in one direction and only a third in the other. Usually the horse’s stiff side is the one that gets neglected.

The ultimate test is being able to ride nice tight corners away from a fence or rail. This is extremely good for coordination, concentration and discipline. Try this exercise occasionally in the center of a large arena or pasture. Ride a square or rectangle, aiming to make the sides dead straight and the corners as tight as possible. This is where thinking “turn” will really come into it’s own, and the final shape should prove once and for all whether the aids and techniques have been mastered. If corners have been simmering away on the back burner of your training program, now is the time to bring them forward and turn the heat up. They can be very appealing when ridden correctly.

Buckets Full of Holiday Joy

4

Are you at your wit’s end when it comes to deciding what to give your horsey friends this holiday? Before you collapse with a case of colic, take heart: here are some nifty gifts for your trainer, your riding partners, and even that favorite horse on your list. What’s really great is that you don’t have to wrap these presents. Just stash them inside a colorful feed bucket. Then tie a big bow on the handle, perhaps add some easily removable holiday stickers, and your bucket of joy is ready for presentation!

Trainer treats:

  • A gift certificate to a local restaurant or movie theatereven professionals like to get away from the barn once in a while
  • Baseball cap or visor with the stable’s name embroidered above the brim
  • Set of stable towels (moderately priced hand towels work fine) in the barn’s colors; add monogram
  • Inexpensive work gloves
  • Photo frame that includes a group snapshot of barn clients

For the rider who has everything:

  • Coupons for the local bistro or burger stand so they can grab a quick lunch after a long ride
  • Some boot socks, a pair of boot pulls and a jar of polish
  • Saddle soap and a small sponge
  • Gift certificate, purchased from their instructor, for an extra lesson
  • Maps or road atlas of local freeways and highways for those who do a lot of hauling to shows or trail rides

Happy horse stuff:

  • Gift bag of horse treats (If you’re creative, locate a recipe and make them yourself!)
  • Fly mask and fly spray
  • Hoof dressing in brushtop can
  • Bottle of color-enhancing shampoo, body sponge and sweat scraper
  • Certificate to local feed store

Further Reading
Holiday Horse Fun

The author is Horse Illustrated’s horsey holiday hostess with the mostess.

Longeing Safely

7

Don’t forget your safety sense when longeing. The following guidelines will help keep you safe.
Equipment:

  • A cotton longeline, rather than synthetic, will stop rope burns. 
  • A broken chain can cause injuries to both horse and handler. Choose a line that has a sturdy snap.
  • Wear gloves. Gloves will pull free if your hands becomes trapped in the line or prevent rope burns if your horse runs away. 
  • Wear a helmet.  It will protect your head if your horse comes in on the circle and kicks out. 
  • Boots or solid shoes with a heel will help you stay upright if your horse should pull away. 

Safety Techniques:

Hold your longe like you would hold a rein to keep your fingers from becoming entangled. Carry the end of the line in your free hand with the excess in folds rather than as a loop. If your horse rushes off, a loop can spiral closed and trap your hand. The stacked line will play out freely. Also, a trailing line can get caught around your legs, so keep it off the ground.

Point or flick your longe whip toward your horse’s shoulder to encourage him to stay out on the circle. If he kicks out and he’s too close to you, you could get struck. 

If your horse bolts off, pull your elbows into your sides, dig in your heels and try to slow him with a few tugs. If you think the situation is out of control, let go! Longeing in a confined space (a small arena or round pen is preferable) allows you to keep control or retrieve a loose horse more easily. With a green horse, make sure there are no obstacles in the arenaif he breaks free, the trailing line can tangle around the equipment.  

Read more on longeing equipment >>

Sharon Biggs is the author of In One Arena: Top Dressage Experts Share Their Knowledge Through the Levels.

A Thanksgiving Treat

3

Most of us can afford the occasional dive into a rich treat, but our horses can’t. Their digestive systems are different, and a binge on grains, grass clippings or treats could lead to colic and even death. But with the holiday season approaching, it doesn’t seem fair to sit down to a sumptuous turkey dinner while our horses munch away at that same, boring dinner.

There is a way you can make the day special for your horse by putting a safe spin on his daily ration. You can pour a dollop of molasses or corn syrup on his pellets, soak his hay with water and sprinkle a few apple peelings on top for a refreshing snack, or cut up an apple and a carrot and sprinkle them around his stall (which will also help to alleviate stall boredom that day since you will probably be stuck in the kitchen or visiting relatives). You might try whipping up a bran mash to serve with your horse’s dinner. Here’s a recipe to try:

Thanksgiving Mash

Ingredients:
Hot Water
A dollop of molasses
A handful of brown sugar
Two carrots shredded
One chopped apple
6 Cups of bran mash
Your horse’s daily grain ration (either morning or evening portion)
2 cups of apple juice
Optional ingredients: chopped up corn (still on the cob), apple sauce, carrot tops, dollop of corn oil, store-bought horse cookies or sugar lumps.

Instructions:
Mix all ingredients together in a large bucket.  Pour enough hot water on top to resemble soupy oatmeal. Allow the mixture to sit for a few minutes, or until the bran has absorbed the water and is cool enough to eat. Pour the apple juice on top and serve. Discard any leftovers.

The author is a freelance writer based in England.

Rating the Competition

5

Tips on choosing the right riding disciplineHorse show season is in full swing, and it’s time for me to plan the rest of the competition year. But being entrenched in our family’s horse breeding business, I’m forced to gaze only wistfully this year at premiums for the big rated shows: My sister and I have to finally confront the small herd of greenbroke youngsters we keep shuffling to the back burner. So this season I’ll be a fixture at the schooling shows. Yes, that will be me endlessly trotting over the crossrail in the warm-up arena on yet another gangly warmblood. If I’m lucky and can pawn some of these Goliaths off on my sister, I’ll find time to show my trainer’s gentleman gelding in some amateur classes at an A-rated show.

Don’t feel sorry for me. I don’t really miss the A-circuit shows anymore. I suppose when I was younger—much younger—and still had that Olympic dream, A-shows were a necessity. I went there to get noticed, to build a reputation. But right now, the A-circuit is not what’s best for my horses and me. And they may not be right for you just now, either. By choosing the most suitable level of competition, you can have fun, improve your young horses and keep your riding skills sharp — without overfacing yourself or burning yourself out.

School Days
If you’re managing a schooling show in the San Diego area and offering an English saddle as a high-point award, you might as well tag it now for one of Karole Caldwell Henry’s students. With yet a third junior rider well on her way to securing another saddle this year, Karole is earning a reputation for turning out riders who, with limited financial backing, are nonetheless fine equitation riders well-versed in showmanship skills.

Because most of her riders are new to showing and must operate on a budget, Karole steers them toward non-rated schooling shows with a history of good management, fair judges and safe courses. And she also prefers schooling shows that are conducted as a series of three or more dates, where riders earn points for each ribbon won. The series champions are then awarded prizes at the end of the season.

“I like my beginning riders to have a goal and a plan to get there,” says Karole. “Competing in a series for a high-point award is a great one. Plus, the atmosphere at these shows is not psychologically intimidating. The warm-up ring isn’t scary, because all of the riders are basically at the same level.”

The schooling shows offer more than just a shot at a glamorous prize for Karole’s students. They’re also a way to gain an education about horsemanship.

Tips on choosing the right riding disciplineI always want my students to learn safety first, especially when jumping a course of fences. Usually these types of shows offer crossrail classes. I want my students who are starting out to be slow and safe, and at schooling shows the rules are less stringent. Usually trotting in the corners is allowed in the crossrail classes, which is great.”

Another plus is that non-rated shows offer beginning riders a chance to improve their skills at a price that’s quite affordable, especially compared to the rated shows. Not only are entry fees cheaper, but the horses who bring home the aforementioned championships can be comparatively bargain-priced, too. What counts in a horse at this level of showing is reliability, not classic hunter type or movement. Hence, a suitable horse can usually be purchased in the $2,000 to S4,000 price range.

“I like to find those ‘old campaigners,'” Karole says. “You know the type—an older horse who knows his job, may be semi retired, who doesn’t have much resale value on the open market but has a heart of gold. These horses are very special to us.”

For Pete’s Sake is one such special horse, a venerable gray gelding Karole salvaged after he had been relegated to pasture life. Perhaps in gratitude, the kindly gray packs all comers around the lower courses, and has earned a lifelong home at Karole’s barn.

When horses like Pete have done their job, it’s time for the rider to move on to the larger shows and a more challenging mount. After all, no one likes to compete against a “cherry picker,” an accomplished rider who swoops down for an appearance at a small show just to horde the first-place prizes. Asked when she knows it’s time for a student to advance, Karole says with a grin, “When they’ve won everything. Then it’s time to move up.”

Making that move onward and upward is Amanda Loya, one of Karole’s junior riders. A saddle winner herself, Amanda explains how the non-rated schooling shows served her well.

“Because the classes are pretty inexpensive, I could go in a lot of classes at one show and really practice what I needed to work on. For me, one thing I needed to work on was making my corners better. I learned how to use my corners while jumping a course, and how to set up a horse for a flying lead change.”

Amanda gained this experience aboard the trusty For Pete’s Sake.

“I rode For Pete’s Sake, and he brought me along quickly and taught me a lot. But I outgrew him and needed a challenge. I was able to lease an older warmblood gelding, and I found myself at county shows winning in hunters and medal classes.”

So enthused with her prowess, her parents and Karole went on a mission to find an even higher caliber horse capable of taking Amanda further. Hopefully they’ve found it in Churchill, an impressive bay gelding, who looks the type to carry Amanda to the next step.

Tips on choosing the right riding discipline
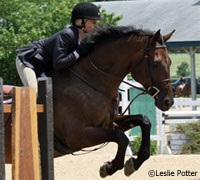
“B”: Best of Both Worlds
A step up from non-rated schooling shows is the circuit of locally rated shows, sponsored mostly by county riding associations. Also referred to as the B-circuit, these shows offer divisions for novices as well as hunt seat medal classes for the more experienced riders. Hunter and jumper classes are generally geared toward green horses or junior and adult amateur riders, helping to create an environment where exhibitors are often heard encouraging each other at the back gate. The end of the show season culminates with either a members-only championship show or a banquet hosting the presentation of year-end trophies.

Although once considered merely a training ground for future A-circuit riders, or a limbo land for horses and riders who somehow couldn’t cut it in the big time, the B-shows are increasingly popular as an end unto themselves. Lasting one day or over the weekend, these shows don’t require the commitment of time and money that nationally rated shows demand.

“This is what most of my clients do for fun after working 40 hours a week,” says trainer Susan Smith. From her Cornerstone Equestrian Center in Norco, Calif., Susan consistently produces champion junior and amateur adult riders on the B-circuits.

With a background in the A-shows, Susan is able to explain why the county-rated shows appeal to so many riders. “I’ve got customers who are perfectly capable of competing at the A-level, but they either can’t afford to or they simply don’t want to spend that amount of money on horse shows. Basically that’s what it comes down to: the amount of money they’re willing to spend.”

As the B-shows gain in popularity throughout the country, the price and quality of the horses needed to win at this level rise as well. While the glorified school horse may be acceptable at the schooling shows, chances are he just won’t be sharp enough for the B-shows. The starting price for a serviceably sound horse, with enough mileage to step right into the arena and put in a credible round at the B-level, is about $7,500 to $12,000.

Add the floating movement necessary to win under saddle and the schooling required to be a dependable medal-class mount, and the price escalates to about $25,000. These are just price estimates based on the West Coast market, but they demonstrate how the cost of a horse rises with the level of competition.

“To win at the county or B-shows anymore a hunter needs to be, in general, a Thoroughbred type,” Susan describes. “He needs to be athletic—meaning he jumps in good hunter style—be attractive and a good mover. He must make clean flying lead changes. Plus he must have the length of stride to make the prescribed, set distances on the course comfortably. You know,” she adds, “a hunter shouldn’t have to be racing around at Mach Five in order to make the correct number of strides in a line.”

Knowing how to read and study the posted course for a class requires some practice, and it is one of the lessons Susan strives to teach her riders. Errors that might still have earned a ribbon at a schooling show are simply not tolerated at B-shows.

“Riders have to be more technically correct. If the course is set, for example, with a five-stride line, you must get those five strides. There’s no allowing for adding strides if you want to be in the ribbons.”

One of the adult amateur riders who has blossomed under Susan Smith’s tutelage is Erin Compton. After several years of winning at schooling shows, Erin joined Susan’s barn and decided to move up to the B-shows.

“I’ve always been a competitive person and I wanted to push myself to be even better. I get bored if there’s not a challenge,” Erin explains.

She became a member of the local Orange Count Horse Show Association, and set her sights on qualifying to ride in the club’s annual championship show. It took her awhile to prepare.

“I found it takes more consistent practice to be competitive at the county shows than the schooling shows. Mistakes just don’t go unnoticed,” she sighs. “I had to concentrate on improving my overall look, perfecting the ‘picture’ the judges are looking for.”

She also needed to fine-tune her horse, affectionately named Best Pal (not related to the famous racehorse). Although a good mover and a decent hunter type, Best Pal was a little nonchalant about his flying lead changes. Wisely, Erin had her horse schooled by more educated riders while she focused on perfecting her aids necessary for getting those smooth changes.

Her practice and determination paid off, because at the 1997 championship show Susan coached Erin to first place in the Horsemanship Medal finals, offered for novice adult amateur riders. A college student and new mom (to a human baby, no less!), Erin concedes that the B-circuit is probably as far as her riding career will go. But that’s fine with her. Here the shows are affordable, yet the competition still keeps her refining her skills.

Susan Smith agrees that many riders, particularly the adult amateurs, decide to stick with the B-shows once they’ve experienced what the circuit has to offer. Dare a rider who’s enjoyed success at B-shows return year after year?

“Sure, why not?” Susan replies. Especially if you live in an area that offers multiple county associations within driving distance. “We’re fortunate here in Southern California, because we have several county associations we can compete in: Los Angeles, Orange and San Diego. Each association has its own group of members, so my riders get a chance to compete against different horses and riders. I also have good B-circuit riders who like to start the new show season with a green horse, and that’s a whole new experience.”

On the other hand, if you live in an area with a limited competitive pool and you return year after year to easily win on the same horse, don’t be surprised if you feel a resentful chill coming from your fellow competitors. If you care about getting along, you might choose to show elsewhere or at least find a green mount with which to begin again. But if you care about what other competitors say or how they treat you, the A-circuit might not be for you either, as the intense competition can create rivalries.

Tips on choosing the right riding disciplineFormal Attire and Fine Horseflesh
To give you an idea of how different the A-circuit can be, here’s a bit of not-so-veiled advice I received from the mother of one of my A-circuit horse show buddies: “If you can’t afford to go first class then you shouldn’t go at all.” I was a naive teenager and the admonishment stung like a riding crop. At the Del Mar National my horse was assigned the last stall in my trainer’s aisle, relegated to the far end where my tack trunk that (gasp!) didn’t bear the barn’s logo wouldn’t detract from the elegant ambiance of the shedrow. Yet I had to snicker, because each time I won a ribbon — usually beating the stars of the barn, I might add — my prizes were grandly displayed outside the tackroom right along with everyone else’s.

I don’t grumble about it anymore. It’s just the way things are.

No doubt about it, the A-shows boast the cream of the current crop of competing horseflesh. There are no mediocre movers in the under-saddle classes and no hunters with uneven knees over a fence. If I had a dollar for every gorgeous bay gelding in the amateur hunter division, why, I’d be able to buy that new tack trunk!

The A-circuit is where the money flows like water — bottled designer water, thank you. A solid junior or amateur hunter can easily cost $50,000 to (hold onto your hunt caps) $100,000.

Besides the cost of the horse, the A-circuit also requires a great investment of time and effort. Because competition is so tough, there’s no sliding by with just one riding lesson a week. Any cracks in a rider’s foundation become glaringly apparent during the pressure of the multi-day A-shows.

Then there are the associated travel costs of attending an A-show. Because these are multi-day shows, junior riders must skip school and adults be freed from careers and domestic responsibilities Besides paying for meals eaten away from home and hotel bills, it is also customary for exhibitors to share the cost of their trainer’s meals and lodging during the show. This can be a substantial investment, especially if the trainer is accompanied by an entourage of barn managers, assistants and grooms.

Yet there is an unmistakable lure. For hotshot junior riders there are the medal finals to qualify for, in particular the USEF, the Maclay and the USET. Take a look at America’s roster of leading show jumping riders and it reads like a Who’s Who of former medal final contestants. For amateur adult riders the A-circuit can offer a heady social atmosphere and the opportunity to compete against some of your former rivals, now adults themselves, without worrying about which one of you will attract the attention of some USET scout. Another attraction is the chance to win more than just a ribbon. Most of the divisions divide a cash purse among the prize winners and offer lucrative “classics” or sweepstakes. A consistent hunter or jumper can earn enough money to help offset show costs.

Finally, there is the unmistakable air of pageantry that surrounds an A-show: Striped awnings provide shade for a catered exhibitors’ party; a cluster of bays and chestnuts, coats glistening, stand ready at the back gate with their attendants; the nattily attired ring steward presents each ribbon with a flourish of importance.

But whether you’re polishing off a textbook-perfect round at an A-show, enjoying the relaxed camaraderie of the county show or vying for points at a schooling show in hopes of winning a saddle, remember to give your horse a nice pat on the neck as you leave the ring. After all, regardless of which level best suits you and your horse, the incomparable partnership between horse and rider is really what’s important, isn’t it?

Further Reading
Horse Show Survival
Horse Show Dos and Don’ts

Moving Your Horse to a Colder Climate

1

Winter horsePeggy Gibson, 35, had lived in Florida most of her life. An owner of two Quarter Horses that she showed in pleasure classes, she relished her state’s moderate year-round temperatures (not to mention her ability to train consistently through the winter). Then Peggy got the word that her company was transferring her to Buffalo, New York, for two years to work on a major account. She’d not only have to move herself, but her horses, too — a big challenge. They’d rarely seen frost, and had never experienced snow.

Growing job opportunities and shrinking horse property availability are factors that are encouraging horse owners to move from coastal areas and southern states (where their horses have enjoyed mild weather year-round) to colder climates. Moving to a cold weather state in the middle of January can truly stress your horse’s unprepared body and make him susceptible to injury and illness. To ease the transition, formulate a plan and be extra diligent in his care.

Seasonal Body Changes
As the days shorten in late summer to early fall, your horse’s body begins to react to the change of seasons. It begins to layer on fat under the skin and grow a long, dense coat to insulate him against the impending cold. When winter arrives and temperatures drop, changes in his circulatory system minimize heat loss through the skin. When needed, the muscle contractions of exercise create additional heat that gets trapped by the dense coat. Shivering (a last-ditch effort to keep warm) involves rapid muscle activity throughout the horse’s body and generates even more heat. Normally these physical adaptations are sufficient to protect a horse when he’s kept outdoors at pasture in all but the most extreme wet and windy weather.

However, a horse’s body is designed to add only as much fat and hair coat as needed, based on the weather conditions as the season changes. If these changes in climate are minimal and stay above freezing, as they usually do in coastal and southern regions, your horse’s physical response will be mild. But if he’s suddenly transported to an extremely cold climate, his body will be challenged beyond its preparation.

First, discuss the upcoming move with your horse’s current vet to develop a management strategy for the move. Also ask your vet to put you in contact with a colleague in your new town so you don’t have to search for one in the midst of an unexpected emergency. Another option is to call the state veterinarian (find him or her through the American Association of Equine Practitioners at 606-233-0147) for recommendations, or get a copy of the local yellow pages for your new city. (A phone book will also help you locate a farrier and a boarding stable if you won’t be keeping your horse on your own property.) Ideally you’ll know a couple months ahead of time that you’ll be moving during winter, so you can begin to prepare your horse as you search for his new home.

Welcome the Woollies
To prepare for the future cold, while he’s still in a moderate climate, don’t blanket him when the weather cools and he begins to get hairy; and don’t leave lights on to limit his hair coat. This is even more important if you plan to keep your outdoor horse in a pasture or outdoor pen. As long as he’s healthy, has shelter against wind and rain, and receives adequate nutrition, a few nights of enduring the mild chill now will better prepare him for the truly cold weather he’ll be living in later. Lights and blanketing will only blunt his body’s effort to adapt by interfering with the “message” the fall weather brings about the coming winter. Trying to minimize your stabled show horse’s coat for the winter circuit is counterproductive if you want him to adjust to the cold. Also, pastured horses will need that extra hair to insulate them from the wet ground when they lie down to sleep — so clipping should be kept to minimum.

Keep in mind that with a woolly coat, you’ll need to take extra care to cool him out and dry him after workouts. A wet coat loses its insulating abilities and your horse can become chilled in even mild weather.

Plump Him Up
Not only will he need his dense hair coat to withstand the bitter chill, he’ll need a sufficient layer of insulating fat. Adding a few extra pounds can help your horse stay warm while his body adjusts to the temperature difference. If he doesn’t receive enough calories to burn from an adequate diet, his body will revert to the fat stores in his body — including that important insulating layer. Once those become depleted, his body will turn toward muscle and other organs in its attempt to maintain a normal body temperature. Consult your vet for tips on gradually increasing caloric intake without risking colic or laminitis.

Cutting back on exercise may seem like a quick way to pack on some pounds, but keep in mind that a fit horse is healthier and better able to withstand challenges in the form of weather, illness and injury. You should be able to feel ribs, but not see them, feel fat on his tailhead without seeing a bulge, and his shoulders, back and withers should be rounded but not surrounded by thick, lumpy pads of fat. Finally, before moving day, make sure your horse is current on all vaccinations and deworming treatments so he won’t have to deal with an internal assault while trying to cope with the stress of moving. Whether you’re transporting him between states (and are required to have a health certificate), or you’re just moving to colder regions within the state, have your vet examine your horse for health problems.

Gimme Shelter
While you’re preparing your horse for the demands of his new climate, you should also be spending some time finding or preparing a suitable shelter. You may be told by locals that the horses do just fine left outside unprotected without blankets. While that may be true if you were to move your horse in summer or early fall to give him time to acclimate, they may not realize the effect the dramatic difference in environment can cause. You would be appalled if your horse had gone from plump to gaunt in a single night or two from nonstop shivering.

If you don’t have ample moving notice, choose a barn with well-ventilated — but not drafty — box stalls and blanket him appropriately for freezing weather. If stabled outside, the minimum he’ll need is a covered, three-sided shelter from wind and rain. It’s also a good idea to install a heated waterer. Adequate water intake is just as important in winter as it is in summer, but because it’s so cold, horses often don’t drink enough. If the water trough doesn’t have access to electricity, insulate it by dropping in a large inflated rubber ball to keep ice from forming. Invest in a hay rack or pallet if you’ll be feeding your horse in a pasture, to keep hay from getting churned into the snow and mud. Also consider stall mats and bedding for extra insulation at bedtime.

If you’ll be boarding, find out the type and amount of hay the barn offers. You may need to purchase additional hay and possibly supplements to give your horse enough nutrients and calories. If you’re looking for a pasture situation, find one that also has a barn where your horse can get shelter in case a severe storm is too much for him.

Arrival
When your horse steps off the trailer and into snow for the first time, be prepared to have your hands full. Although many horses take snow in stride and even seem to enjoy playing in it, others are frightened at first by this new stuff that looks solid but gives way beneath their hooves. If your horse becomes anxious, stay calm and speak soothingly. He may never learn to love it, but at least he may accept it.

For his first few days, keep your pasture horse separated from the rest of the herd. He shouldn’t have to establish pecking order or fight for his food ashe’s adjusting to the extreme cold. Traveling through snow and mud takes more work than on flat, dry ground and skirmishes can quickly fatigue muscles and cause tendon and ligament trouble — in addition to injury from bites and kicks your horse is unable to avoid because he’s yet not adept at moving on the slippery ground. A quarantine will also allow him time to acclimate before having to fight off infections from other horses. When you do acquaint him to the herd, first put him in a pen alongside the pasture for a few days so they can see, smell and hear each other, but can’t fight.

Resist the urge to ride through the white stuff on day one. For the first few days stick to hand walking to allow your horse a chance to adjust his balance and stride in the snow. This will give you a good idea of how hard the going is — and how tiring it can be! Go gradually to allow your horse the time he needs to build up speed and duration. Rushing can lead to serious injury.

Monitor your horse’s condition over the next several weeks. Because it requires so much energy to process, roughage is the best feed to help your horse produce warmth, however, if he drops too much weight, you’ll need to feed him fats to build up that insulation layer. Be wary of feeding him too much grain in your attempts to add calories, which can lead to laminitis. Work with your new vet to adjust your horse’s diet until he can maintain a healthy weight.

Generally speaking, most horses adapt to a new environment within a few weeks. With a little common sense and effort on your part, you can help him adjust without strain.

Further Reading
Prepare your horse for cold weather
Horse Blanket Central

Supplements for Horses

1

The circulars and catalogs a la equine slide through the mail chute. Unable to resist the latest horse thing, you eagerly open the first pamphlet. “Got a Poor Doer?” the glossy color brochure asks. “Feed Him Our Newest Supplement — Fat Albert. Our studies show that most horses are lacking in the very important mineral blankety-blank and vitamin bloopity-bloop which halts irregular stoppage. In order to have a healthy, happy animal, he must have in his diet the very important tincture of this and that…”

You cast a guilty glance over to the framed photo of your beautiful Thoroughbred gelding, Jumpin’ Jimmy. Maybe he is a “poor doer,” you think, leafing through another catalog that boasts the best in equine nutrition. “Maybe he’s really a ticking time bomb of malnutrition. But how do I know? Which supplement do I choose?”

Deciding whether your horse needs a supplement — and which one — can be a daunting task. Visit any tack store or check out any horse-care catalog and you’ll see an almost unlimited choice of little buckets and bottles full of products designed to enhance your feeding program.

After all, vitamins and minerals are essential for proper health, growth and maturity, and they provide coenzymes that are necessary for metabolism. A diet lacking in these essentials can lead to severe health problems, and nutritional supplements can be an important piece of the puzzle that make up your horse’s nutrition picture.

While your horse can often obtain most of his vitamins through his normal feed ration, sometimes hay is lacking in specific minerals or vitamins, and grain may skew the important mineral ratios or boost a horse’s energy too much. Supplements can help balance the dinner plate.

Dr. Paul McClellan of San Dieguito Equine Group in Rancho Santa Fe, California, is the top-notch veterinarian responsible for keeping Guenter Seidel’s Olympic partner Graf George in the pink of health. He offers his knowledge to help you understand nutrition supplements.

Nutrition 101

It’s a good idea to have a firm grasp on nutrition basics before you rush out and blindly buy a supplement. This means that first you should examine your basic feeding regimen. While a full discussion on general nutrition is beyond the scope of the article (it’s the subject of many volumes and textbooks), feeds are basically divided into these categories: roughage, concentrates and supplements.

Roughage includes all the hays; concentrates are the grain products; and nutrition supplements are the vitamins, minerals, salt and probiotics. Equine nutrition supplements generally come as a powder to be sprinkled over or mixed in grain, or as an extruded pelleted feed, or sometimes as a liquid to be poured over feed.

Before dressing your horse’s meals with supplements, however, you need to evaluate his hay and grain intake as well as his particular energy demands. “Don’t supplement without defining a specific need for it,” says Dr. McClellan. Feeding too many supplements is a waste of money and, more importantly, can decrease the uptake of certain essential minerals. Too much zinc, for instance, can interfere with the body’s use of other vitamins. Calcium and phosphorous need to maintain a specific ratio, or bone problems could develop. If you offer your horse two or three supplements that contain calcium, but only one that has phosphorous, you could upset the balance. This is especially important for young horses, whose bones are still forming.

A horse’s diet should contain the requirements for energy. Often that can be evaluated clinically by the appearance of the horse, then adjusting the amount of roughage and concentrate for the horse. There also are computer programs available that can evaluate the amount and ratio of protein, fat and carbohydrates for a particular horse’s work and age category. “Your veterinarian is best equipped to evaluate your horse’s weight, energy, disposition and appearance (to determine if his needs are being met) because he sees so many horses,” says Dr. McClellan.

Because the nutritional needs of horses vary by — among other things — work and geographic region, there isn’t one specific product or recipe to recommend for all horses. For example, selenium, a trace mineral that aids in building tissues, is inherent in the soil in the western mountain states. Horses grazing or eating hay grown in this region are often troubled by excess selenium. If you live in this area and feed your horse a supplement that contains additional selenium, you could give your horse a toxic overdose. However, coastal and glacial areas don’t have enough selenium in the soil, and your horse may need supplementation of this mineral.

Also, the casual weekend trail horse doesn’t have the same energy needs as a competing three-day event horse, so he may not need any extra calories from a weight-building or energy-boosting supplement.

For more information on general equine nutrition, consider reading books on the subject, such as Understanding Equine Nutrition, by Karen Briggs (The Blood-Horse Inc.) or Beyond the Hay Days, A Refreshingly Simple Guide To Effective Horse Nutrition, by Rex A. Ewing (PixyJack Press). Once you understand the basics, you can better determine where your horse’s diet may be lacking. You can ask the feed store or hay supplier about their product, but if you’re not satisfied you can send a sample of your horse’s hay for laboratory analysis to your county extension agent. They can give you an idea of any mineral and vitamin deficiencies or excesses you’ll have to compensate for with a supplement.

Ingredients List:
What Do All Those Words Mean?

Alfalfa: High in protein roughage (16-18 percent), full of amino acids, chlorophyll and betacarotene.

Antioxidants: Name for a group of vitamins and minerals that control free radicals, which are the normal byproducts of cellular metabolism. Studies say that free radicals may contribute to cancer and heart disease. Examples of anti-oxidants are vitamins C and E, betacarotene, selenium and lipoic acid.

B-Complex Vitamins: Protein builders required for normal cellular metabolism.

Biotin: (Also known as vitamin H) Naturally present in grass, biotin helps build strong hooves.

Blackstrap molasses: Made of sugar beets, this pure sugar is full of iron, calcium and potassium.

Chelated Minerals: (Iron, copper, magnesium, cobalt, zinc and magnesium) Essential for maintaining red blood cells, nervous system function and protein metabolism. Chelation is a process that presumably improves absorption of minerals.

Copper: (Trace mineral) Helps build red blood cells.

Essential Fatty Acids (EFA): Aids healthy cell functions; improves skin and cell membranes; increases oxygen consumption, energy and metabolism; increases kidney, nerve and immune system functions. EFAs are considered beneficial fats.

Flax Seed: Good source of essential fatty acids, great for putting the bloom on coats.

Folic Acid: Helps maintain red blood cells.

Garlic: Reported to be a natural antibiotic, but not proven.

Why Supplement?

“There are several reasons why you may need to use a supplement,” says Dr. McClellan. “If the horse has a chronic disease process, such as hypothyroidism, sometimes supplements help control it.” Horses that are on long-term medications may also need supplements to counteract the side effects of medications. Equine protozoal myeloencephalitis (EPM) for example, is one disease that requires long-term use of medications (trimethoprim sulfa and pyrimethamine), which can affect the metabolism of red blood cells. Supplementation of folic acid is needed to counterbalance this action.

Supplementation also may be necessary if for some reason the horse is on a grass-hay-only diet, which may be all that is available locally or which might happen if he has an allergy to alfalfa or he can’t tolerate a different feed. In this case, calcium (which is abundant in alfalfa) may need to be supplemented. Foals with epiphysitis can be supplemented with calcium or phosphorous to improve the ratio. Also, hay grown in nutrient-weak soils may be deficient in other essentials.

Athletes in heavy work may also need something beyond the normal equine forage and grain meals and might benefit from nutrition supplements. If a horse is working very hard and/or has a need for extra calories but cannot consume enough of the necessary roughage and concentrates, supplementing with fat — in oil base or rice bran — can make up their dietary requirements for energy and calories,” says Dr. McClellan.

While sometimes a horse that just won’t gain weight may have a medical condition, such as stomach ulcers, that must be dealt with by a vet, sometimes it’s just a matter of an overefficient metabolism. Such a horse can benefit from a high-fat diet (not chocolate chip cookies!). Or a horse with digestion problems may be helped by bacterial cultures known as “direct fed microbials” or “probiotics” (see Ingredients List).

Working Signs

So you’ve analyzed your horse’s diet, decided he needs a boost and plunked down your money for the equine version of One-A-Day vitamins. How can you tell if the supplement is working?

“Preventive medicine is always the most difficult thing to ascertain,” says Dr. McClellan. And basically, that is what you are doing feeding to prevent disease, weight loss and loss of condition. You’re doing everything possible to maintain his top condition. Dr. McClellan’s rule of thumb is that if you choose to use a supplement or change a concentrate, you should give it 30 days and re-evaluate the horse’s appearance, how he’s going and how he feels.

If you don’t see a dramatic difference — or at least a measurable difference — then the supplement is probably not necessary. However, you may feed products that give no obvious results on the outside but are working internally, so it’s a bit of a gamble — more reason to feed only with professional guidance.

“It’s OK to stop and start feeding most supplements as needed without having any digestion difficulties. Just don’t combine supplements unless your vet advises you to do so,” says Dr. McClellan. Supplements containing protein should be added and taken away gradually, over two to three days, to avoid upsetting your horse’s digestive system.

“Nutrition is a dynamic process and it’s very difficult to have one feed program for an individual horse for his entire useful life,” says Dr. McClellan. “You have to be able to make adjustments depending on the horse’s work, his environment, his age and any injury.” Also, vitamins cannot replace food — they augment a healthy ration.

So with a little planning on your part, you can put back the bloom on your horse’s coat, build up those Arnold-muscles, rev up his sluggish attitude and help his hooves grow like Jack’s beanstalk. Just be prepared to reevaluate his diet if he starts looking like a sumo wrestler or acting like he’s the reincarnation of Secretariat — or if he starts fading again.

Read more
HorseChannel’s Guide to Supplements

Teach Your Horse to Back

6

As riders, most of our attention is usually focused on how well our horses go forward. In the show ring, our minds are cluttered with concerns: Is the jog too fast? Is my horse staying balanced at the lope? Did the judge see my horse quicken for a moment at the walk? Yet all of our tribulations over forward movement are for naught if the horse fails a seemingly simple request of the judge. You know the one. You’re standing in the lineup, sweating beneath your hat, thinking perhaps you squeezed out a ribbon in the class, when you spy the judge deliberately walking down the line of horses, nodding each time he makes his request. Yup, he’s spouting those four words so many of us dread to hear: “Please back your horse.”

Backing up a horse

Teaching a horse to willingly back up, or reschooling one that resists the command, needn’t be so traumatic. Backing up is, after all, a vital fact of your horse’s training. Whether you’re competing in the show arena or pleasure riding on the trails, being able to safely and smoothly back your horse is just as important as controlling his forward movements.

Teaching a Young Horse to Back

Western trainer Judy Bonham has earned a reputation for producing a succession of winning trail horses in both youth and open divisions at major shows. And one requirement for all trail horses, both in and out of the arena, is that they back up, often while negotiating tight turns and obstacles.

Ideally, Bonham likes to introduce a horse to the concept of backing up when he is a foal. She believes in imprint training at birth, in which the foal is taught immediately to accept gentle handling by humans. She carefully nudges the foal to get him to shift his weight and get used to the idea of not only moving forward in response to a human, but stepping backward as well.

Some of her horses, however, come to her facility at a later age and present a different kind of challenge. She works yearlings in their halters, and teaches them to move forward with a light pull on a lead rope and also back up. “When I’m teaching a horse to back with a halter and lead rope, I press on his neck and chest muscles, and ask him to back up,” says Bonham. “I don’t take a shank and jerk on him, forcing him backward. I say, ‘back,’ cluck and push him back. As he backs up from the pressure, I relax and let him come forward.”

With 2-year-olds, Bonham teaches backing up during ground-driving training. “I drive the horse forward and teach him to turn,” says Bonham. “I also use both driving reins and ask the horse, with a cluck and a light pull on both reins, to back.” As soon as the young horse responds to the slight pressure and takes a step back, Bonham releases the rein. She never resorts to pulling the young horse backward; that only results in the horse resisting by opening his mouth and throwing his head up against the bit.

Backing Under Saddle

“When I get on the young horse’s back, I ask him to go forward, turn and move off my leg by pushing him with my leg and suppling him up sideways.” Once the horse is relaxed and responsive to her hand and leg aids, Bonham asks the horse to back. “I ask him to back with light, even pressure on both reins.” She also squeezes with both legs to get the horse to engage his hind end and round or lift up his back. “Now, if the horse freezes up, which a young horse normally does by bracing his front legs, instead of pulling him back with even more pressure, I go back to getting the horse to move around again from side to side,” adds Bonham. “Once the horse has frozen up and won’t go backward, I have to make him go somewhere. Then once the horse has loosened up, it becomes his idea that going backward isn’t so bad.” For example, if the horse evades backing up by locking his jaw and cranking his head and neck to the right, Bonham uses a direct or leading left rein and bends the horse in a circle to the left, getting him to become supple once again. Any displacement of the horse’s weight shows that he is beginning to yield to the rider’s aids. Once the horse relaxes, Bonham once more asks him to take a step or two back by picking up the reins, applying slight pressure and squeezing with her legs.

“In order to back up, the horse has to bend his front legs and lift his back,” she says. “If the horse hollows out his back and stiffens up his front legs, he’s braced himself and physically cannot back up.”

Backing in the Show Ring

As the horse’s training progresses, Bonham introduces some of the maneuvers that will be required in the trail classes. One example is teaching the horse to back up while turning, which requires him to be especially responsive to the rider’s leg aids. It is the pressure from the rider’s leg that tells the horse whether to shift his haunches to the right or left as he backs, effectively making a backward turn. “If I want my horse to turn his hips to the left, I push my left leg out, away from the horse’s side and use my right leg to displace his weight,” says Bonham. All the while her hands are not pulling on the reins, but merely lifting lightly up, cueing the horse to round and lift his back.

Bonham’s goal is to train the horse to be supple and giving in the bridle, and to lift his back once she picks up the reins and asks him to shift into reverse. As both an exhibitor and a judge, Bonham knows that what wins in the show ring is a horse that, when asked to back, demonstrates the least amount of resistance.

Bonham says that in rail classes judges don’t usually have a prescribed number of steps that they want to see the horses back. Mostly, the judge is looking for a horse in the lineup that gives no resistance when the rider lifts up the reins and asks for the horse to back. In contrast, a horse that freezes up, bracing his front legs and hollowing his back is marked down considerably.

A common mistake Bonham sees in the show ring is riders incorrectly asking their horses to back up. They forget to use their legs to engage the horse’s hindquarters, and just use their hands and pull. As a result, the horse never lifts or rounds his back.

Though a large class is rarely decided based on which horse backs up the best, Bonham sees backing up as an integral part of a horse’s education. By incorporating backing into your horse’s early training, you can avoid getting stuck when trying to go in reverse.

Further Reading
Horsemanship How-to: Teach Your Horse to Back

Horse Buying Checklist

35

What to Do When Shopping for a New Horse

  1. Have a vet evaluate your prospect for soundness before purchasing, but be realistic: The age of the horse is a big factor.
  2. Pay attention to the horse’s attitude and disposition. If your horse has an attitude problem, it will be extremely difficult to ride.
  3. Choose your discipline and objective, and stick with it.
  4. Choose a breed you prefer, but be willing to look at other breeds for comparison.
  5. Set a price range, but be willing to go above the range by about $1,000.
  6. Set an age limit, but be open to a span of five years around that age.
  7. Figure out ahead of time what questions you want to ask the seller.
  8. Choose a horse with good, quiet ground manners.
  9. Choose a horse you can develop a relationship with.
  10. Decide what perfect-horse aspects you can sacrifice in order to meet your budget.

Avoid These if You’re a First-Time Horse Shopper

  • Auctions: Horses that are auctioned off usually wind up there for a reason, rather than being sold through the general market. You don’t need to find out why. For the most part, these are mystery horses and not much is known about them. You often won’t have much chance to ride them or talk to their owners. Unless it’s a reputable breeding farm where its reputation is at stake, stay away from auctions.
  • Buying a horse that has “potential”: Buy a horse that has potential only if you are the gambling type. That is what equine potential is – a gamble. You may have to fork out a great deal of training money to get that potential out. Weigh this against the asking price of the horse, your goals and your abilities before you jump at a horse with “potential.”
  • Buying a horse that is green: The old saying “green horse, green rider” is very true. A novice with an untrained horse can be a terrible combination. You may end up spending a lot more money for training your young horse than you ever dreamed possible.

Further Reading
Be Smart When Horse Shopping

0FansLike
0SubscribersSubscribe
We use cookies to help personalize content, tailor and measure ads, and provide a safer experience. By navigating the site, you agree to the use of cookies to collect information. Read our Cookie Policy.
OK